


With the new version of Dux-Soup (6.3 - full guide here), your follow-up messages will be automatically stopped if someone responds. This means you can now set up an automated flow of follow-up messages to educate and help your LinkedIn connections so that they want to speak with you.
Essentially, you can plan out your whole outreach in advance, within a specific time period (e.g. 2 months). Your outreach plan will then be executed for you in the background while you focus on other tasks.
This is super exciting as it eliminates all the manual work you had to do around this in the past, plus you no longer have to ‘mark the day’ to remember to follow-up as Dux-Soup Turbo will do it for you!
If you want to plan out your outreach campaign and warm up your leads first, this is what the process might look like:
- First, you send out a LinkedIn connection request through Dux-Soup Turbo to kickstart the whole process.
- Then set up Dux-Soup Webhooks on Zapier to prepare for automatic follow-ups for when they accept (click here for a full guide) .
- Then, you start writing the personalised outreach messages of your drip campaign (you can use some ready-to-go templates in this guide below) to continue with your pitch.
- Afterwards, you add a delay between your messages so that you don’t end up spamming your contacts.
- Finally, you watch your outreach messages start sending in the background, automatically following up and stopping when they reply.
We’ve mapped out a great example below for you - that follows the process from start to finish - from sending the initial connection request to setting up a flow of follow-up messages after the first one.
Curious to know what this setup looks like in Dux-Soup Turbo? Read on to find out.
Personalising connection request
First things first, you need to send a connection request before pitching your services.
If you’re targeting your potential leads on LinkedIn, you need to first make sure that your messages and services are going to be relevant to them.
Who is the decision-maker in your industry? The CEO? Are you looking at a specific location?
To make sure you’re filtering your data correctly and targeting the right people, see our guide here.
When sending a connection request message, you can use the Dux-Soup Markers to personalise them. Something as simple as introducing yourself and why you want to connect usually works.
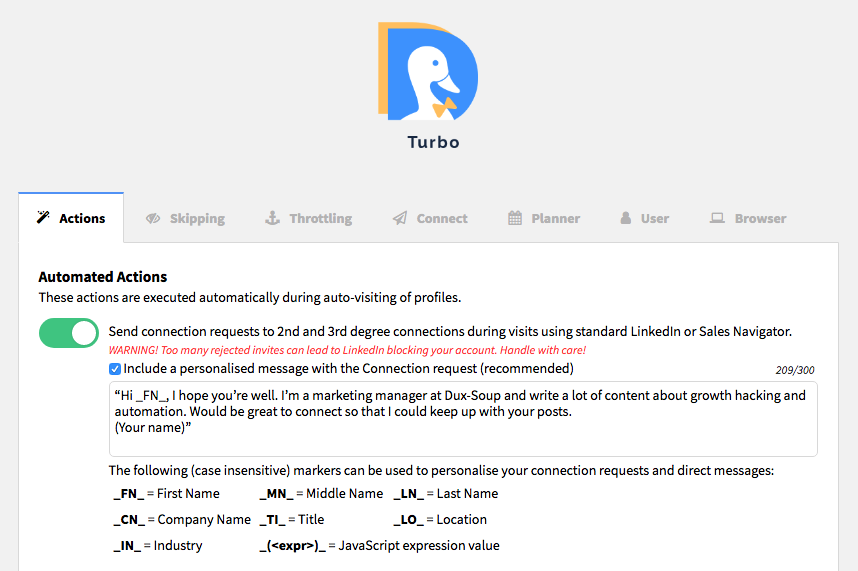
“Hi _FN_, I hope you’re well. I’m a marketing manager at Dux-Soup and write a lot of content about growth hacking and automation. Would be great to connect so that I could keep up with your posts.
(Your name)”
It’s important to note that the reason you’re doing is to simply get them to accept and that you shouldn’t be pitching anything at this stage. In most cases, this template works and you can then move onto the next step.
Setting up Webhooks on Zapier
Now when someone accepts a connection request (and you have a filter to only message those who have accepted), you can start sending automatic follow-ups. To enable this, as with any other outreach campaign using Dux-Soup, you need to set up a Zap with a Webhook trigger on Zapier.
A Webhook simply posts data to a specific URL every time some activity is registered on Dux-Soup. For example, when a profile visit, scan, or an automation action happens, the Webhook will send data of the event that occurred so that you can kick off a workflow in Zapier.
Read our full guide on using Webhooks in Dux-Soup here.
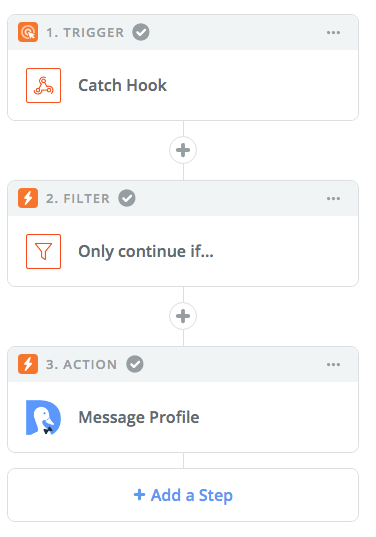
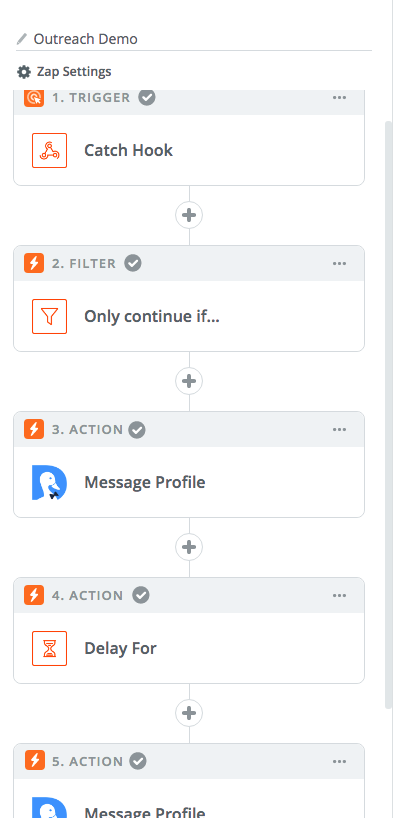
Until now, your outreach flow should look like this:
In the final “message profile” step, the “message template to use” is where you can insert your template and start your outreach.
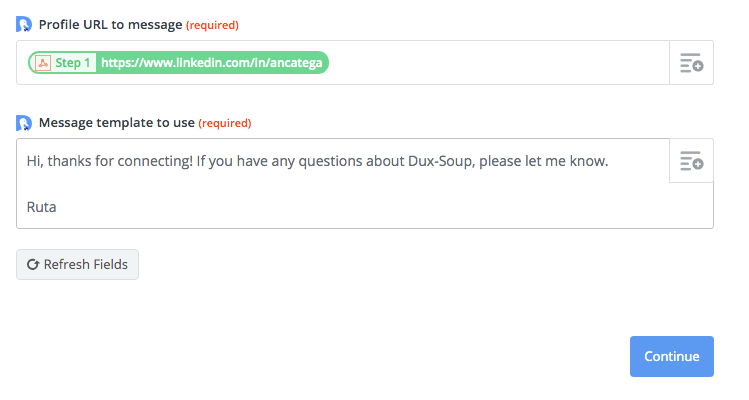
Once they accept, your follow up template should be another simple one.
Like in the one above, simply thank them for connecting and state what you can offer to help them with - without being too direct or offering your services straightaway. Your template might also look something like this:
“Hi _FN_, thanks for connecting! I work a lot with startups and SMBs to help them build websites. Feel free to get in touch if you have any questions and I’ll be more than glad to help.
(Your name)”
Once again, you’re not pitching your services straightaway. Instead, the focus is on genuinely helping them and getting to know them for now. The more personal your template is, the better, so feel free to adjust accordingly.
Once you’ve done that, here is where you can really customise your campaign, add delays and look at the bigger picture of your outreach.
Warming up your leads takes time, so be patient and consider offering some value (for free) first.
Setting a Delay
Adding delays in between your messages is a simple way to make sure you don’t end up spamming your contacts.
To add a delay, click on “Add a step” after your initial message in Zapier and then select “Delay”.
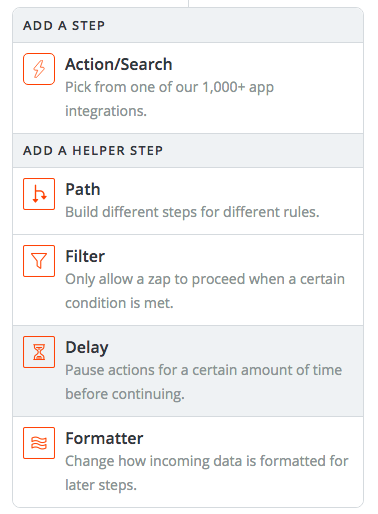
Select “Delay for” and then simply choose the amount of time.
As an example, let’s say we want to wait one week after the first follow up.

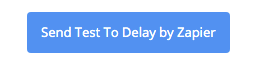
Now click on “Send Test to Delay”:
If set correctly, you’ll see this green notification.

Delayed Follow Ups
Now that you have added the delay, you have to repeat the step and add another “Message Profile” action after the delay.
Here is what the full campaign so far should look like on Zapier:
Now, for the second follow up, remember that the focus is still on giving value.
The next template might sound something like this:
“Hi _FN_. Thought I’d share our new blog post on the 5 essential steps of lead generation on LinkedIn. I think you’ll find it interesting. You can read the article here:
https://www.dux-soup.com/blog/5-essential-steps-to-lead-generation-on-linkedin
Happy to chat more when you need help.
(Your name)”
Once again, feel free to customise based around your own content or value offering, and be sure to let them know that you’re happy to talk if they have questions.
Ideally, the content you’re sharing should be positioning yourself as an expert in your field and they should be able to contact you from the website as well.
After this, you simply replicate the previous steps: add another delay and “Message Profile” action.
At this stage, if there is still no reply, consider asking them a question instead to gauge what they’re looking for and react accordingly. This might look something like this:
“Hi _FN_. I hope your business is going great. I’ve been just looking into what you do in more detail. Most of our work is helping companies like yours automate their lead generation process. Have you had any experience with LinkedIn outreach marketing? Let me know if you have any questions.
(Your name)”
Finally, if they still have not replied, don’t get too discouraged. Most acceptances happen in the follow-ups as people can be busy or just forget.
If they still have not shown any signs of interest, however, it might be worth it to follow through with the campaign all the way.
For your final follow-up message, consider being more direct after you’ve demonstrated some value and that you’re an expert on the subject.
“Hi _FN_. Here at Dux-Soup, we help agency-owners gain more leads through lead generation automation and I wanted to check with you if you’d be interested.
Feel free to book a call and we can discuss more in-depth.
(Link here)
Let me know if you have any questions and keep in touch.
(Your name)”
It’s important to note that if they do reply at any step of the campaign, however, Dux-Soup will break the flow, giving you the chance to reply on your own. If that’s the case, you can also integrate Dux-Soup with your favourite sales CRM so that you don’t have to manually add leads (full guide here).
If you’ve been following this guide accurately you can now turn on the Zap to make sure everything works.

From there, your final campaign can automatically start running in the background, automating everything from the initial connection request to the final follow up, and even add your leads to your CRM.
Once you set up this whole campaign on Zapier, you’ll be saving a lot of time in your outreach as all of the steps will be automated. Should someone reply, the campaign will stop for them.
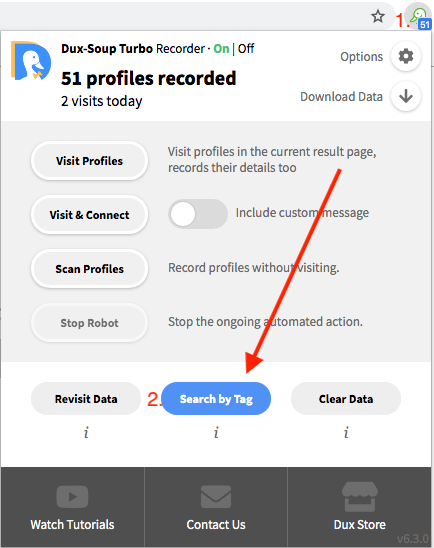
To see the full list of people who replied, you can manage your tags through the extension here -
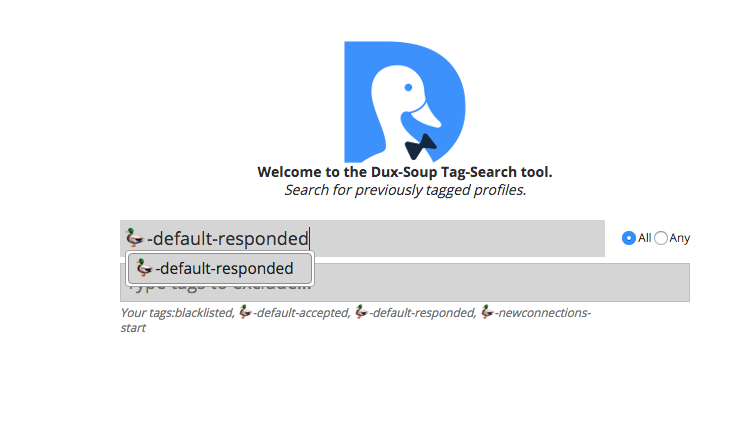
Once there, copy the “🦆-default-responded” tag and insert it in the search query to get a full list
From there, you can reply individually to each profile.
Hopefully, if you follow this guide correctly, you’re all set. Be patient while the automated outreach works in the background, and wait for your leads to take action!
If you have any questions with each step of the way, let us know at info@dux-soup.com or comment below, and we’ll get back to you!


