


Since Dux-Soup Turbo and Cloud offer the capability to integrate with any external application and to implement your own follow-up messaging using the Message Bridge, we'd like to introduce you to another great tool to improve your LinkedIn lead generation. If you're interested to learn more, keep on reading!
To begin with, the Dux Webhook is needed to send information to Zapier. Before we begin, here is a reminder on how to set it up and get the game started!
Once you have everything in place, you can choose what you'd like to do next: send all information about a LinkedIn profile to Google Sheets? Or maybe set a follow-up message? There are plenty of options, just let your imagination run wild!
Disclaimer note: Zapier frequently updates its user interface (UI) to enhance the user experience and functionality. While we make every effort to keep our articles up-to-date with the latest changes and update screenshots accordingly, there may be instances where changes have occurred on the Zapier platform that are not reflected in our articles.
If you encounter a different interface or have any questions about using Zapier, please don't hesitate to contact our support team at info@dux-soup.com
Filtering a Webhook
When you have a trigger (webhook) in place, the next step can be adding a "Filter" which will help to export only the data you need. Possibilities for filters are endless but let's cover a few of them to have a better picture:
If you're interested in specific profiles, for example, you are looking for people from a certain location or job role; or maybe you are interested in collecting only those profiles that have email addresses? No problem! You can use filters to get a selective list of profiles you need.
Let's take one example to see how it works.
E.g. You want to add all visited profiles that contain email addresses to your CRM or a Google sheet.
- First, you need to go to Zapier.com and click on "Make a Zap" button.

- Choose a "trigger" which will always be "webhooks". You will need to copy and paste the webhook URL from Zapier to Dux-Soup Options > Connect tab. After this, visit LinkedIn to trigger some test data. Please read this blog to learn how to do this.

- Click on "+ Add a Step" and choose Filter.

- Then click on "Save + Continue"

- In the next window, select "Data Email" and "Exists". Then, click on "Test & Continue"

If everything is set correctly, you should see this notification:

6. Now you're ready to add the final step - "Action". It can be a sales CRM, Google Sheets or any other app or software you’d like to keep the information in.
Once everything is set, you can start visiting profiles with Dux-Soup and each contact with an email address will be transferred to your desired software!
Note: Dux-Soup can capture the email addresses only of your 1st-degree LinkedIn connections. If you want to capture the emails for your 2nd and 3rd-degree connections, you will have to purchase Dux-Soup Points.
Delaying a Follow-Up
Zapier has another great function - Delays.
We recommend using it with follow-up messaging. If you create a Zap without a delay, once someone accepts your invitation within 15 minutes, Dux-Soup will send an automatic "Thank you" message. However, if you'd like to make it seem more natural and less automated, Delay function will help you to achieve that.
First, you need to set up a follow-up message Zap and if you haven’t done this yet, read the step-by-step guide here.
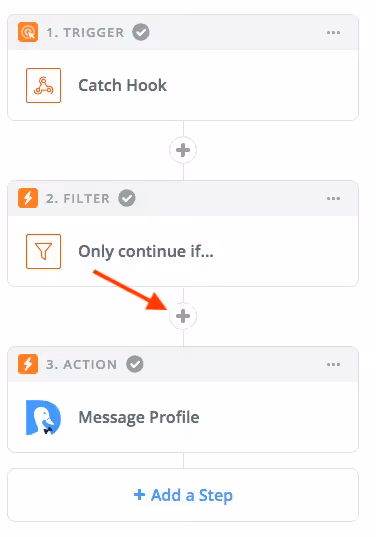
Once you set up the follow-up message Zap, your sequence should look like this (please see the image below)
- Trigger (which is always Webhooks)
- Filter (adding a filter “Only continue if…)
- Action (Dux-Soup Remote Control)

Delay Setup
- To add a delay click on + sign after the "Filter"
2. Click on "Delay for" and press "Save + Continue"

3. Choose the length of your delay before sending a follow-up message:

4. Now, click on "Send Test To Delay by Zapier"

5. And if all set correctly, you'll see this green notification:

6. Click continue and switch on the zap:

That is it! In this blog you learnt how to set up Filters and Delays on Zapier to improve your messaging with Dux-Soup!
We hope this helps and that you found our tips useful. If you have any questions/feedback feel free to send us a message to info@dux-soup.com - the team is always happy to hear from you!


