


Updated November 2025
One of the main benefits of having LinkedIn Sales Navigator is the advanced search filters and the option to visit up to 500 profiles per day with Dux-Soup. What about the number of connection requests per day? And how many direct messages can you send?
This how-to blog guide will walk you through the process of sending connection requests and messages on Sales Navigator. Grab our free Turbo trial and follow along.
Sending connection requests to your 2nd-, 3rd-degree connections
Before setting up your connection campaign and automating the sending of connection requests with Dux-Soup, make sure to read our guide on how many LinkedIn connection requests you can safely send per day.
Now, let’s walk through how to set up your search and target your potential clients.
Step 1: Build your Sales Navigator list
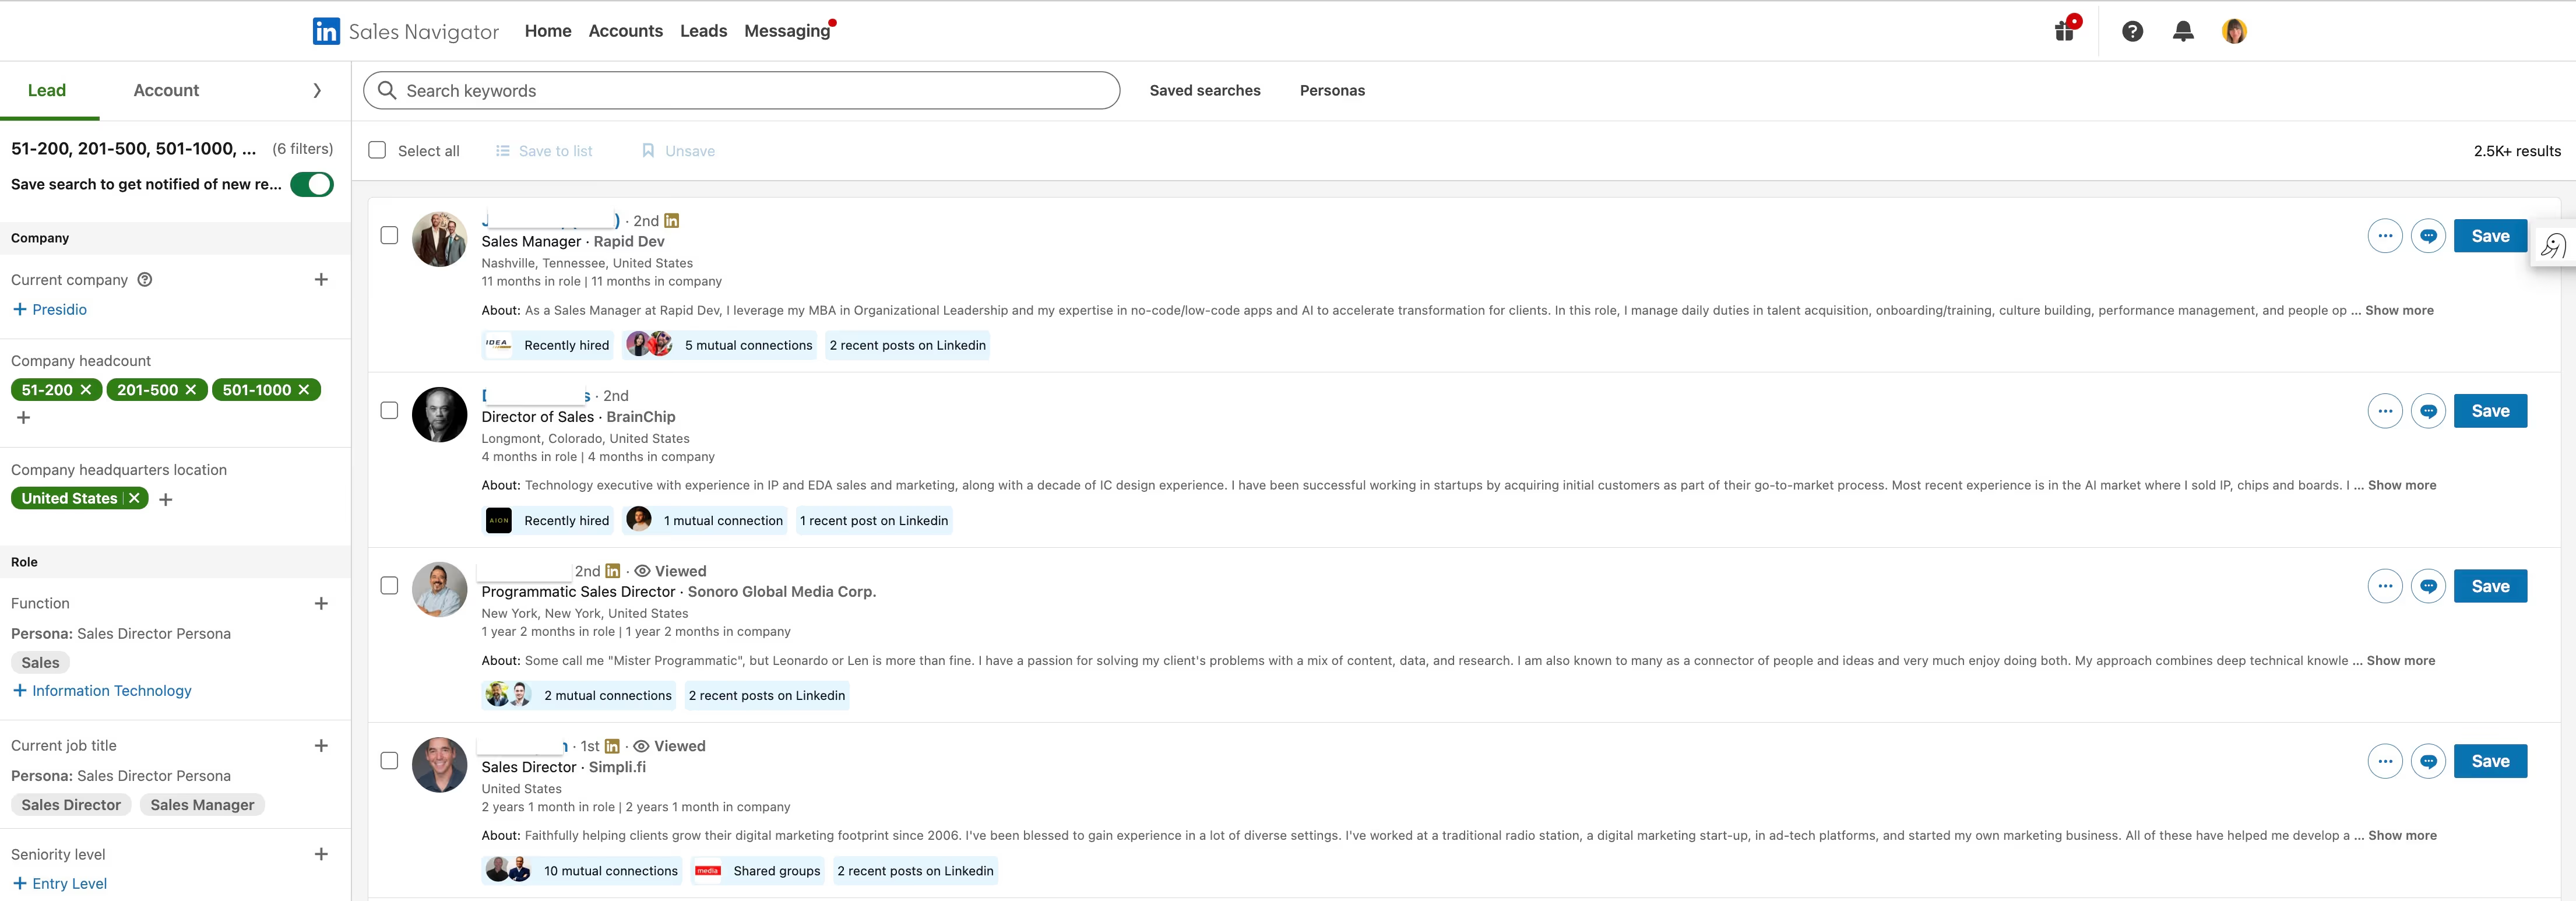
To start, open Sales Navigator and click on 'Lead filters' in the search bar at the top.
(Note: Dux-Soup works only with “Leads”, not “Accounts”.)

On the left, you will see some available filters but if you click “View all filters” at the bottom, it will open up a window with many more filters.
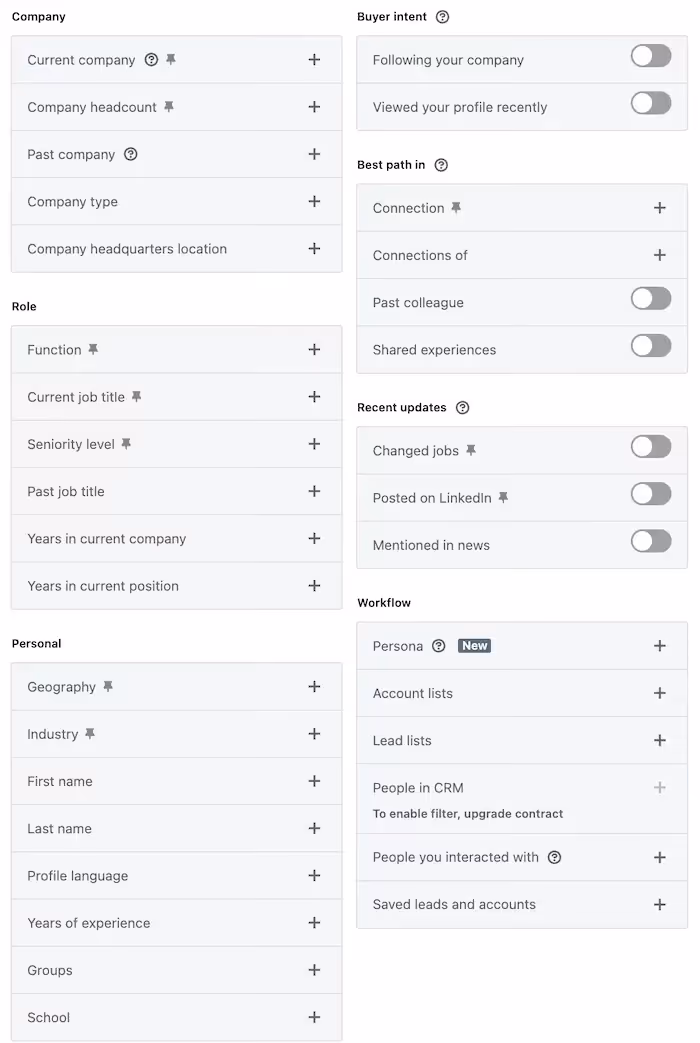
You can even sort the profiles by the company size, years of experience, previous interactions etc. This means that you will get a more relevant, better-targeted list of potential leads.
If we go more advanced, you can use the Boolean search to filter out the profiles even further.
For example, under the Keywords field, you can play around and use Boolean searches with job roles you want to target, companies or industries you want to exclude.
In the example below, we are looking for specific industries like camping and outdoors and to make sure we do not have any profiles in our search that work in a company offering hunting gear, the Boolean search looks like this:

Once you have added your search filters, you'll have a list of results that match your criteria.
Now that you have your list of ideal customer profiles (ICPs), it's time to create your campaign.
Step 2: Create your campaign
With a Trial, Turbo, or Cloud plan, you create campaigns in the Dux-Dash. If you have a Pro license, the process is slightly different; you can follow this support article.
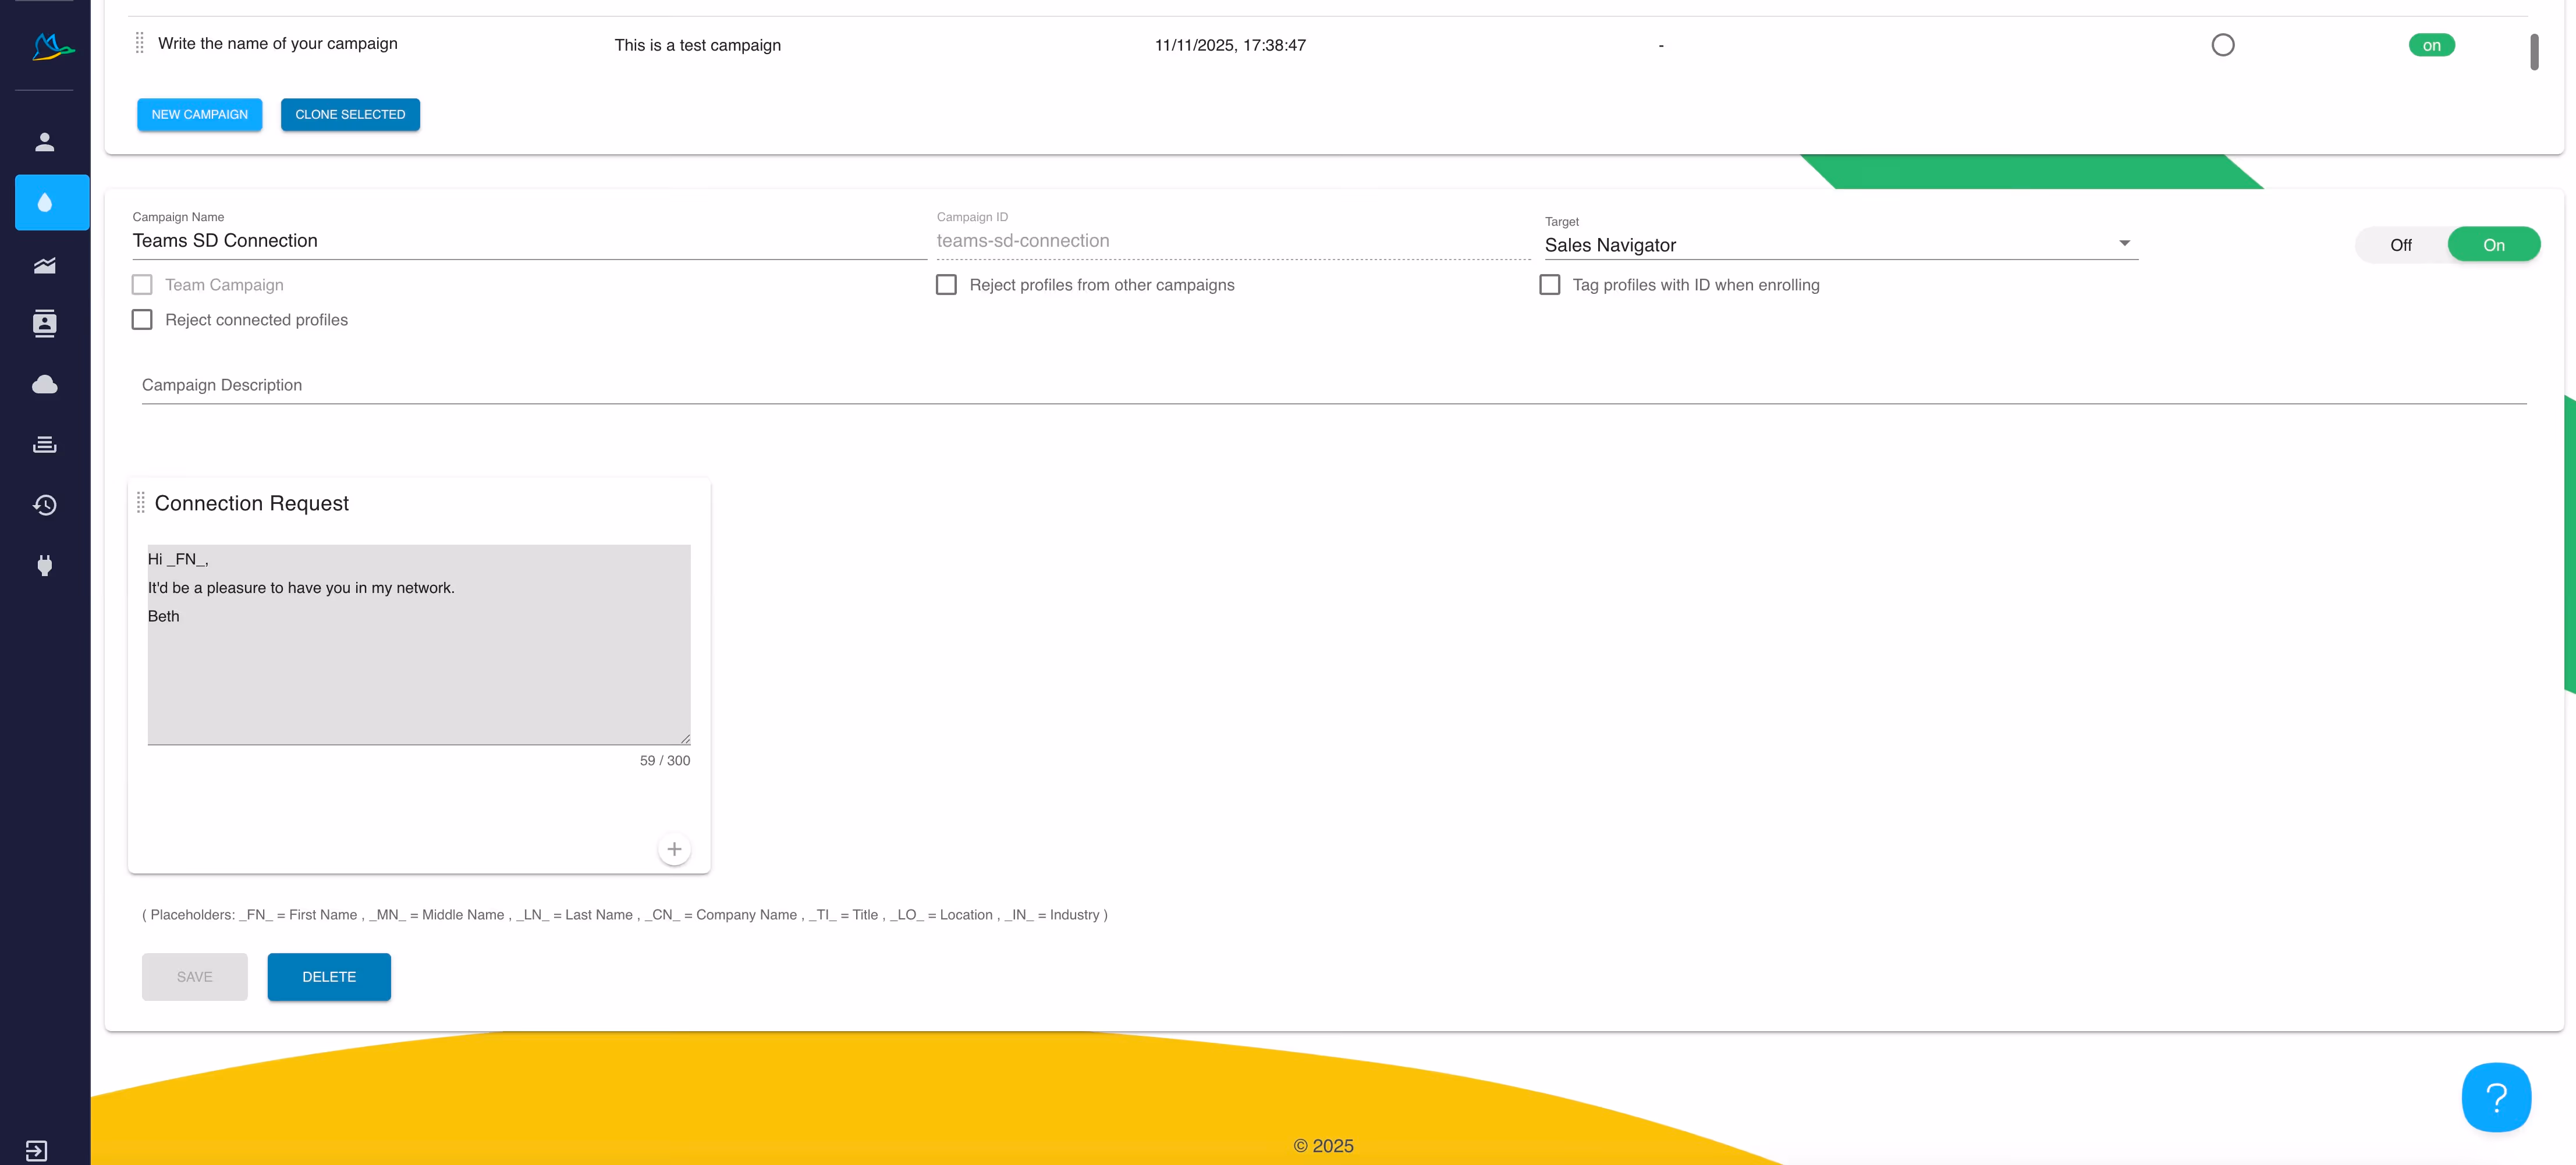
From the Dux-Dash, go to drip campaigns and create a new campaign.
- Select Sales Navigator as the Target
- Name your campaign, and tick any boxes that apply
- remove the follow-up message #1 campaign step to keep it just as a connection campaign, without a follow-up
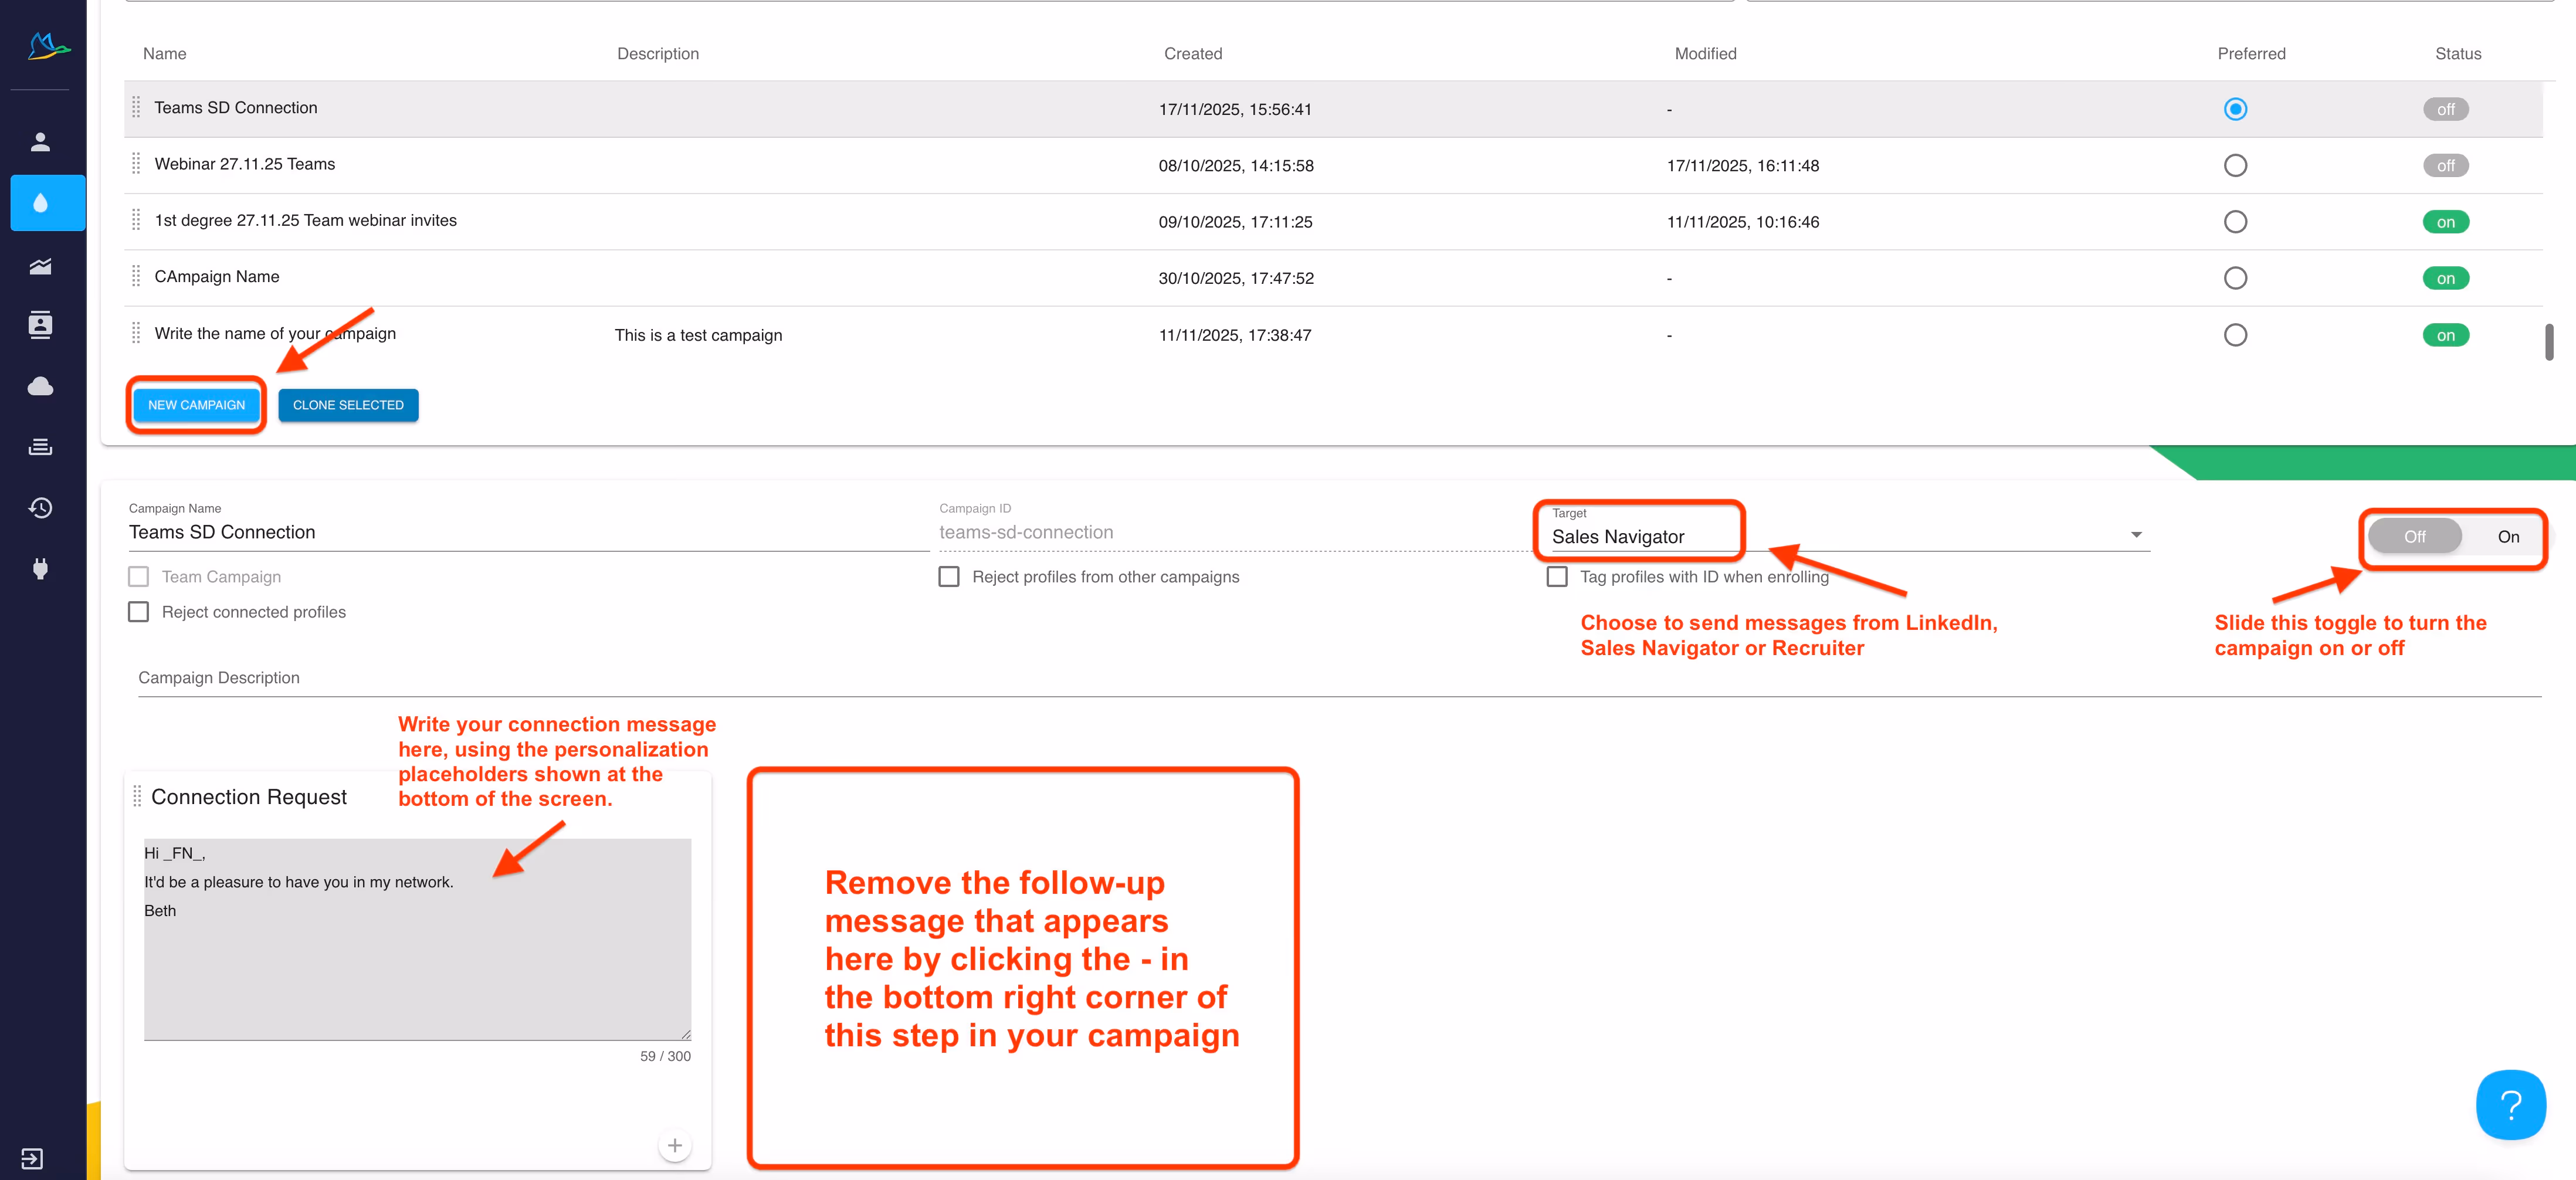
Type your message in the box, personalizing it using the markers underneath.
When you are happy with your connection message, save your campaign. If you need more help, refer to our blog on sending personalized connection messages with Dux-Soup. Your campaign should look something like this:
Step 3: Enroll your Sales Navigator list into your campaign
Return to your Sales Navigator search. From the Dux-Soup extension in your toolbar, click on 'Enroll'. It's the same process whether you have a Turbo or Cloud plan.
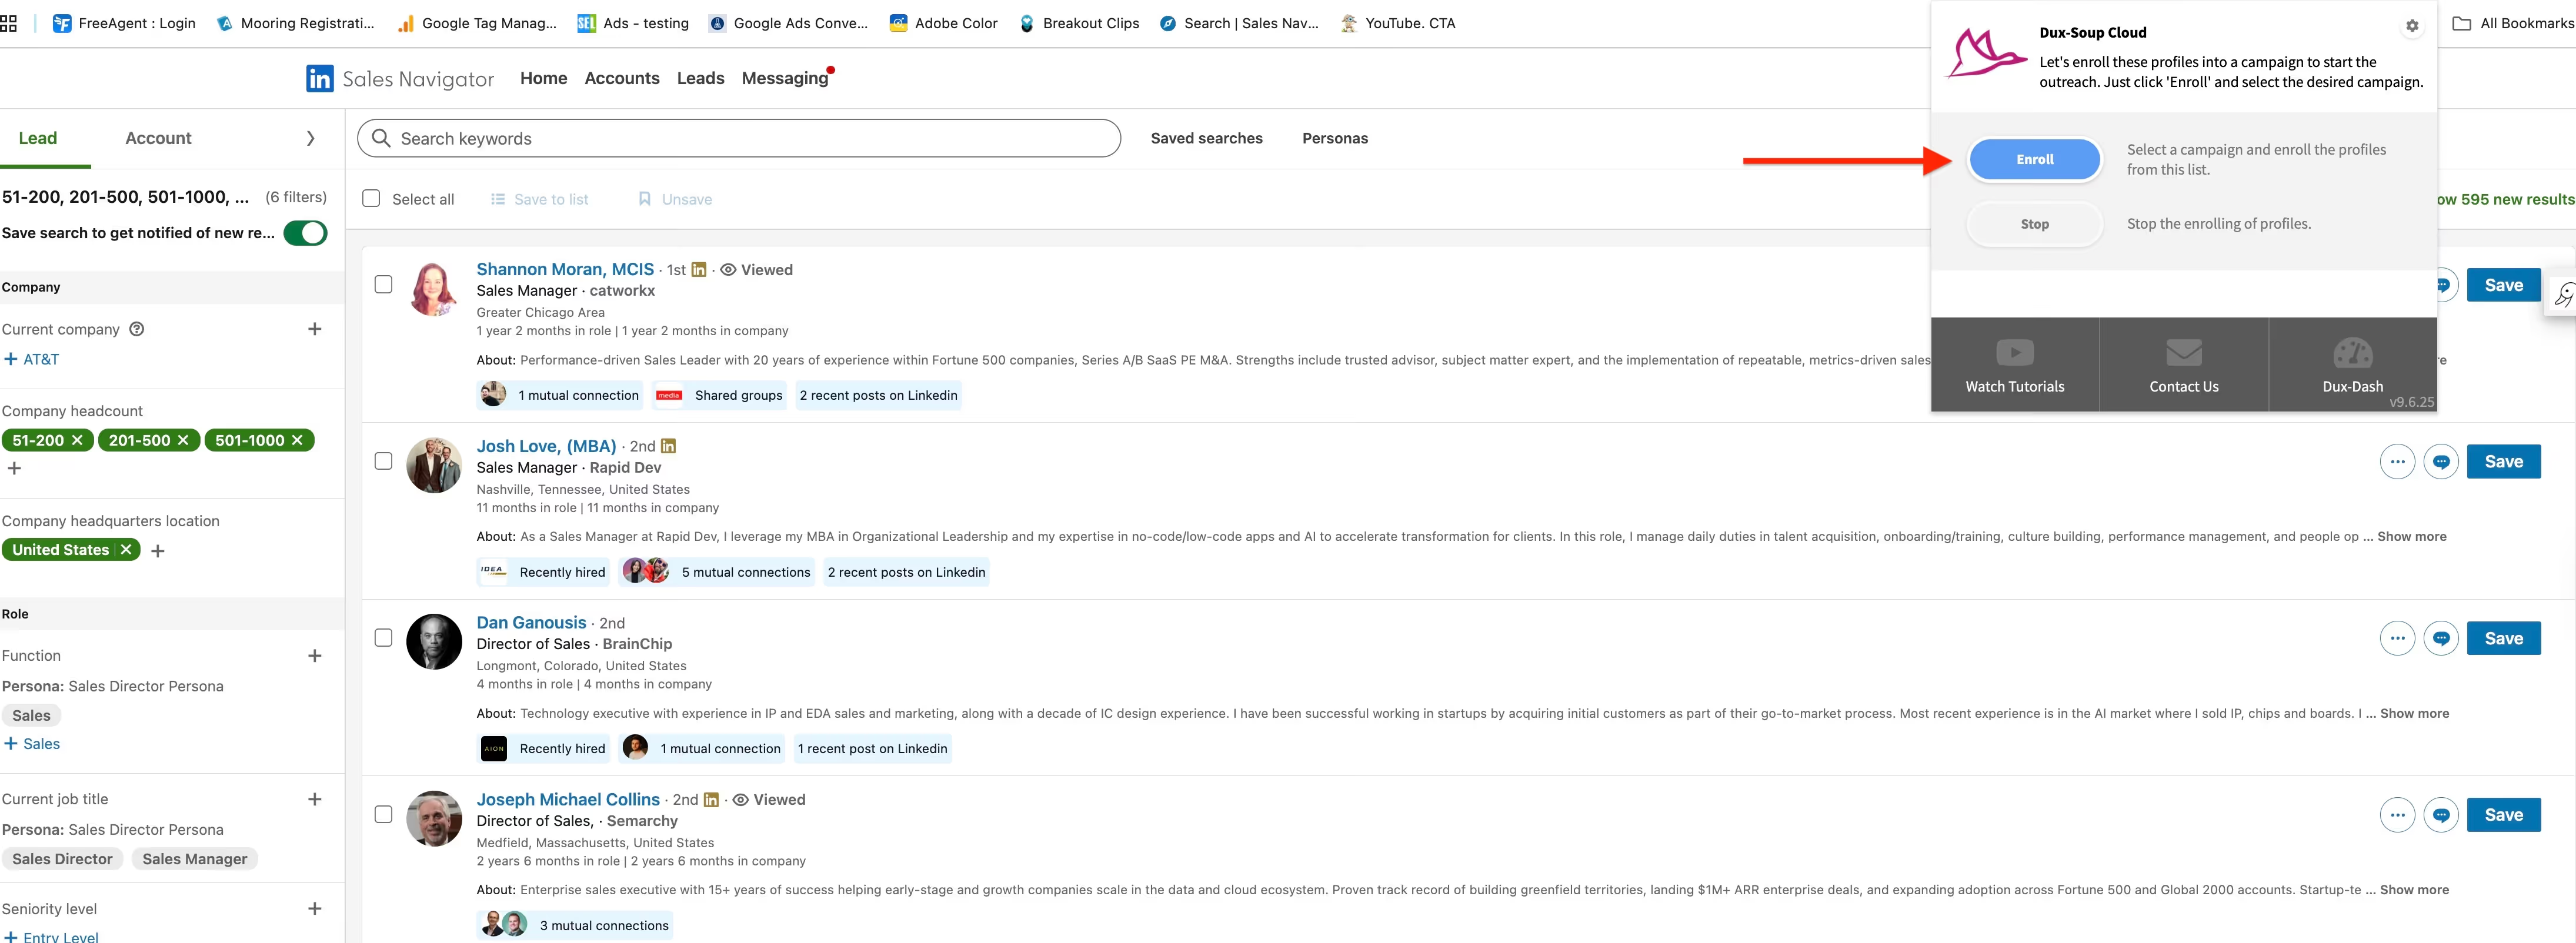
Dux-Soup will start adding the contacts in your list to your campaign, and start sending your connection messages for you. You'll see it working away on your screen.
Where can I find my sent requests?
Your sent connection requests can be found on your standard LinkedIn here: https://www.linkedin.com/mynetwork/invitation-manager/sent/ or you can access them by going to your Network on standard LinkedIn and clicking to view all sent invites:

Sending direct messages to your 1st-degree connections
Dux-Soup can also automate follow-up messages to your 1st-degree LinkedIn connections. If you want to catch up with some clients or announce your new website or project, it's a great way to engage with them.
When it comes to our daily LinkedIn limits, we recommend sending a maximum of 250 direct messages per day with a Sales Navigator license, but you can choose to override this.
Simply, add a follow-up message to your drip campaign, or create a new campaign with just a message and enroll your filtered Sales Navigator list of 1st-degree connections into a Dux-Soup campaign with Turbo or Cloud.
Pro tip: you can also add a link to your website or resource and it will turn into a clickable link
Where can I find my sent messages?
Direct messages sent via Sales Navigator will appear in your Sales Navigator inbox. To access it, simply click on 'Messaging' at the top of the page.

So, there you have it — the basics for connecting with leads on Sales Navigator. We hope you took notes and learned something new. In case you have more questions on how to use Dux-Soup, you can always ask our Customer Support team by sending an email to info@dux-soup.com, we’re always available to help.
Are you new to Dux-Soup? Did you know that you can take Dux-Soup for a FREE 14 day test flight? We don't even need your credit card details, so, get your lead gen journey off to the best boost ever, and get started with Dux-Soup today.


