Introduction
In our previous playbook we took the time to determine an outreach funnel, set up your LinkedIn campaign and link it to your CRM. We also linked our campaign to both Facebook and LinkedIn through Zapier, to warm the audience up with ads before connecting. In Part 2 of this series, I will take you through the process of connecting with your prospect and following up at scale.
Part 2 - How to connect with your target audience at scale
Before you start with any outreach, make sure to have optimized your profile for conversion. I have written a whole different playbook on how to optimize your LinkedIn profile (if you want to read, hit me up), so won’t go too deep into this part. But at least make sure to have optimized your positioning in your headline: I help NICHE get RESULTS (using METHOD).
So a quick example in this case could be: “I help CMO’s and marketing directors with creating the right narrative around their product through storytelling.”
When you have optimized your profile and defined a correct headline, it’s time to work on the more technical aspects of the strategy.
Let’s begin.

Step 2.1 Find the correct person in Pipedrive
In the last part we worked on adding our leads to a custom audience. Now we’re two weeks later and we want to remove these leads from the audiences and add them to our network.
If you followed all steps in the previous part of this series correctly, you’ll have selected the “rotting” function in the “prospect” stage (part 1, step 3.3).
Now, we add a Trigger in Zapier that Triggers whenever a deal is updated. Next step is to add a filter to only continue if the “Stage Rotten Flag” = true.
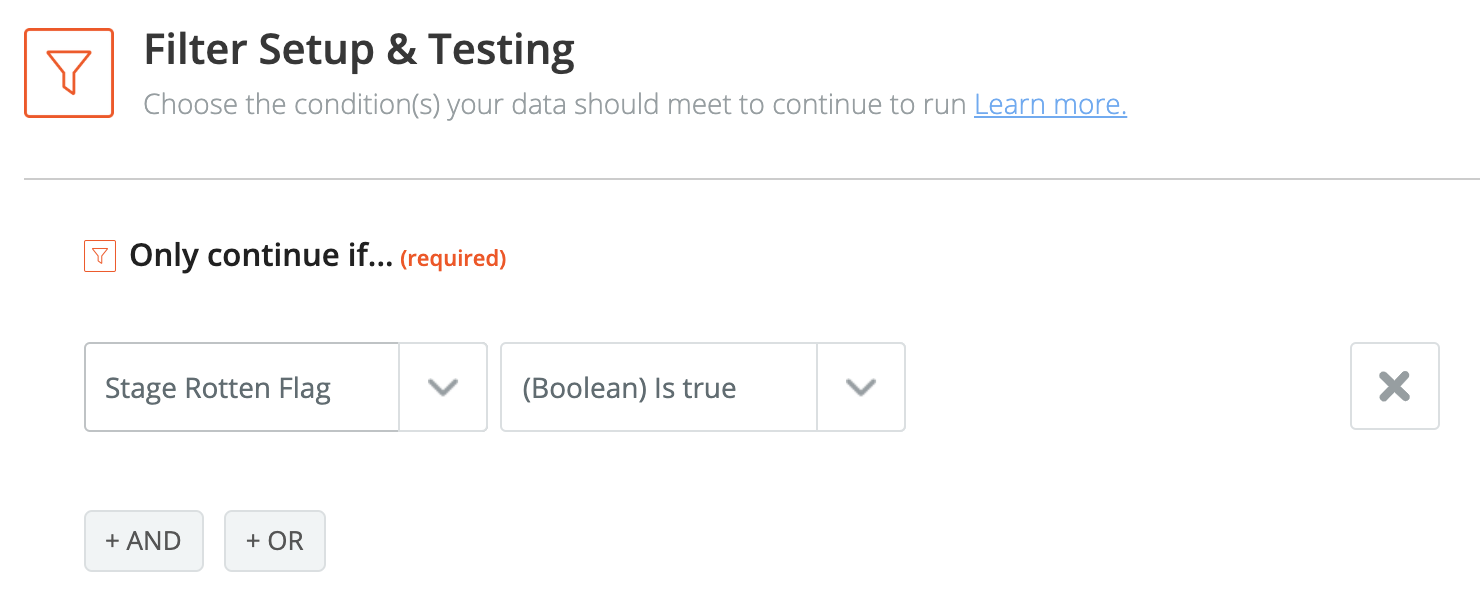
Next up is to tell Zapier to find the correct person by adding a Pipedrive Search to the Zapier stack. We will use the Person ID from the “Updated Deal” trigger, to find the person we want to target.


Step 2.2 Remove the email addresses from audience
Add a new action to Zapier and let it add the persons email address to a new custom audience on Facebook. You’ll exclude this custom audience from the Awareness campaign you’re running so the prospect will stop receiving these ads. Do the same thing with LinkedIn and you’re good to go.
Step 2.3 Add the prospect to your network
So after having warmed up your audience for two weeks, it's now time to send them a connection request.
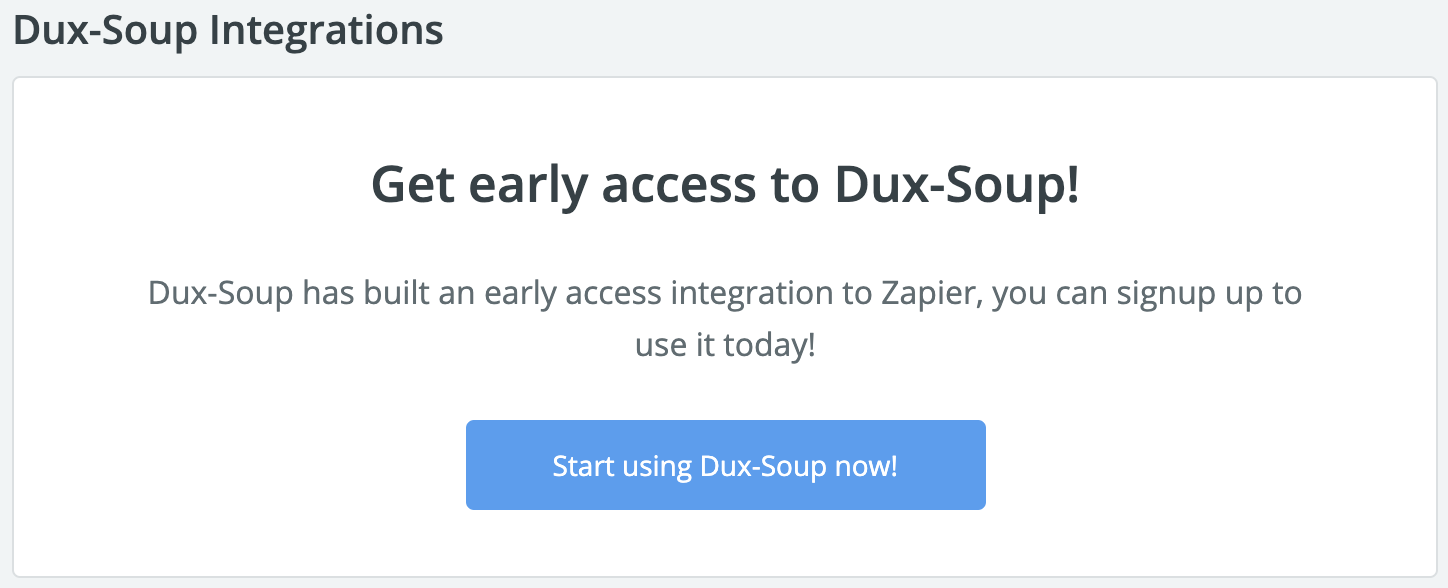
Before you begin with this step, be sure to have added the Dux-Soup Turbo integration to your Zapier stack. You can do so by logging into your Zapier account and follow this link.
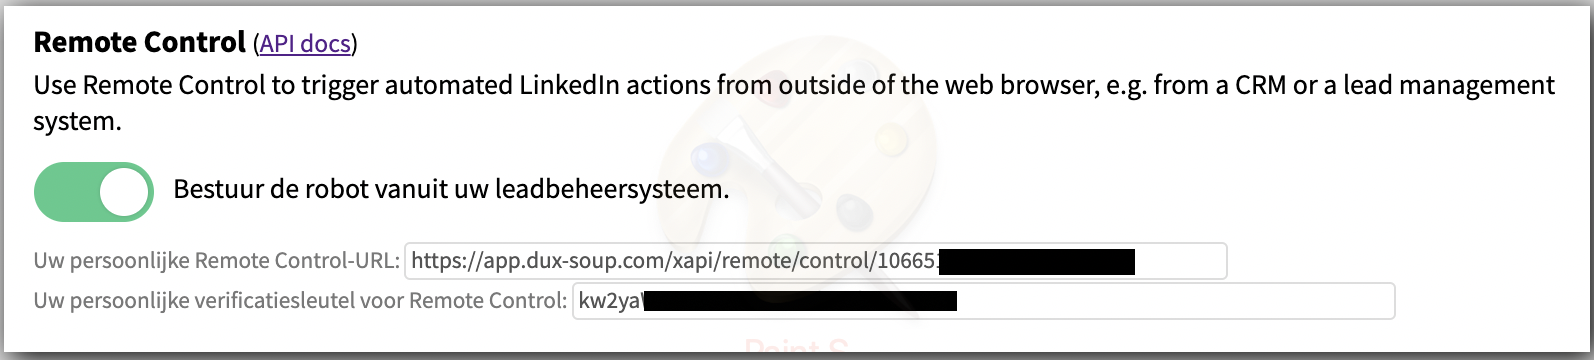
Next up is to create a new Action in Zapier and select “Connect Profile”. Take your API details under the “Remote Control” section under “Connect” and paste them in Zapier.
You now have connected your Dux-Soup Turbo account to your Zapier stack, next up is to configure our outreach message. Select the LinkedIn URL output field under “Find Person” to identify the prospects LinkedIn profile and configure your message.
You can combine both Dux-Soup Turbo's dynamic fields as Pipedrive's output data to form your messaging. This gives you way more flexibility to customize your messages properly than without using a CRM. For example, people often use incorrect / lengthy company names in their LinkedIn profile. By first visiting your search result, importing the data into your CRM and waiting two weeks before reaching out, you have the time to edit the data used for dynamic fields in your CRM. This way your outreach message looks less automated.
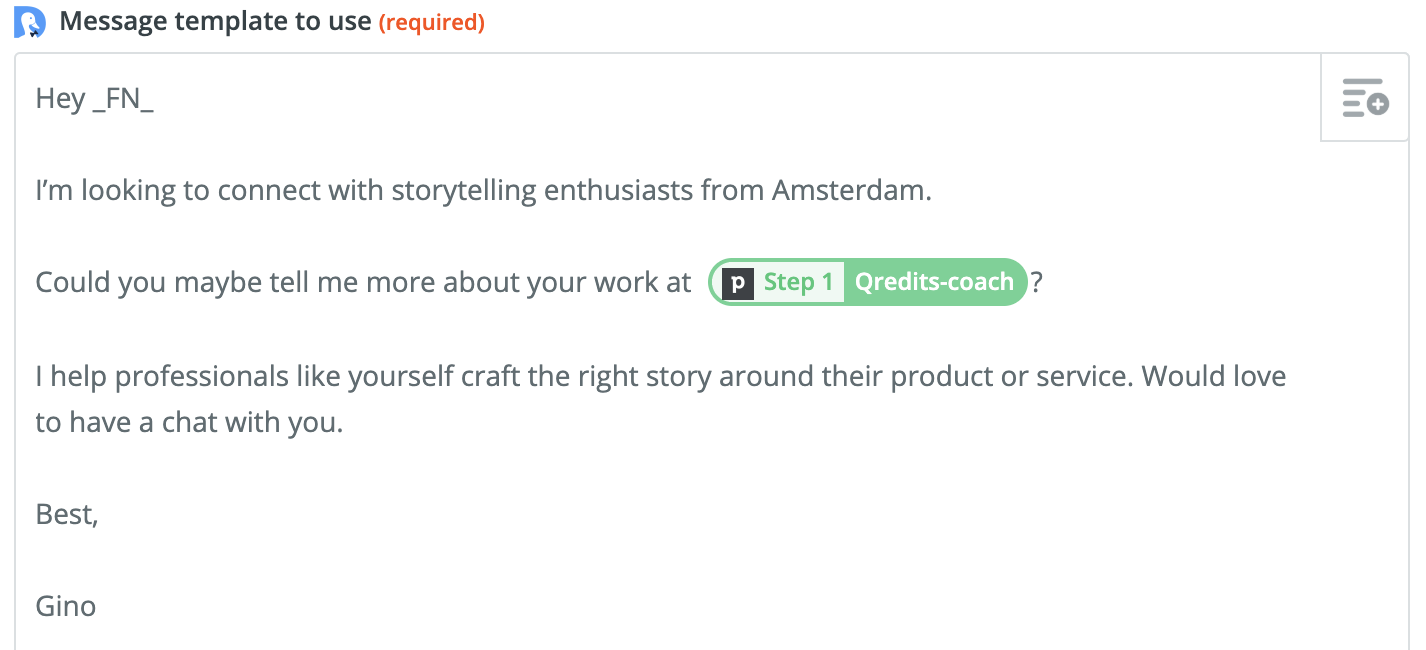
Understanding this part is key because the options are literally endless. You can even go as far as writing custom paragraphs and import them into your CRM to use in your connection request (for example by namedropping other key stakeholders), that fit with that specific prospect.
Lets not get too deep into this right now and continue with our setup.
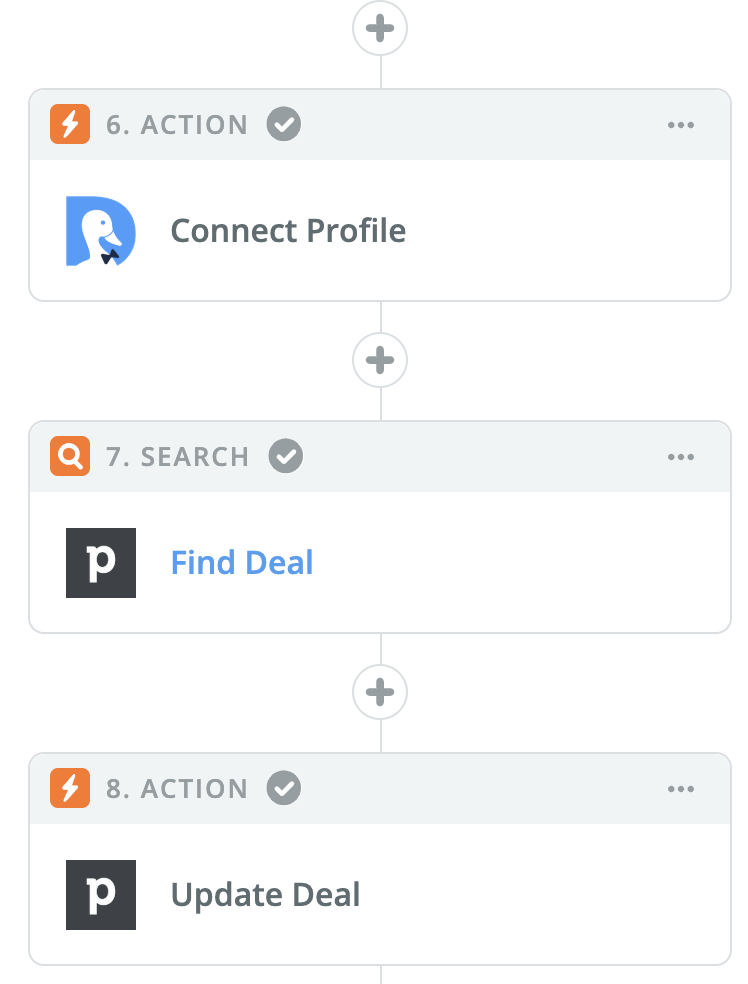
Step 2.4 Update the status in Pipedrive
Now that we have configured our outreach message, we want to update the status in our CRM after the message has been sent.
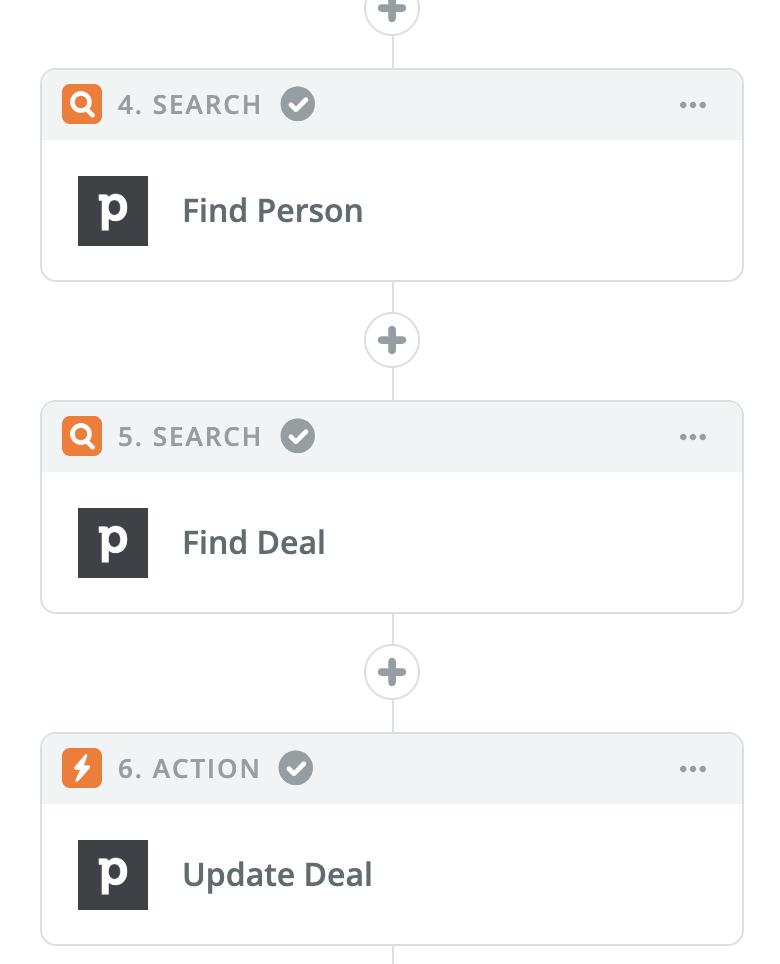
Add a Search to your Zapier stack, find the right deal based on the output of step 1, and update the deal to the correct stage in Pipedrive.
3.0 Auto follow-up to people who accept your request
Now we have deleted our prospects from our awareness campaign, sent them a connection request, and updated the status in our Pipedrive CRM. Next up is to let the Dux check if our prospect actually accepts our request and send out a follow-up message.
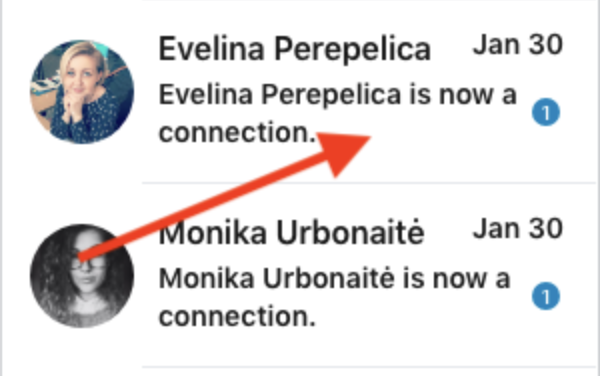
First off, it's important to have a few unread connection request messages in your inbox. If you have opened all of the message threads already, simply mark a few of them as unread in the message options.
Next up is to create a new Zap and set a new webhook up properly as explained in part 2 of my first playbook.
Configuring your follow-up
When adding the webhook to Dux-Soup Turbo under “Connect”, make sure to only select “Message” while you’re at it.

Enable “Message Bridge” in the Dux-Soup Turbo options and let the Dux scan through all of your unread messages. Go back to Zapier and select “Ok I did this”.
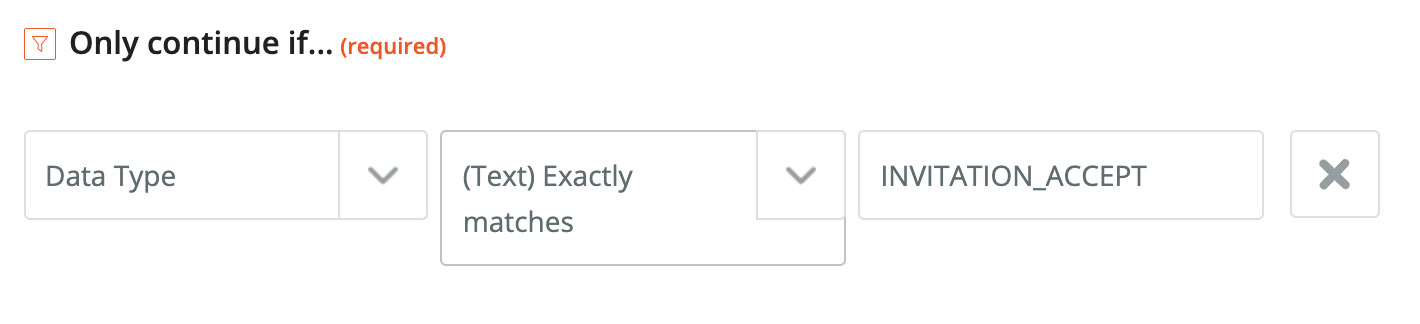
If all went well, you’ll have some data in Zapier popping up under “Hooks”. Click on one of the Hooks and search for “INVITATION_ACCEPT”.

When you have the correct data in Zapier, click on continue.
Next is to add a filter based on INVITATION_ACCEPT to make sure we only send a follow-up to people who have not responded to our message. If you forget to add this step, every unread message in your inbox will receive this message so take the time to configure this properlAfter this step, we have made sure to only send messages to prospects that accepted our request AND did not reply. Now it's time to structure our message.After this step, we have made sure to only send messages to prospects that accepted our request AND did not reply. Now it's time to structure our message.
After this step, we have made sure to only send messages to prospects that accepted our request AND did not reply. Now it's time to structure our message.
After this step, we have made sure to only send messages to prospects that accepted our request AND did not reply. Now it's time to structure our message.
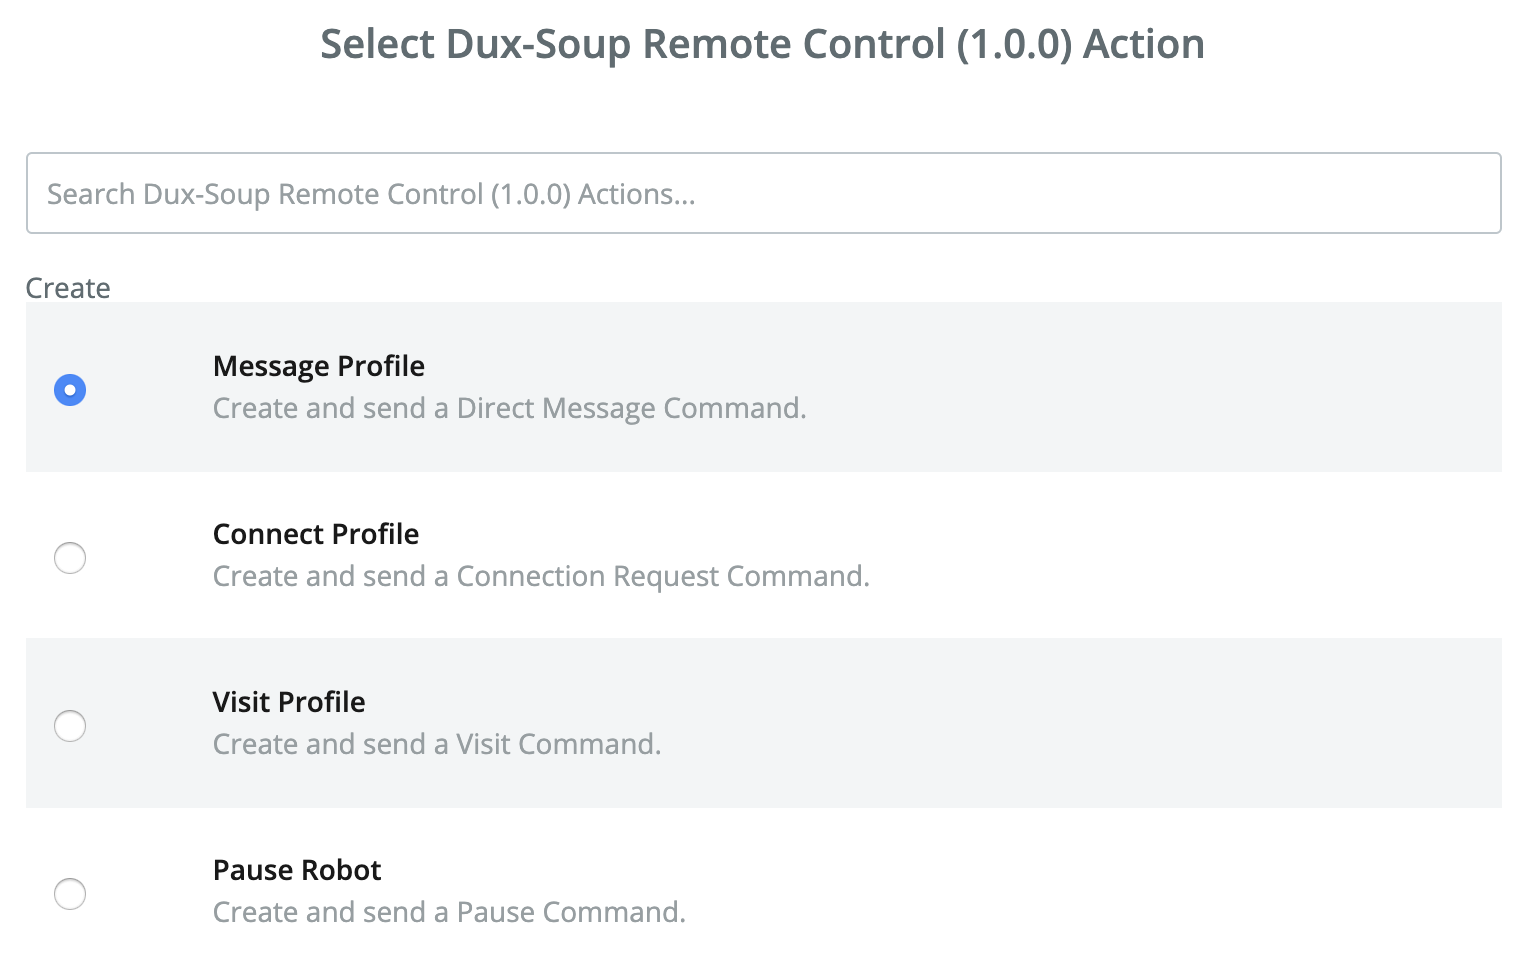
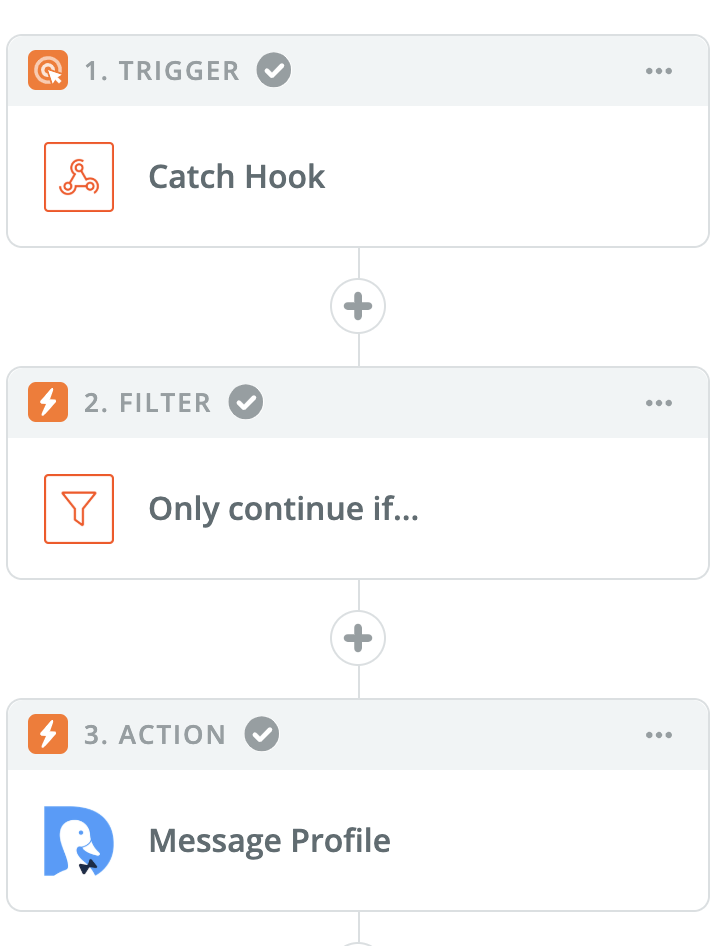
Add “Dux-Soup Remote Control” to your stack, as explained in step 2.3. This time, we select “Message Profile” instead of “Connect profile”.
Next step is to format your message. You can go on the hyper personalization tour by adding a lot of custom data from your CRM, but in this example we keep it rather simple. We identify a pain our prospect has, show them a solution for that specific pain, and close with a CTA (Call To Action).Next step is to format your message. You can go on the hyper personalization tour by adding a lot of custom data from your CRM, but in this example we keep it rather simple. We identify a pain our prospect has, show them a solution for that specific pain, and close with a CTA (Call To Action).
Next step is to format your message. You can go on the hyper personalization tour by adding a lot of custom data from your CRM, but in this example we keep it rather simple. We identify a pain our prospect has, show them a solution for that specific pain, and close with a CTA (Call To Action).

3.2 Updating status in CRM
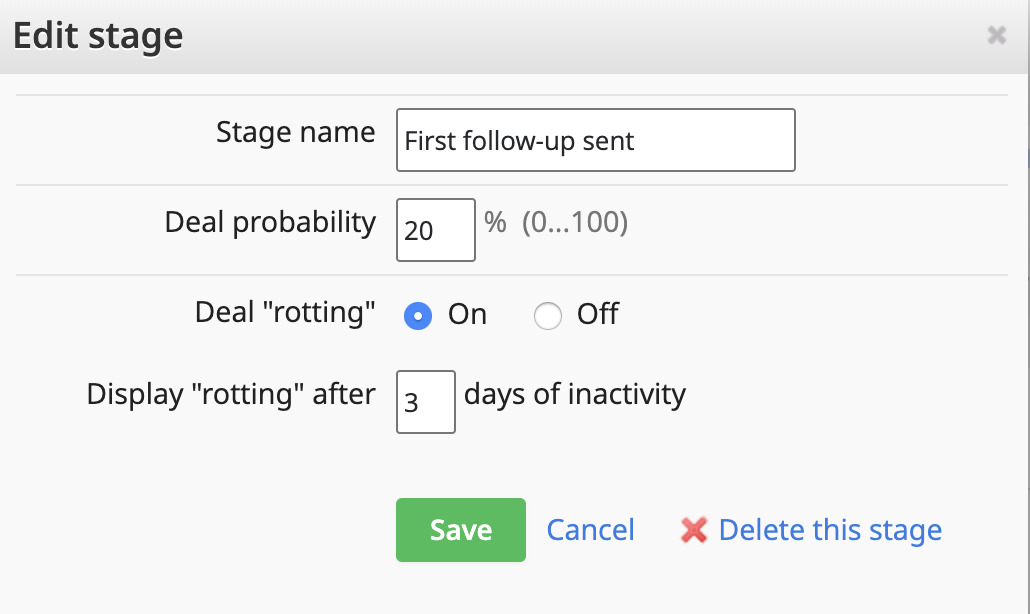
Now, we want to update the status of the prospect in our CRM, so that we know that it has received a follow-up message. You can do so by searching for a person, then a deal linked to that person. Eventually you can update the found deal with a new status, and include the follow-up copy as a note. This way, you always keep track of what prospect has received what information in your CRM. Make sure to turn deal rotting on under the stage “First follow-up sent” and change the settings to display rotting after 3 days of inactivity.
3.3 Send automatic message to people who reply
In this step we will send an automated follow-up to prospects that reply to your message. Next to that, we will send an alert message to our Slack channel to alert us when we have a reply.
Start by creating a new Zap, following the exact same steps as in the beginning of step 3.1, but changing the filter to the following settings.
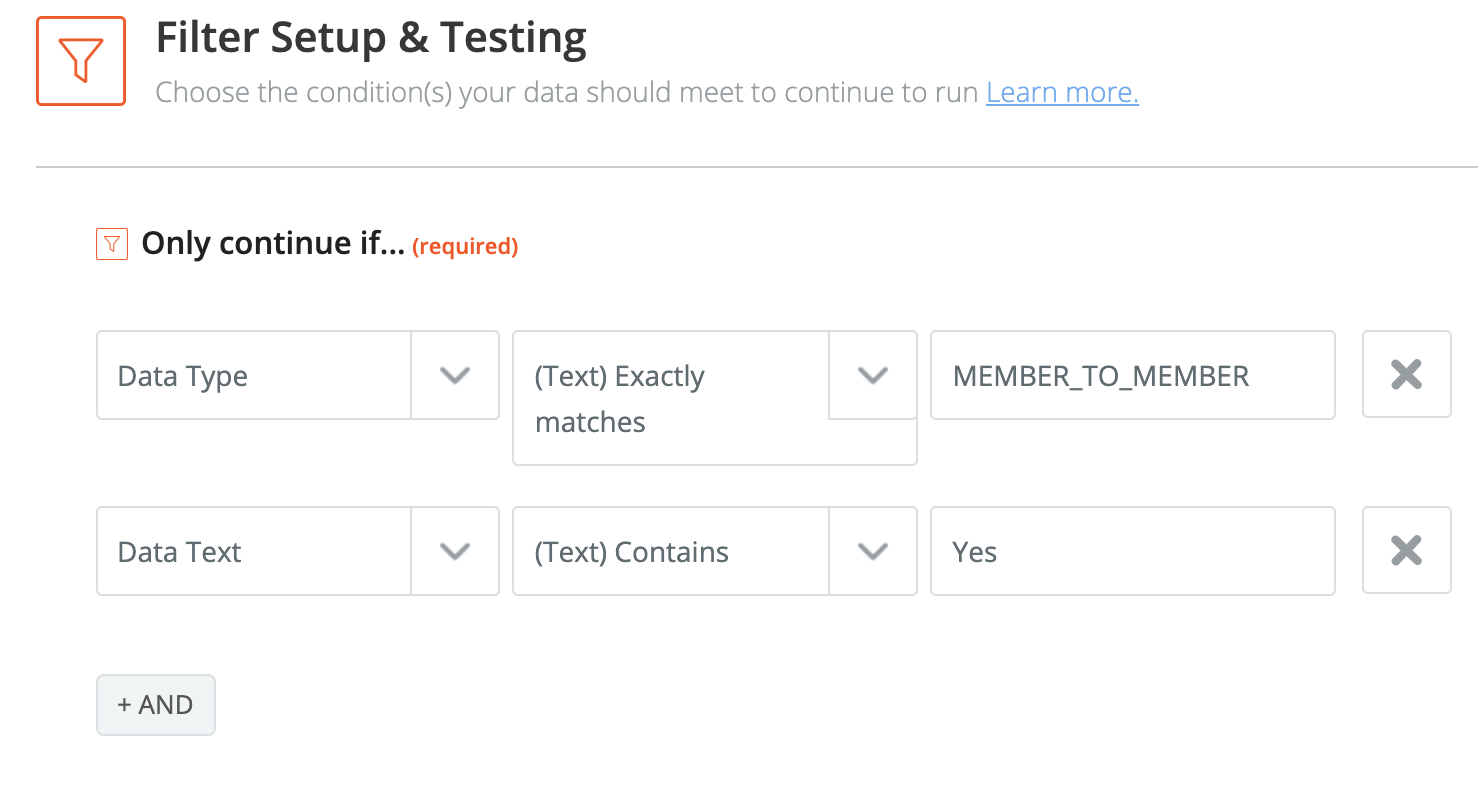
Remember ending the follow-up message with a CTA? Most of the time, the answer to the question “Do you want to receive more information regarding the workshop?” will either be “Yes”, “No”, “Maybe” or a variant of these reactions like “Sure”.
With the above filter option we make sure that we only send a follow-up with more information about the workshop to people who reply positively. With the “Or continue if…” you can easily add other words that the prospect might use in the reply. Keep optimizing your filter options based on your campaign progress, to make sure to have sent automated messages to as many relevant people as possible.
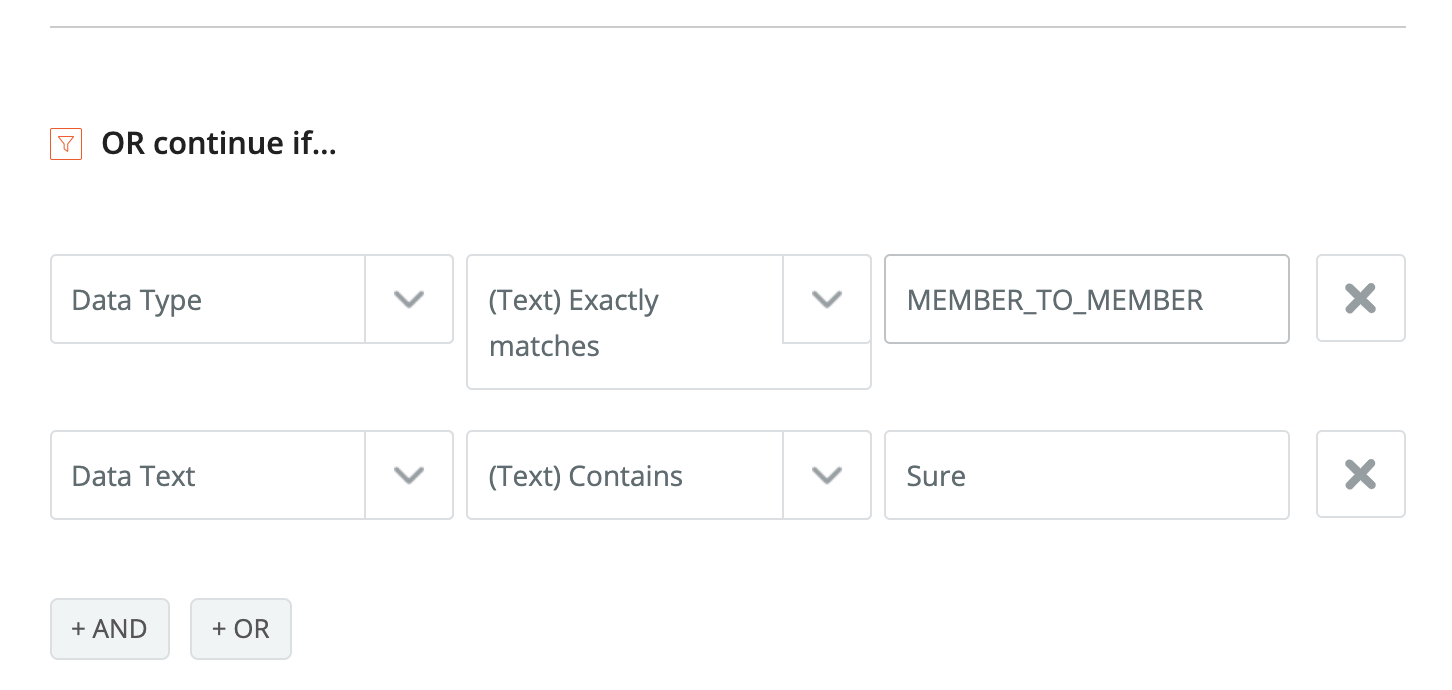
With the “Or continue if…” you can easily add other words that the prospect might use in the reply. Keep optimizing your filter options based on your campaign progress, to make sure to have sent automated messages to as many relevant people as possible.
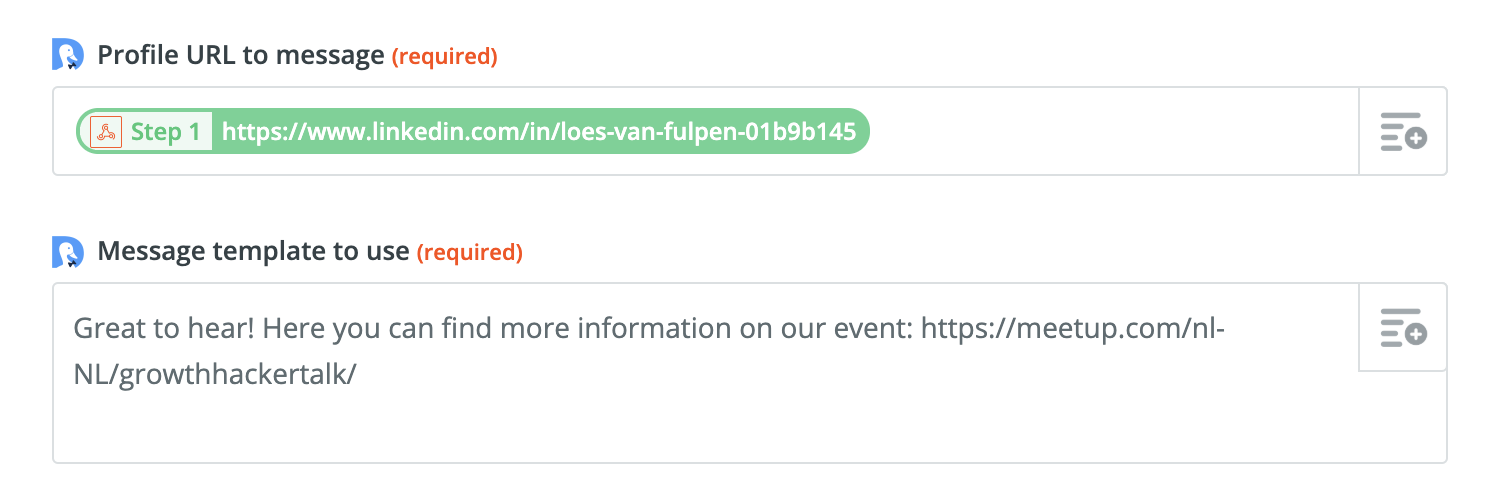
You copy paste the same setup as explained in step 3.1 with the following copy:
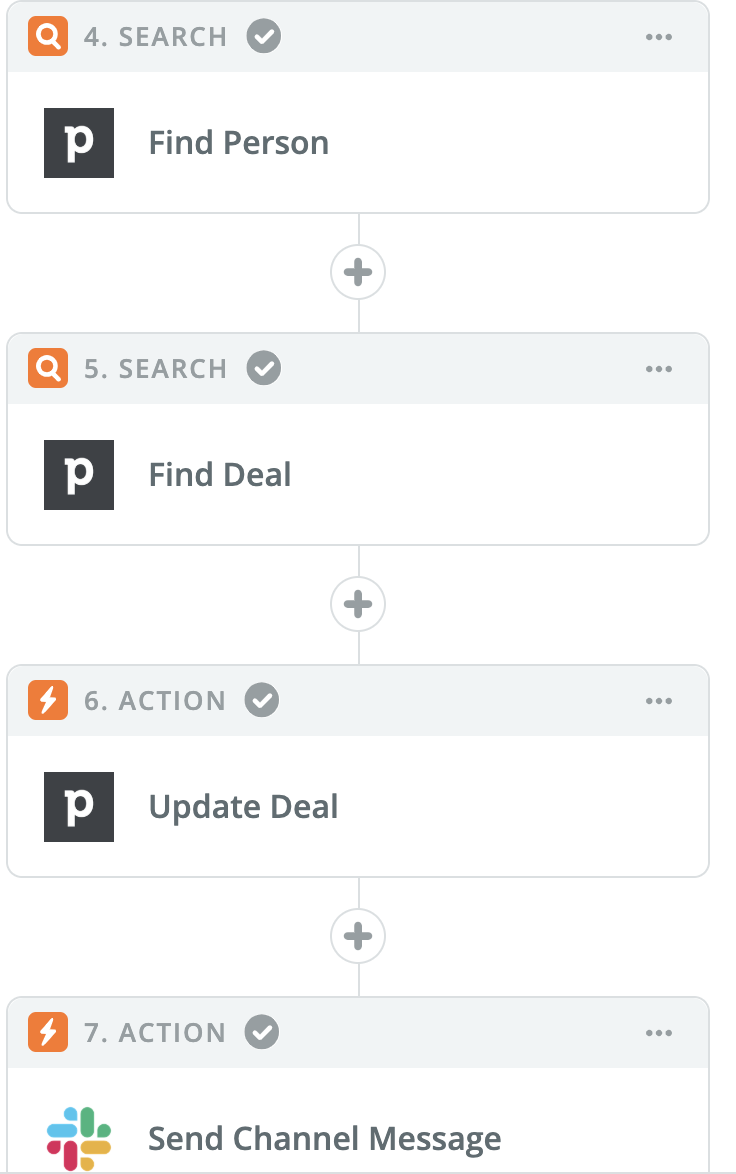
Now make sure to update your deal by adding the steps, “Find Person”, “Find Deal”, and “Update Deal” to your stack, just as in step 3.2.
Because we now send a generic follow-up to everyone that has replied positively, we want to be able to monitor these messages and jump in whenever needed. For example, whenever someone replies, “Yes send it over! Can we join with our whole team?.” or “Sure please do! What kind of storytelling topics will you address?”, the bot will send an automated follow-up that does not answer the full question of the prospect.
Therefore we will add a Slack push message to the stack to alert us directly when someone replies on one of our messages.
You can structure the message as follows, by using both custom fields from your CRM as from the Trigger itself:
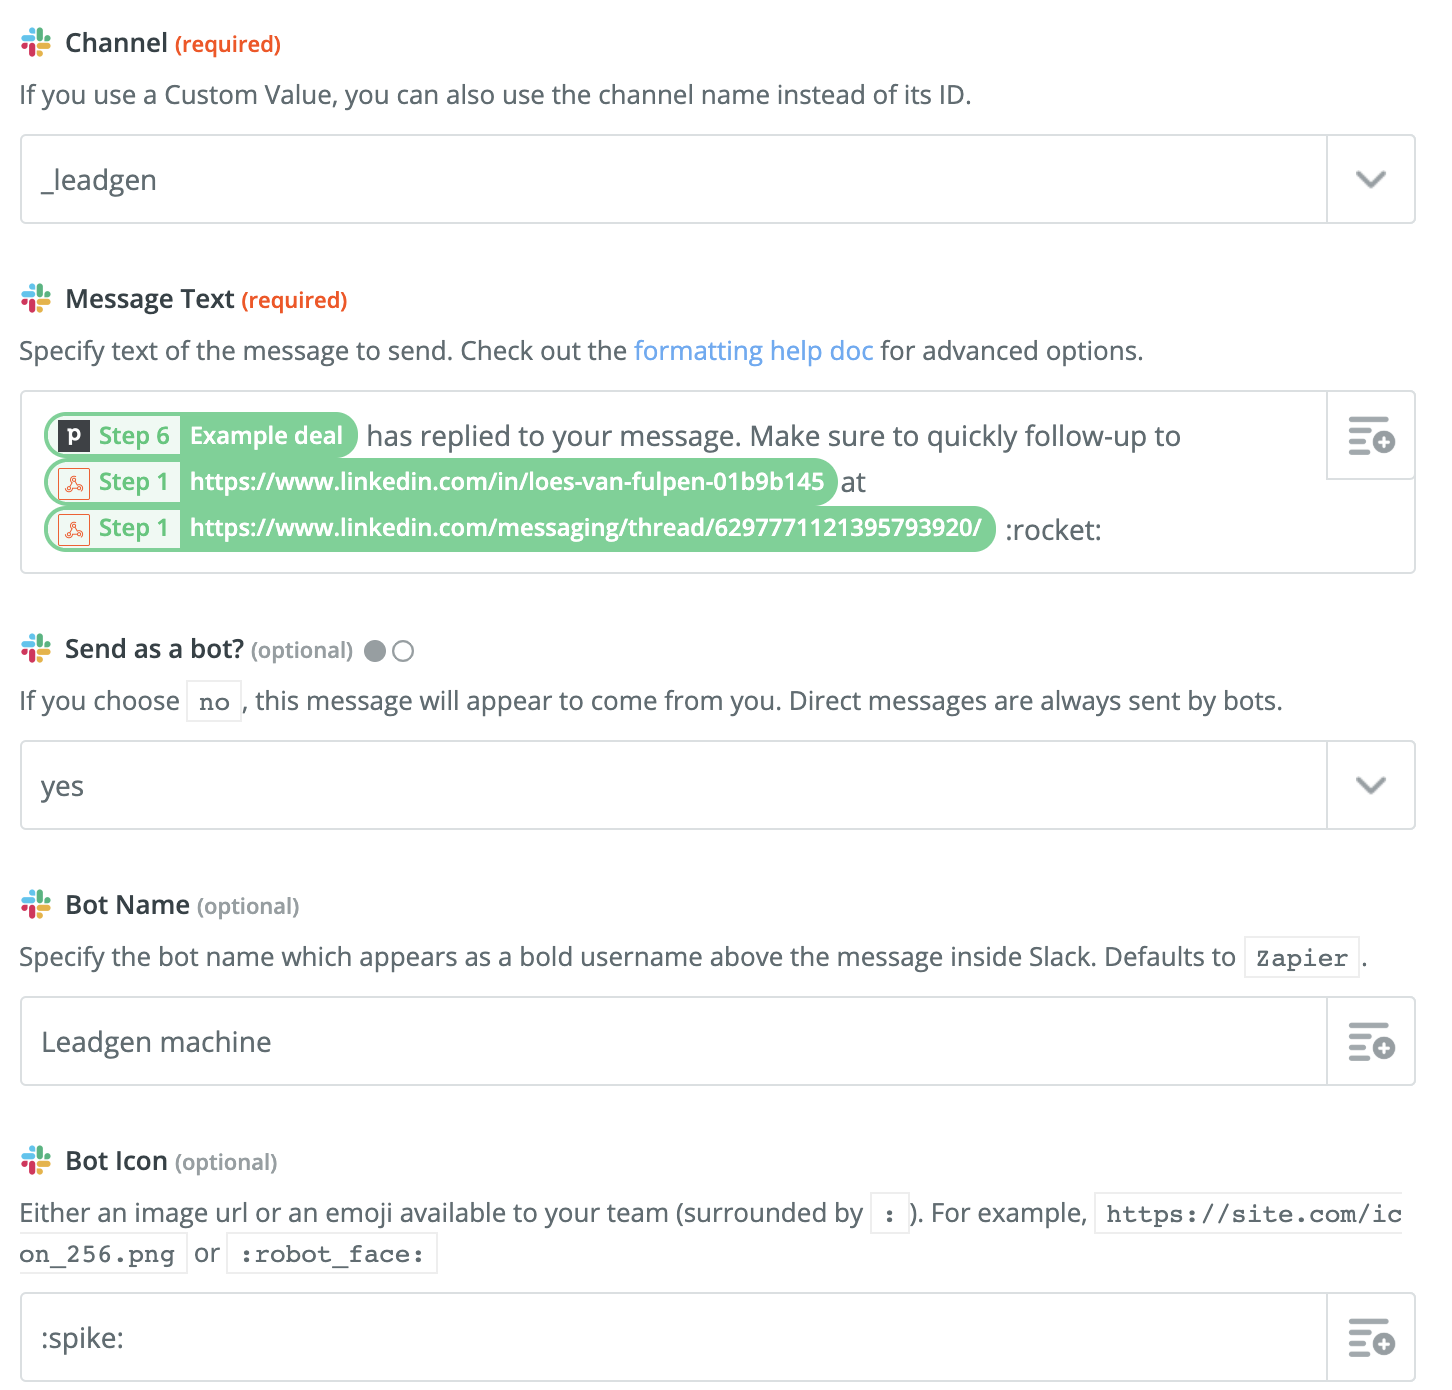
The result of the alert message in Slack will look like this:

3.4 Rinse & repeat
You can repeat step 3 to add additional follow-ups to your outreach campaign. When sending follow-ups to new connections that haven’t replied, just follow the steps of 2.1 to find the correct deal in Pipedrive by searching on stage ““First follow-up sent” filtering on “Stage Rotten Flag = true”, and then continue with sending the second follow-up message to the person connected to that deal.
Remember that the goal here is to get into a conversation with the prospect, and not to spam them for eternity. My most converting flows consist out of 3 follow-ups max. If you cannot get a reaction out of the third follow-up, the probability of a reaction on the fourth of fifth one is very low.
Great job! After showing the prospects ads for a period of two weeks, you have now removed the prospects from your awareness campaign on Facebook and LinkedIn, invited them on LinkedIn by sending a custom connection request, followed up on the prospects that did not reply with a generic message, followed up on prospects that did reply, have sent automatic alerts to your Slack environment, and updated all of your prospect statuses in your CRM with the right conditions - all on auto pilot.
Don’t forget, ONLY connect with prospects if you think you can truly provide value! Don't be the person that uses these powerful tools to annoy your target audience into subservience - this does not work.
If you liked this second part of the series, and you want to receive part three, be sure to join our Facebook group here.
The first part of this series you can find here.
See you on the other side!
Gino Taselaar is founder and Head of Operations at Spike - Growth Marketing Agency.
Need help with generating leads? Add me on LinkedIn or schedule a consultation call through https://cal.mixmax.com/bookginotaselaar/30mincall