


Updated November 2025
How to send personalized LinkedIn connection requests with Dux-Soup
One of the most commonly asked questions we get is “How do I send personalized connection messages with Dux-Soup?” and “Where do those messages show up?” so we’ve prepared a quick guide covering everything you need to know about sending automated personalized LinkedIn connection messages using Dux-Soup.
With Dux-Soup, we make it easy to automate your connection process. It can save you hours every week, and before you know it, you'll have a growing network of connections. Start your free trial below (if you don't already have a license), and let's get going!
What's the difference between 1st, 2nd and 3rd-degree connections on LinkedIn?
Before we begin, it’s important to clarify the difference between 1st-, 2nd-, and 3rd-degree LinkedIn connections. Your 1st-degree connections are people you’re already directly connected with; they can view your posts and send you private messages. In contrast, 2nd- and 3rd-degree connections are individuals outside your immediate network with whom you haven’t yet connected.
Automating LinkedIn connection requests
We're going to show you how to send automated, personalized LinkedIn connection messages using a Trial, Turbo, or Cloud Dux-Soup license - the process is the same.
Pro user? Then you can still do it, but the process is different - head to this support article to find out how.
Step 1 - Create your campaign
- Head to your Dux-Dash and create your campaign in the 'Drip Campaigns' section. (Tip: you can always get to your Dux-Dash from your Dux-Soup extension on your browser toolbar).
- Click 'New Campaign'. Underneath a 2-step campaign will appear, including a connection request and follow-up message #1.
- Name your campaign, then tick the boxes if you want to reject profiles from other campaigns or tag profiles with the campaign ID when they are enrolled.
- Choose which LinkedIn plan you want to send the connection invitations from, only selecting Sales Navigator or Recruiter if you have a valid license.
- Now it's time to add your messaging. First, remove the follow-up message #1 by clicking the '-' that is at the bottom right of that box. Now you should just have a single box called 'Connection Request'. In here, type a personalized message if you want to add one, using the placeholders at the bottom of the page for personalization.
Tip: If you only have a free LinkedIn plan, they will only let you send 5 personalized connection requests a month. You are better off keeping the message blank. If you have Sales Navigator or Recruiter, you can personalize your connection messages.
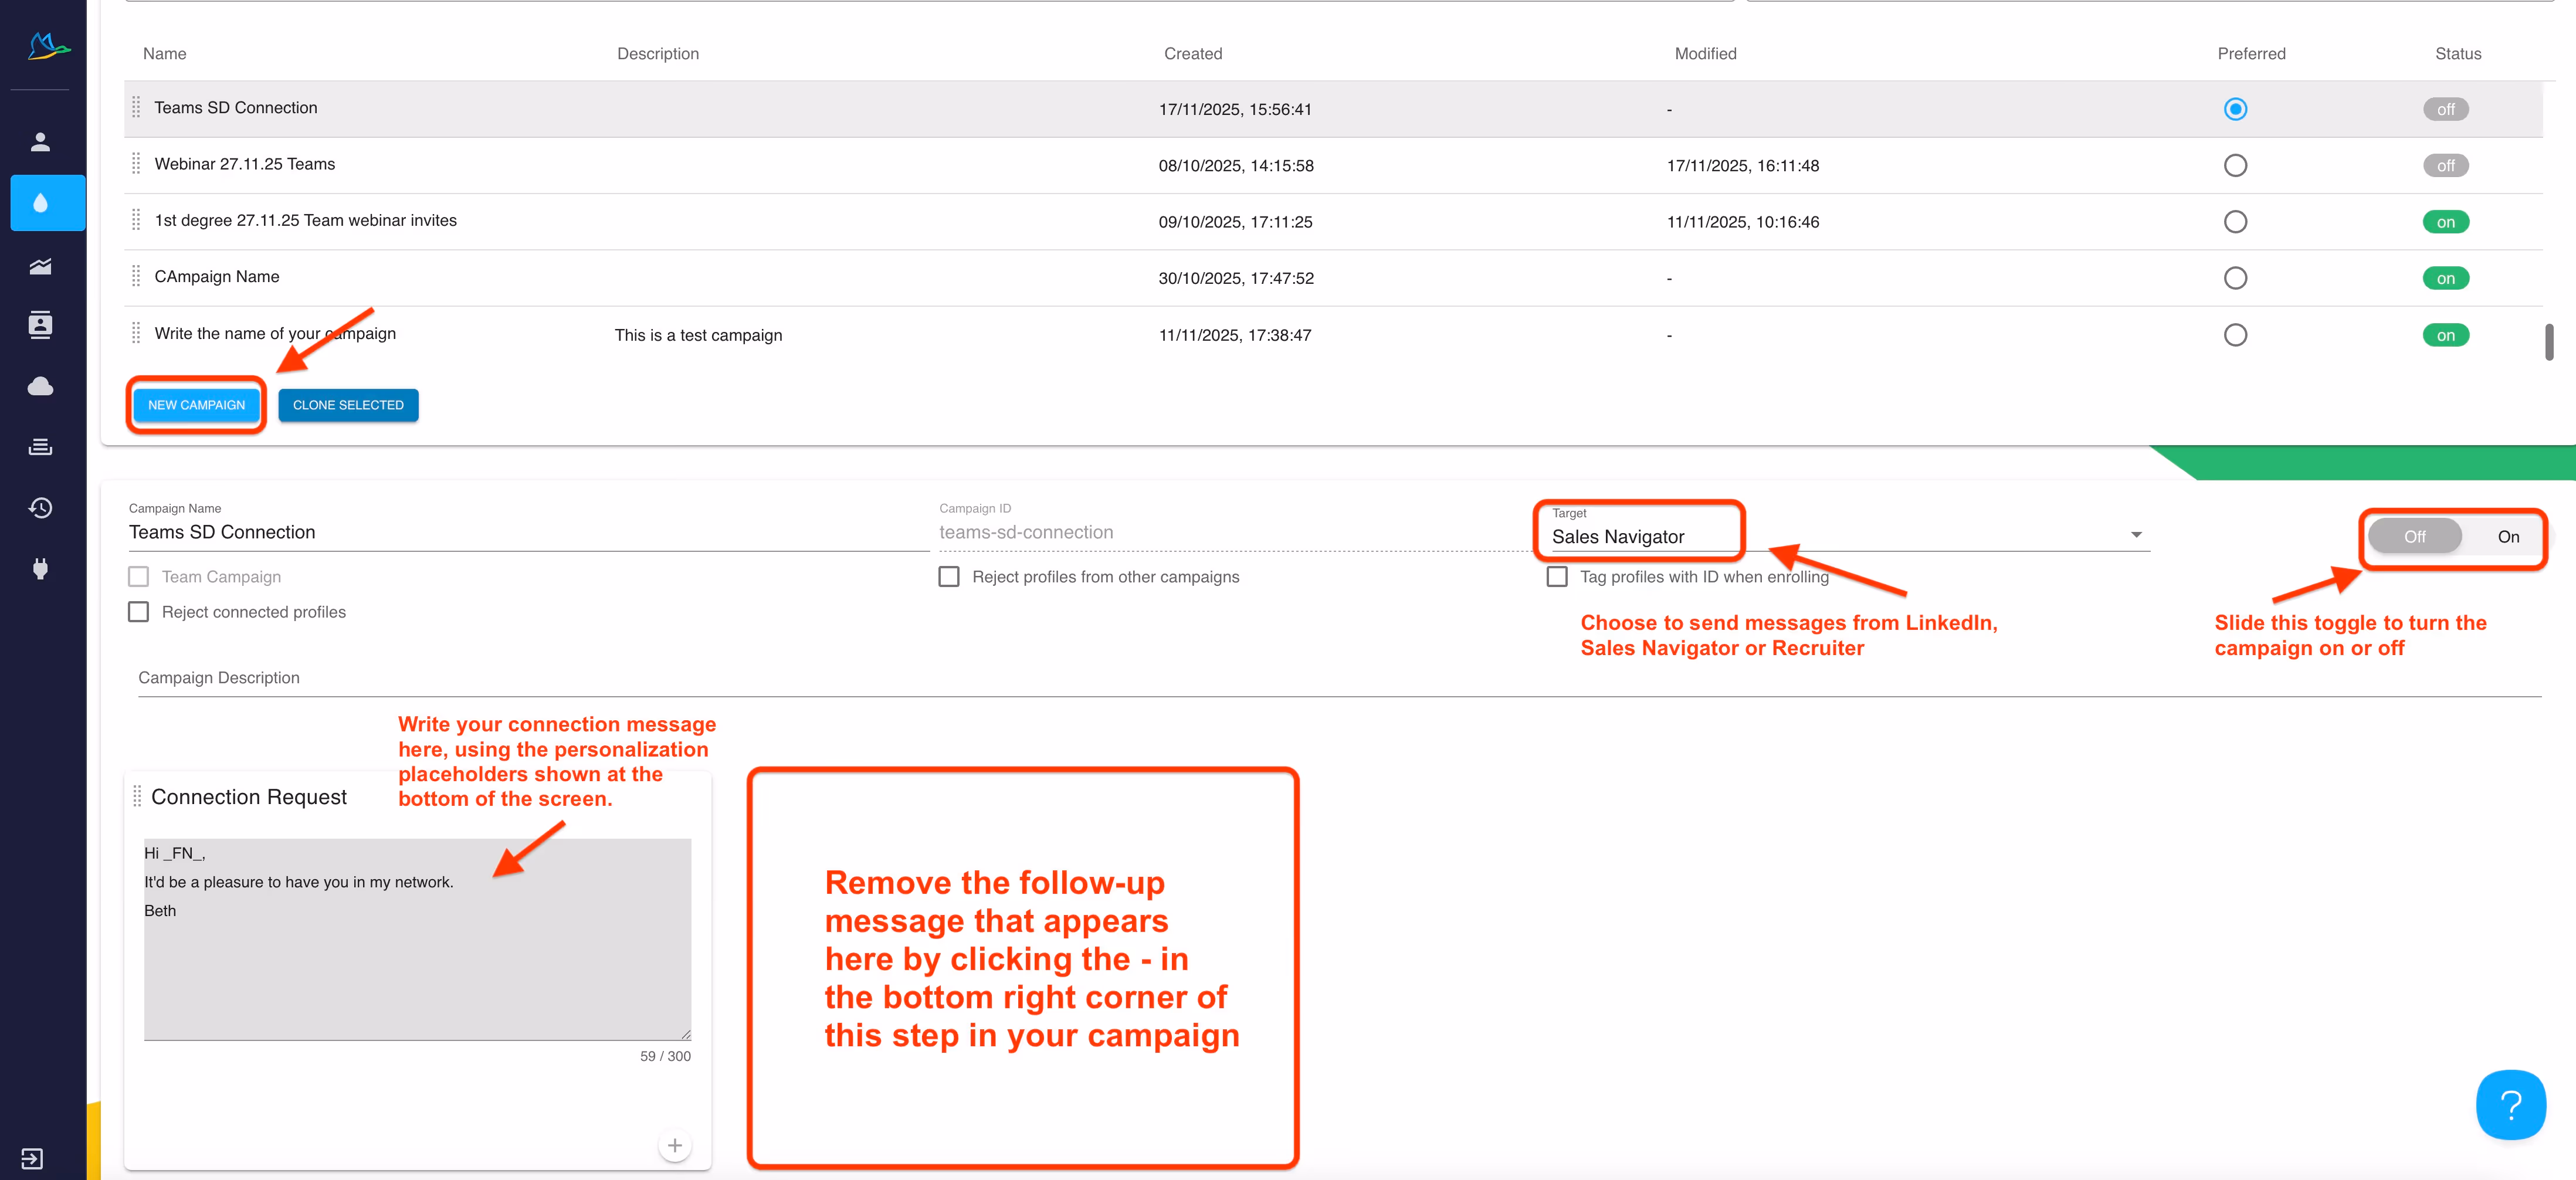
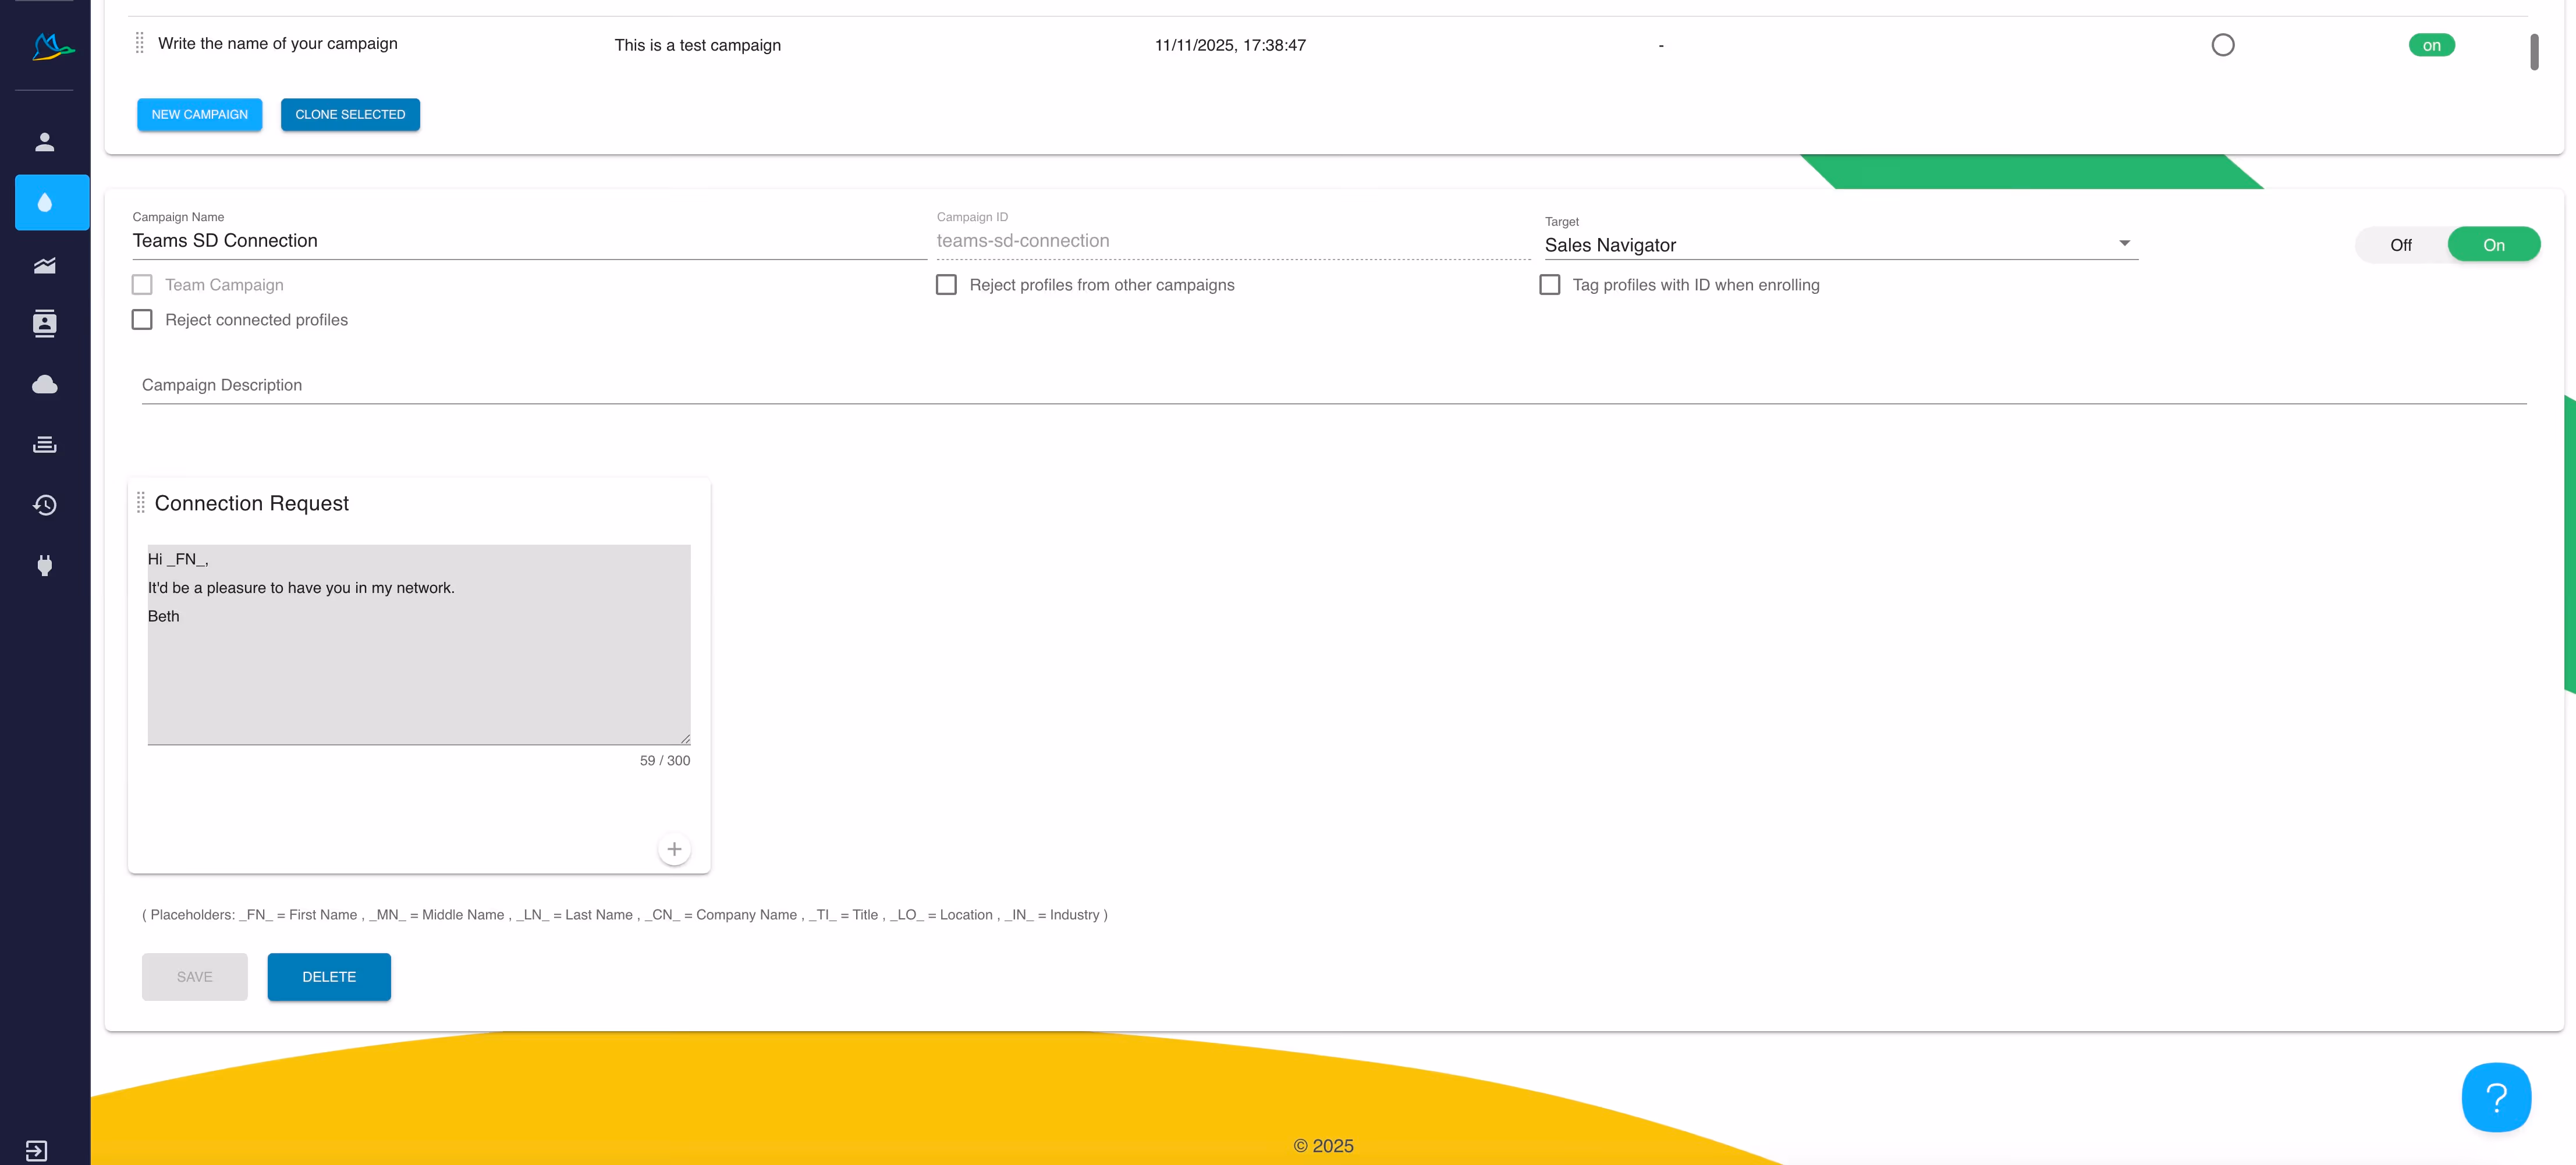
When you have created your campaign, click 'Save' underneath. Your campaign will be turned on by default, but you can turn it off using the toggle as shown in the image. Your finished campaign should look something like this:
Step 2 - Enroll your profiles
Find your list of target profiles to add to your campaign. There are a few data sources you can use:
1. A LinkedIn, Sales Navigator or Recruiter list (If you're unsure how to do this, check out our LinkedIn search and filter masterclass).
2. A CSV file
3. Your CRM system (we have native integrations with Salesforce, HubSpot, Pipedrive, Freshsales, SharpSpring and more. Check out our current integrations.
Enrolling from a LinkedIn list
Once you have your prospect list ready in LinkedIn, Sales Nav or Recruiter, click on your Dux-Soup extension on your Chrome bar. As soon as Dux-Soup is active and ready to perform automated activity (you need to have your LinkedIn list ready), you'll notice a 'Dux-Soup at your service' notification, and the menu will offer you the option to 'Enroll'.
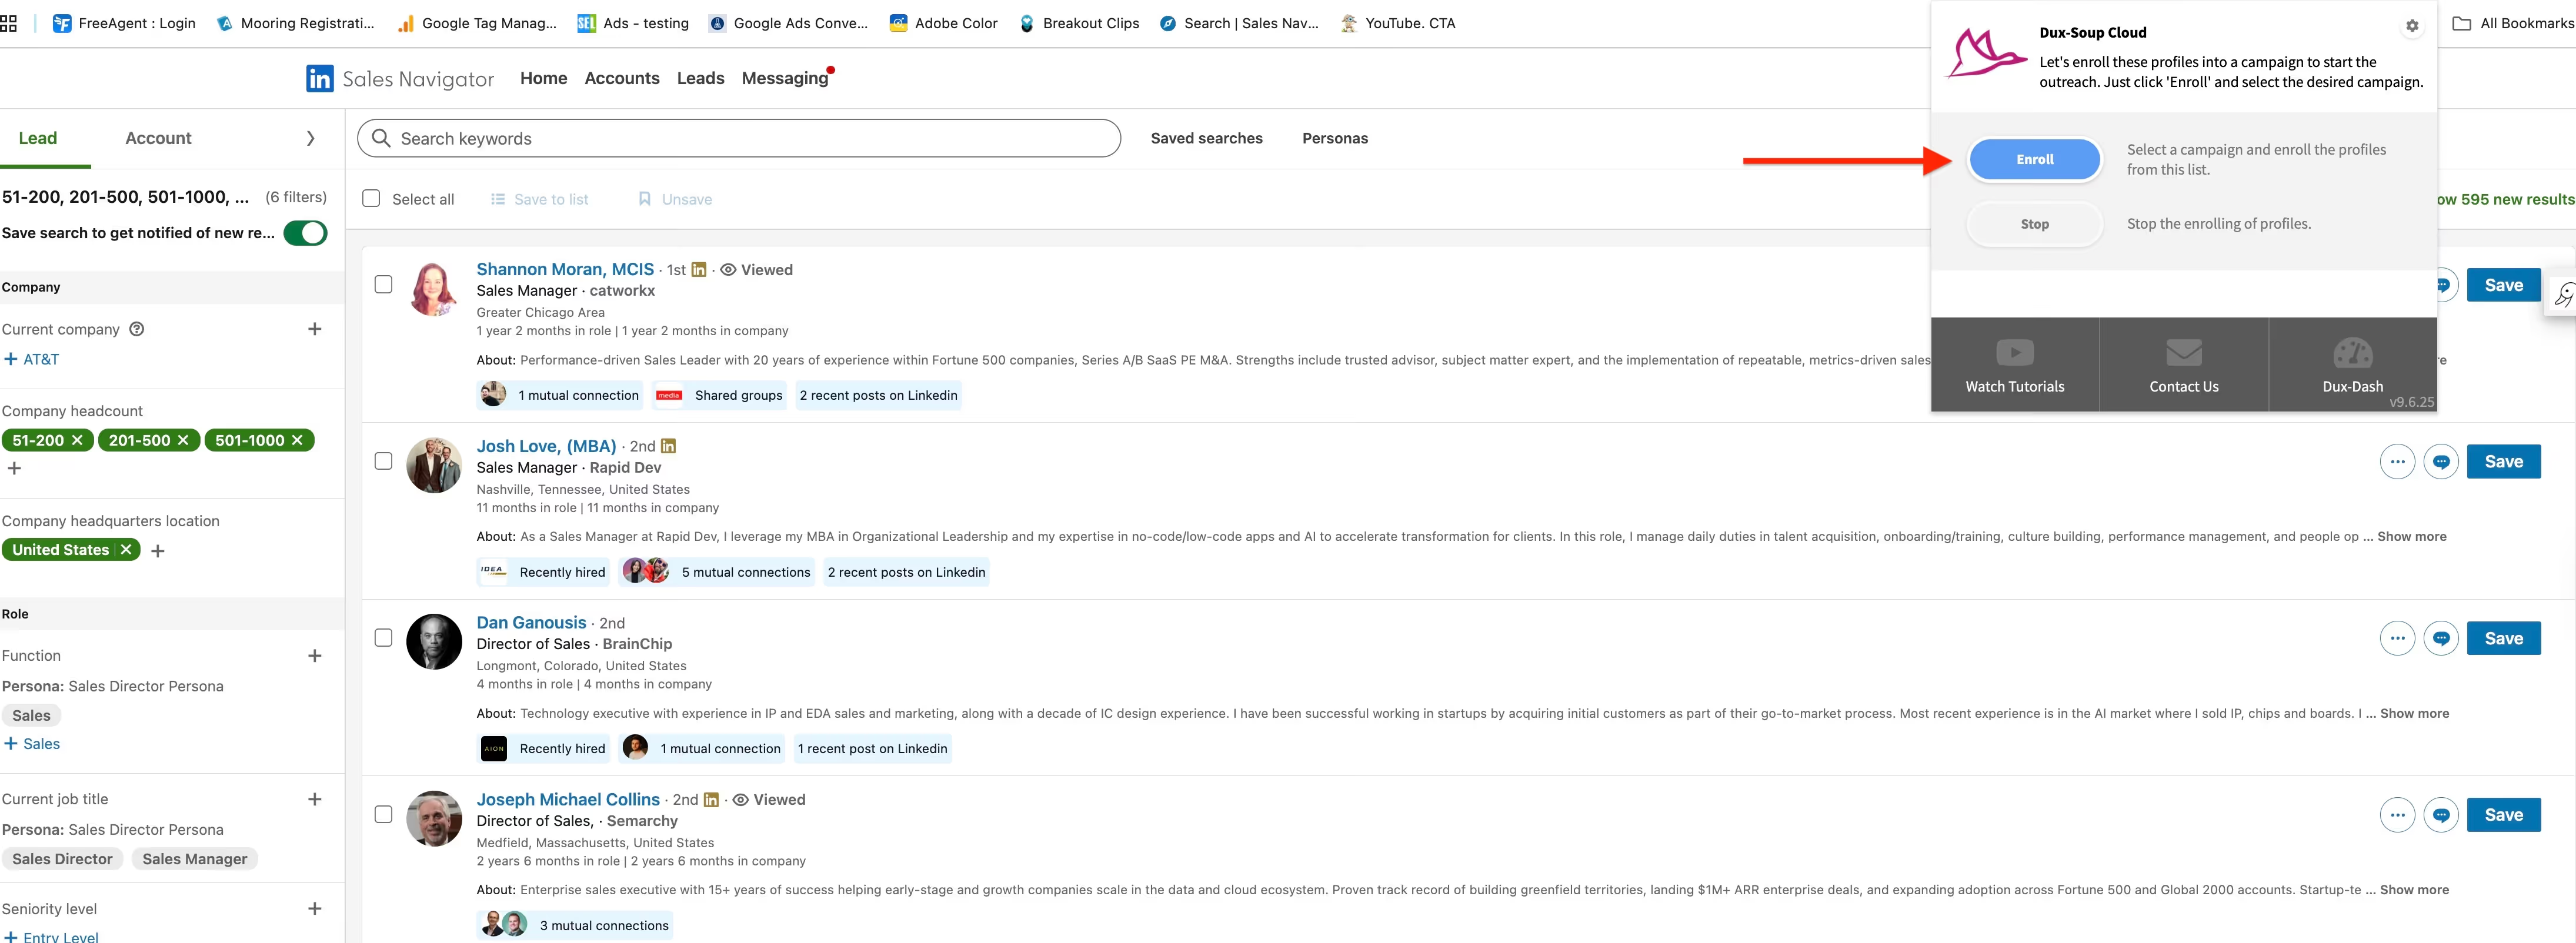
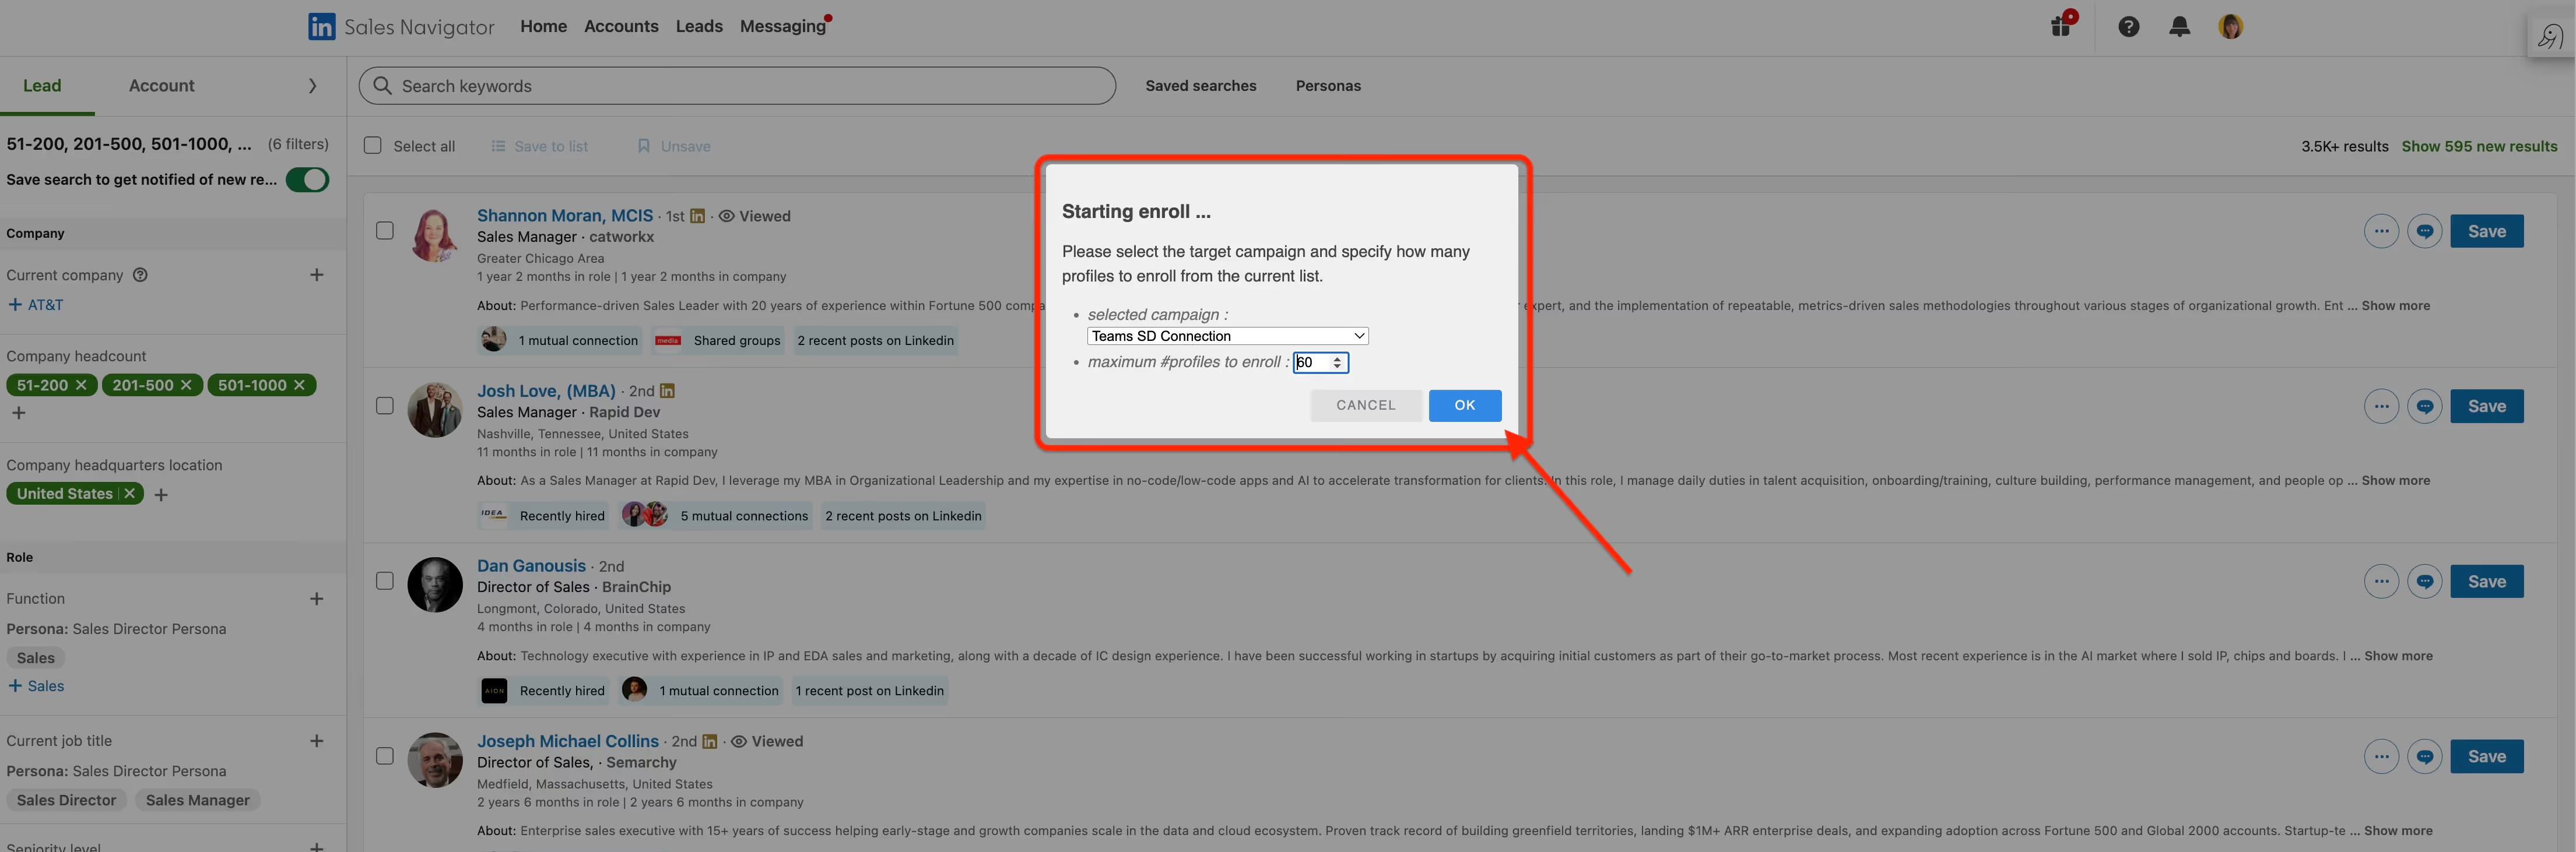
A box will pop up where you can choose your campaign - and the number of profiles to enroll. Then click 'OK'.
Dux-Soup will then get to work, automatically viewing profiles and sending personalized connection requests to your target LinkedIn list. Simple, eh?
Remember, the process is the same whether you're running a Free Trial, Turbo or Cloud license. If you're on Pro, follow this article instead.
Tip: If you set your campaign up with Sales Navigator as the target, source your list in Sales Navigator. The same with regular LinkedIn and Recruiter.
Enrolling from a csv file
If you have a csv file containing LinkedIn URLs, you can upload this file straight into the Dux-Dash to add the contacts to your campaign. Here's how:
- Go to the Funnel Flow section of the Dux-Dash
- Select the campaign you want to enroll into
- Click on the 'Enroll from file' button
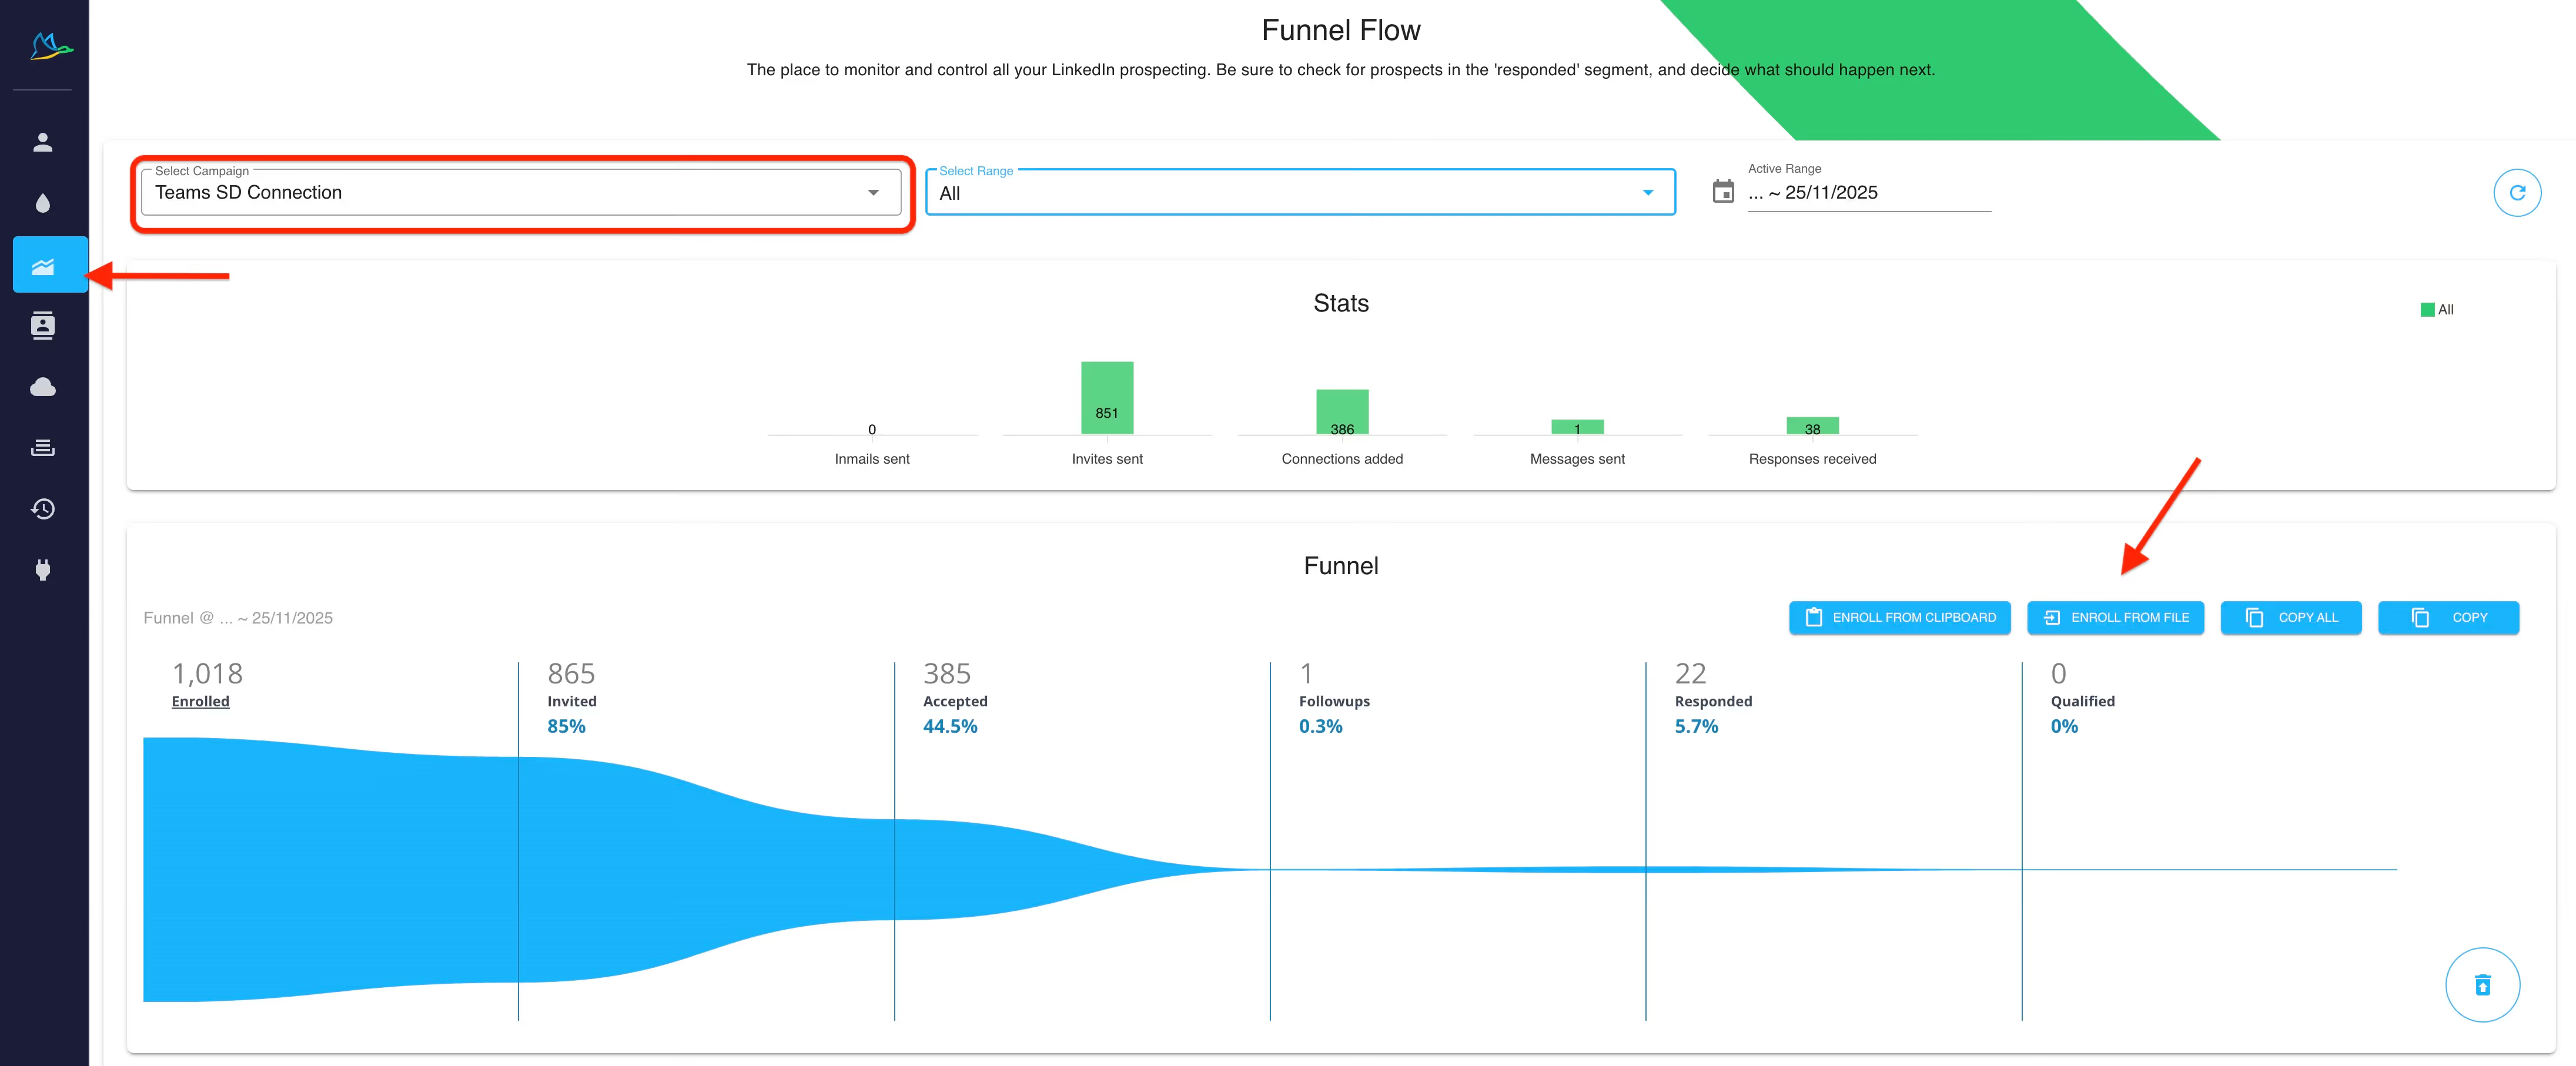
It's pretty straightforward. You can also Enroll from clipboard by clicking the button next to it.
Check out our support article: enrolling into Dux-Soup campaigns from file.
Enrolling from your CRM
With our 2-way CRM integrations, you can add profiles from your CRM system into your connection campaign. For example, in HubSpot you can pull up a list of contacts and batch enroll them using the Dux-Soup.
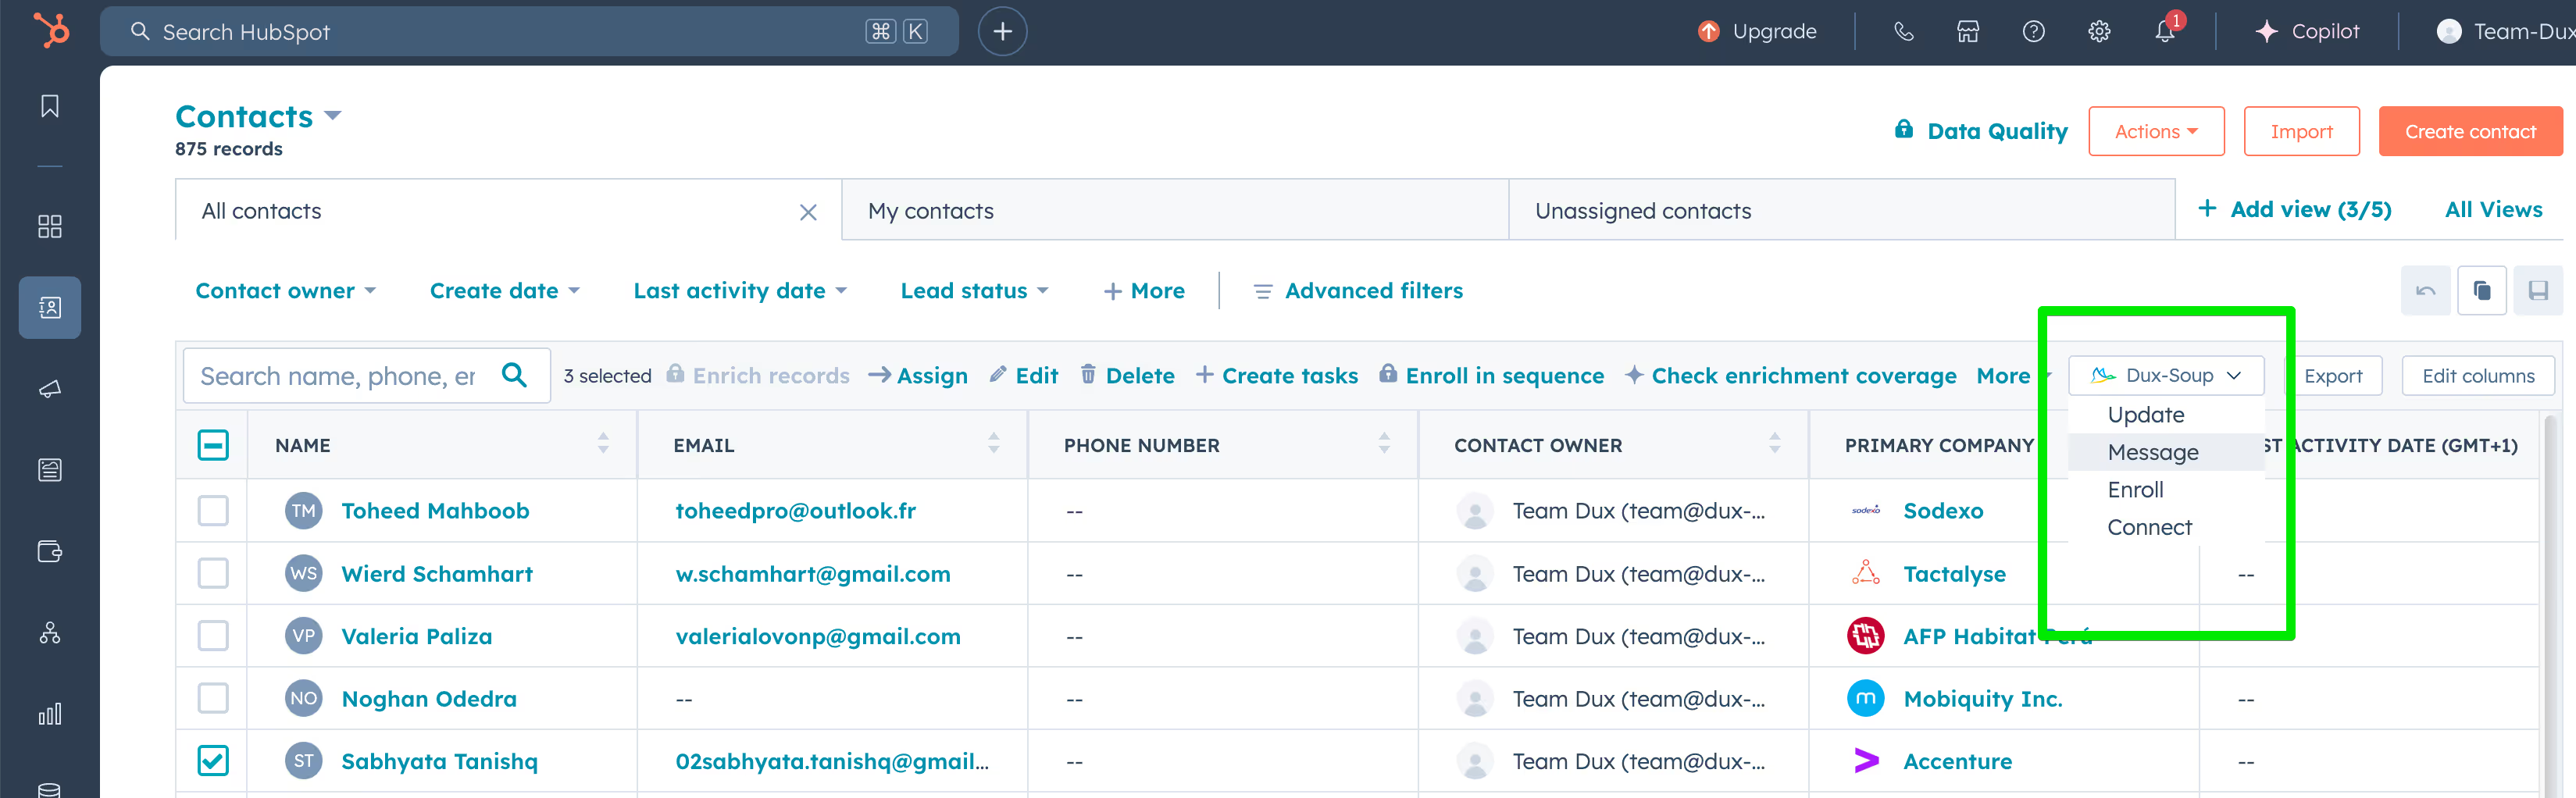
This also works for Salesforce, Pipedrive and other CRMs. You can check out our blog on connecting Dux-Soup to your CRM system for more information.
Step 3 - Measure and test acceptance rates
For ongoing improvement with your LinkedIn lead generation, you can monitor your acceptance rates and experiment with different strategies. The Funnel Flow will show you the acceptance rate.
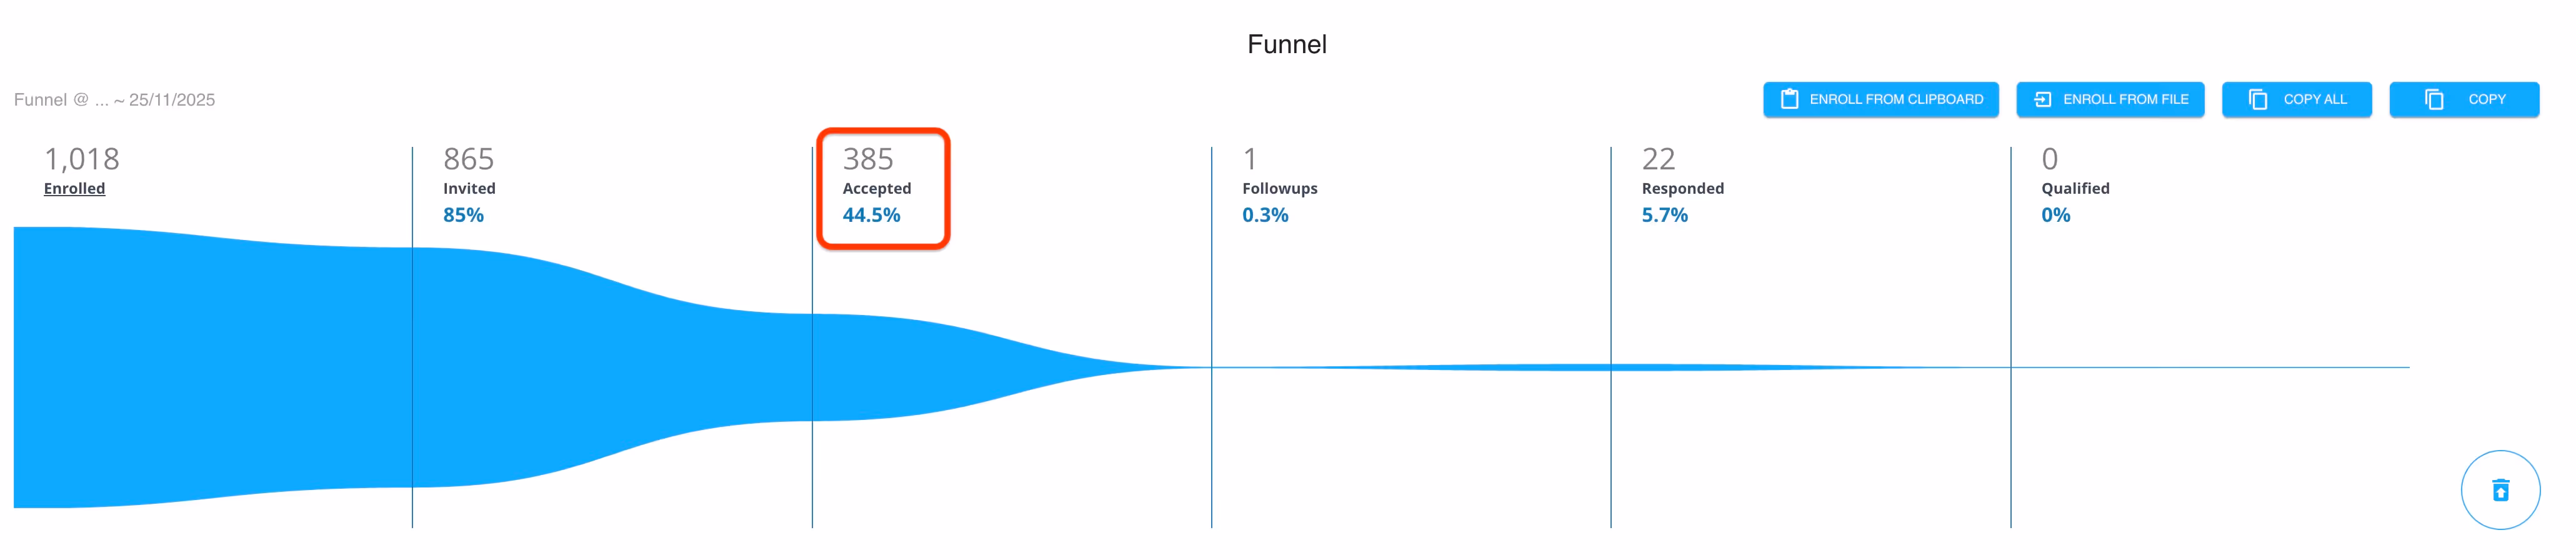
You can filter your funnel by campaign and date range, allowing you to see which message and which target audience gives the best acceptance rate. Over time, with some adjusting, you'll improve these results.
LinkedIn connection message personalization
One of the key challenges marketing experts identified in our B2B lead generation report was personalization. It’s been a buzzword for some time, and it remains a hot topic of debate.
Regardless of where you stand on the issue, at Dux-Soup, we take personalization seriously. That means giving you the choice: personalize your LinkedIn automation outreach messages - or don’t. It’s entirely up to you.
A personalized connection message can stand out from other connection requests. On testing various types of connection requests (blank, general, non-personalized) a connection message with a high degree of personalization and relevance has been found to have a higher acceptance rate.
Remember that you only have 300 characters, which need to include any personalized fields, so leave some extra characters free for long names. The more relevant you can make your connection message to your prospect, the better your results will be. We've heard of connection acceptance rates as high as 70-80 percent. A tip here on making your personalized message look bespoke is to give the impression that you have actually checked the person’s profile before asking to connect.
LinkedIn has a stringent policy when it comes to connecting with people. If a person keeps ignoring your request or, even worse, they keep ticking the option “I don’t know this person”, it could cause your LinkedIn account to get temporarily suspended. Therefore, personalization is key.
Let’s review Dux-Soup's personalization markers:
_FN_ will be replaced by the profile’s first name
_MN_ will be replaced by the profile's middle name
_LN_ will be replaced by the profile’s last name
_TI_ will be replaced by the profile’s job role
_CN_ will be replaced by the profile’s current company name
_LO_ will be replaced by the profile’s location
_IN_ will be replaced by the profile’s industry
_(<expr>)_ will be replaced with the value of the evaluated JavaScript expression
A few important points about using these markers:
- Each marker must have an underscore on both sides to work correctly. If you include any spaces, the marker will not function. For example:
- _FN_ = correct
- _ FN_ = incorrect (a space before FN)
- _FN = incorrect (the closing underscore is missing)
- The markers are case-sensitive, so they must be typed in capital letters.
- You cannot manually choose the name, company name, location, etc. to insert into your message. Dux-Soup automatically pulls this information from the profile.
These markers are especially useful when creating your connection requests, and you can be very creative with them. For inspiration on how to personalize your messages, take a look at the examples below:
Example 1:
Hi _FN_,
I hope you are well. I saw we have similar interests and thought it would be great to connect to share ideas as we work in the same field.
Regards,
(your name)
Example 2:
Hi _FN_,
I hope you are well. I’m a Marketing Manager at Dux-Soup and write blog posts about growth hacking. It would be great to connect so that I could keep up with your posts at _CN_.
Best,
(Your name)
Example 3:
Hi _FN_,
I hope you're well. I am looking to connect with people in the _IN_ industry to swap ideas and came across your profile. I’m a big fan of _CN_ and would love to connect!
Best regards,
(Your name)
Example 4:
Hi _FN_,
I hope you are well. I see that you’re a _TI_ at _CN_ in _LO_ and I work in the same field as you. I thought it would be great to exchange connections and keep up with your posts!
Thanks,
(Your name)
To see what your connection message looks like once it has been sent, you can check it by going to your LinkedIn account and clicking on 'My Network'. Then, click “Manage all” and “Sent” to see all the messages that you have sent to people.
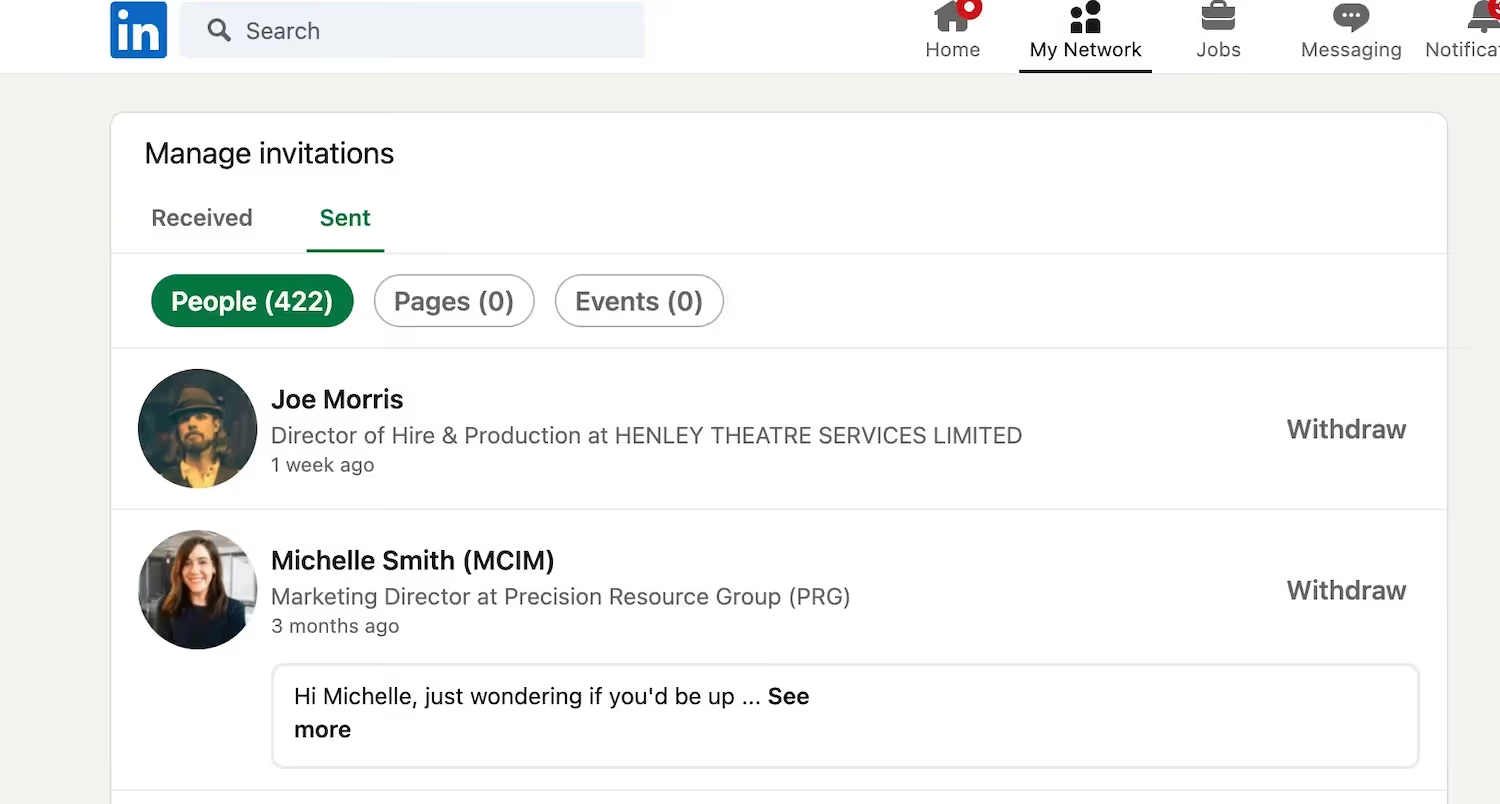
If you notice that you’ve made a mistake in the connection message or the spacing is wrong, you can quickly press “Withdraw”.
For more LinkedIn connection message tips, read "How to write connection messages that get results".
Here are some tips on increasing your LinkedIn connection acceptance rates.
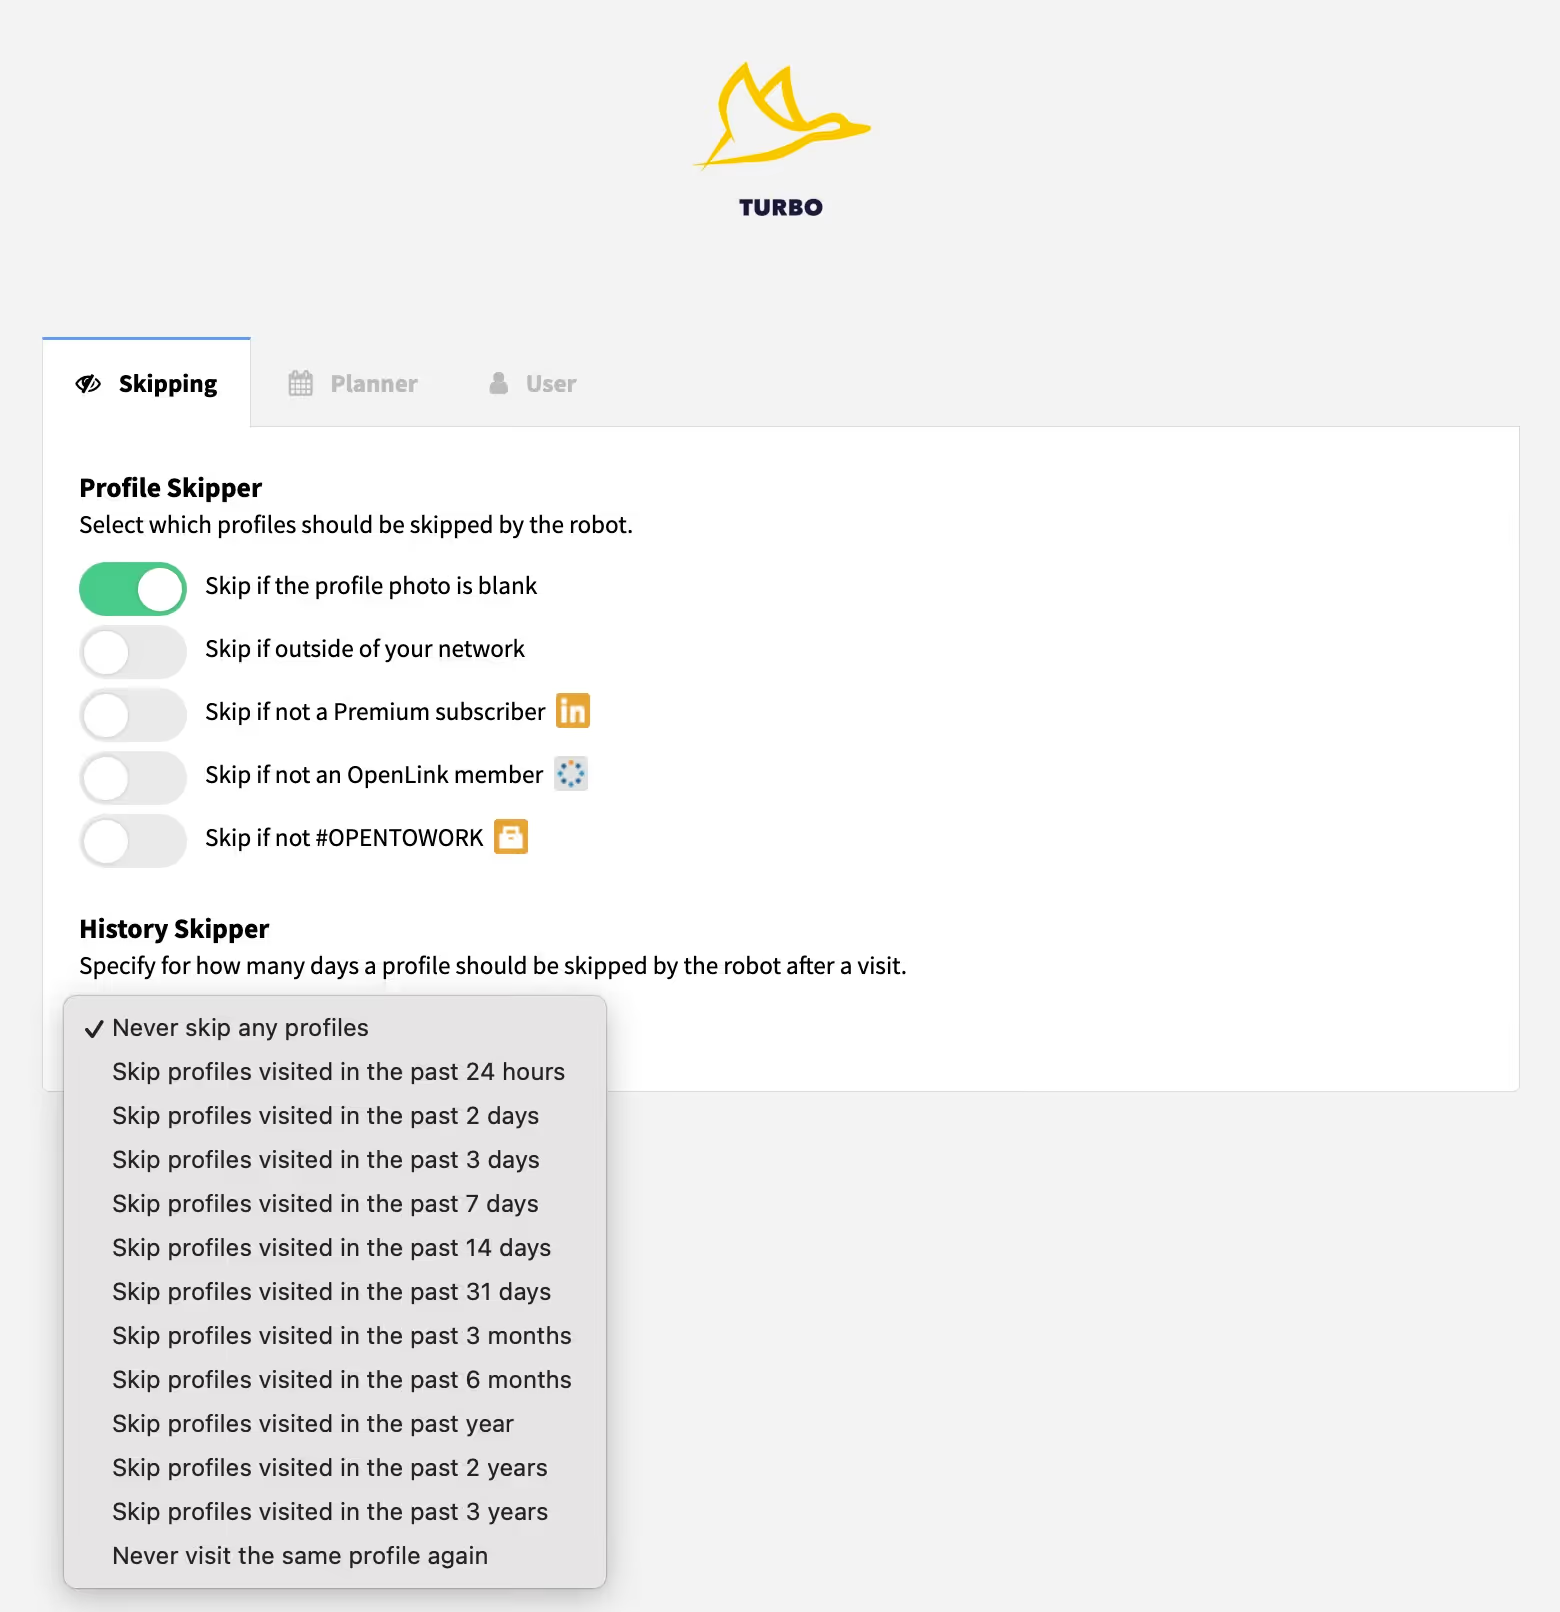
Skipping profiles
When sending automated connection invitations, there may be profiles that you wish to skip. For example, skipping profiles that have a blank profile photo, that are tagged, or that you have visited within the previous 31 days. These can be configured in the 'skipping' tab of your extension.
And that's a wrap. We hope this post provided value and sparked new ideas for automating connection invitations and personalizing your LinkedIn messages with Dux-Soup to grow your network and uncover more leads.
If you have any questions or would like to know more about how to use Dux-Soup, please just get in touch via live chat on our site or email us at info@dux-soup.com and we’d be happy to help!


