

Dux-Soup’s Agency Plan makes managing LinkedIn automation across multiple accounts simple, secure, and highly effective.
Our advanced agency features, combined with our 10-year safety track record and top-rate customer services, are why so many companies and agencies rely on it to power their outreach:
- Enjoy industry-leading safety, backed by 5 protection features and our advanced Cloud platform – the safest LinkedIn automation tool available
- Automate without limits – run unlimited campaigns and enroll as many contacts as you need, across unlimited LinkedIn accounts
- Save time following up on responses and ensure you never miss a reply again with a single unified inbox
- Stay in control with instant visibility into every client’s account status
- Get deeper insights by analyzing performance data across clients, campaigns, and date ranges
- Integrate effortlessly into your workflows using our native 2-way integrations, or connect via Zapier or Make
- Export data instantly with a single click for smooth reporting and sharing
With Dux-Soup, you can manage your organization’s LinkedIn automation from a single centralized Dashboard, giving your agents a 360-degree viewpoint and control centre where they can:
- Add, manage, and remove LinkedIn accounts
- Create campaigns
- View campaign results
- View activity log and queued activity
- Connect to third-party apps
- Export data
It’s ideal for lead generation agencies that want simplicity and ease of client management, or companies with lead generation professionals managing colleagues’ LinkedIn lead generation on their behalf!
Let’s show you around our Agency Dashboard and help you to get started!
Pricing built for Agency flexibility
A Cloud Agency license includes 5 seats.
A seat is a LinkedIn account on which you are running Dux-Soup automation. Admins can add and remove seats from your Agency Dashboard instantaneously in the ‘Sessions’ section of your Dashboard.
There is no limit to the number of seats you can add. Your monthly bill will automatically adjust based on the number of seats you have, with additional seats being billed daily. This allows more flexible pricing for cancellations partway through the month.
Admins (with a crown next to their name) do not need a seat. You can add unlimited admins to your Agency plan, without having to purchase a license for them.
How to get started
Step 1: Purchase a Cloud Agency License
Step 2: Install the Dux-Soup extension and pin it
Every Agency seat should install the Dux-Soup extension. Admins can provide them with a License Key to enter in the Dux-Soup profile page to activate their seat.
Let’s understand the roles when using the Cloud Agency dashboard:
- Admin ->The owner of the Dux-Soup plan and any additional admins the owner decides to add.
Capabilities:
- Access and change other admin settings and campaigns
- Create or delete Cloud users (sessions)
- Switch between client sessions and manage them
- Cloud User ->The client sessions created by the Cloud Admin.
- These are individual LinkedIn accounts managed by Cloud Admins. Each LinkedIn account has its own session.
- OR users can also activate the license key on their own in custom scenarios (see the custom scenarios section)
- Admins can also be users if they activate the license key on their account, meaning one seat will be used for their profile.
How your plan will look once you purchase it
If you are an Admin, your Dux-Soup account will be on the free version.
Until you add client accounts, your Agency Dashboard will be empty.
Now as an admin, you can add:
1. Sessions - these are LinkedIn accounts that you wish to run Dux-Soup automation on. Sessions are paid seats.
2. More Admins - you can add as many Admins as you like, by contacting support on info@dux-soup.com. Admins are unpaid (they don’t count as a seat), as they only manage Sessions. You can’t run Dux-Soup automation on their profile unless they are also added as a Session.
What you need to know about Admins
- Admins have control over the number of Dux-Soup seats at their Agency. Seats can be added or removed from the ‘Sessions’ tab in the Dux-Dash.
- Additional Admins can be added upon request via info@dux-soup.com. Admins will need to install Dux-Soup in order to provide support with their email and User ID.
- All Admins will have access to each other's accounts and all client accounts.
- Adding a client (Session) does not transfer the previous Dux-Soup history from a different user or Admin. To transfer data, contact support at info@dux-soup.com.
With this information, it’s now time to decide how many admins you need (or just start with one, yourself) and how you intend to manage your clients.
Filtering by Session
You can use the ‘Select Session’ filter at the top left of your Dashboard to quickly filter by Session. A crown next to the name indicates it is an Admin.
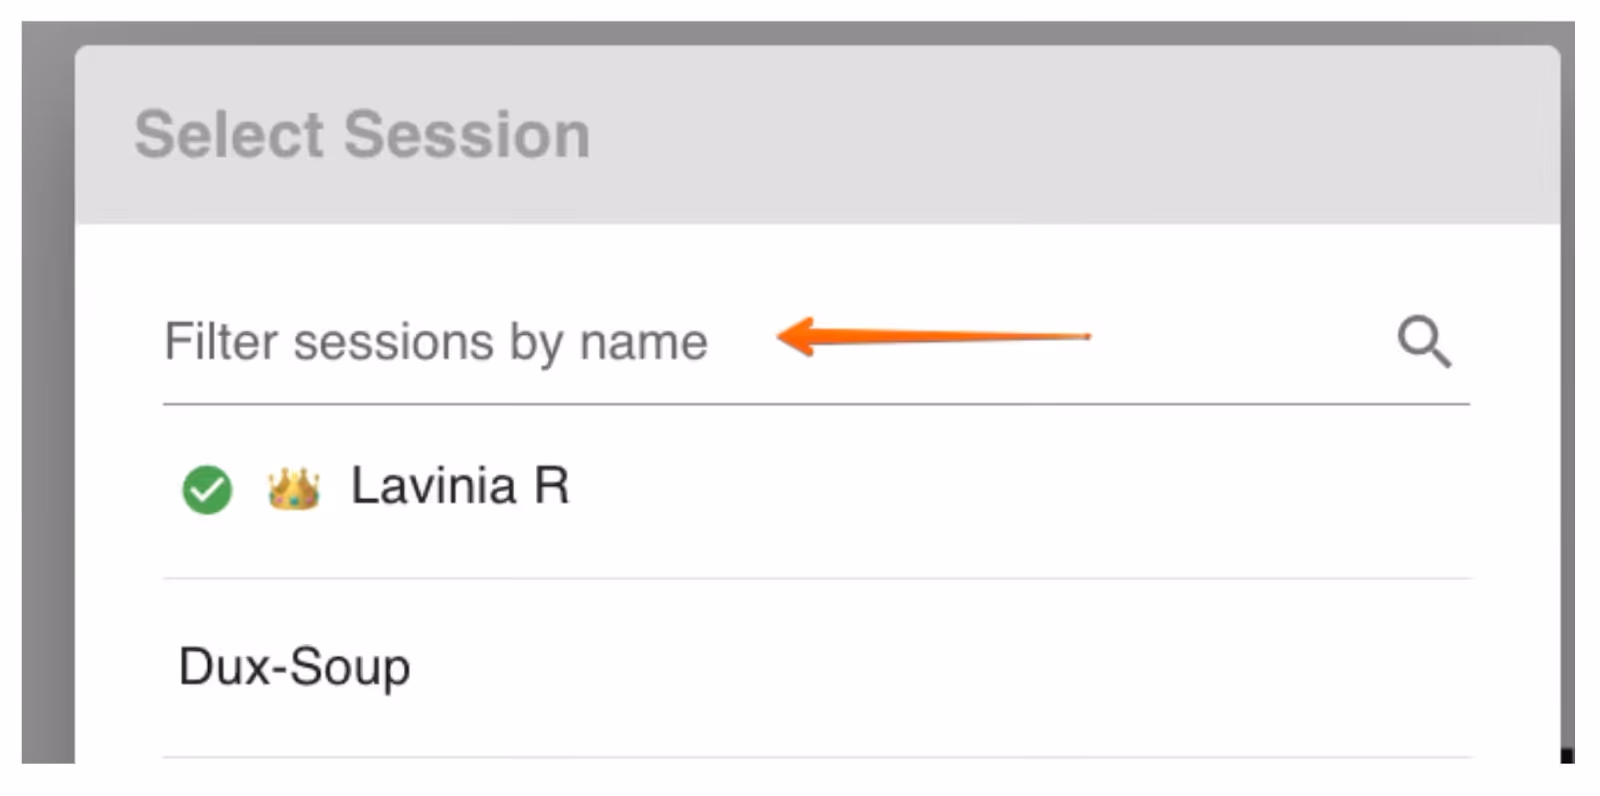
This is useful if your team distributes the management of client sessions across multiple admins, and you need to review a specific session.
Note: Your entire Dashboard will display the statistics of only the Session/s that you choose.
By choosing a session(or more) from this menu, you’ll gain full visibility into all related insights, including KPIs, Funnel performance, Drip Campaigns, Queued Activity, Activity Log (history), Contacts, and Export to CSV options.
Each of these sections automatically updates based on the session filter you apply, ensuring you’re always viewing the most relevant information.
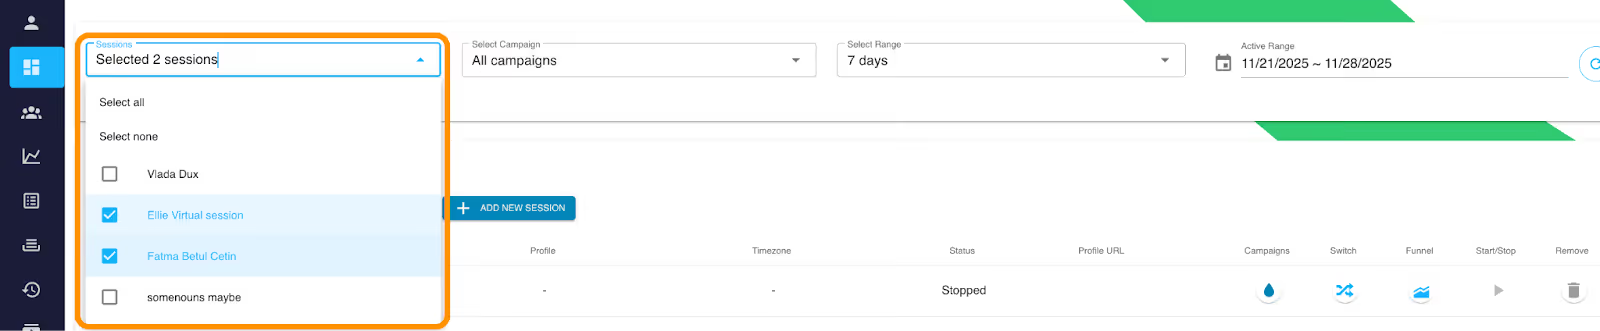
If you’ve selected multiple sessions, you can also use the Session Filter to search and filter sessions by name.

Agency set-up
Adding a new client
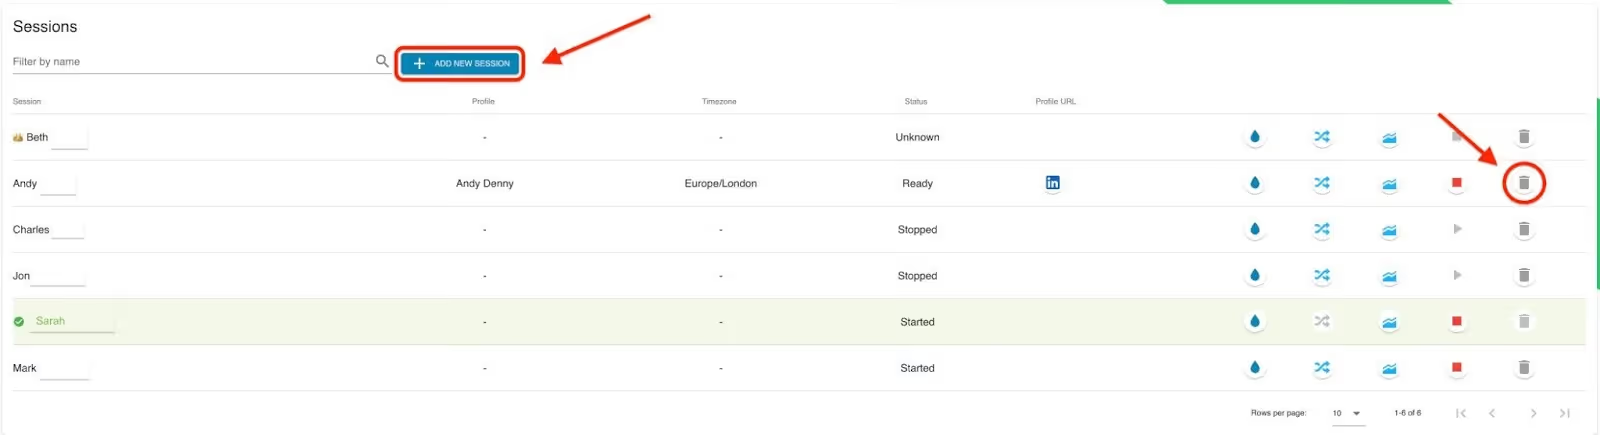
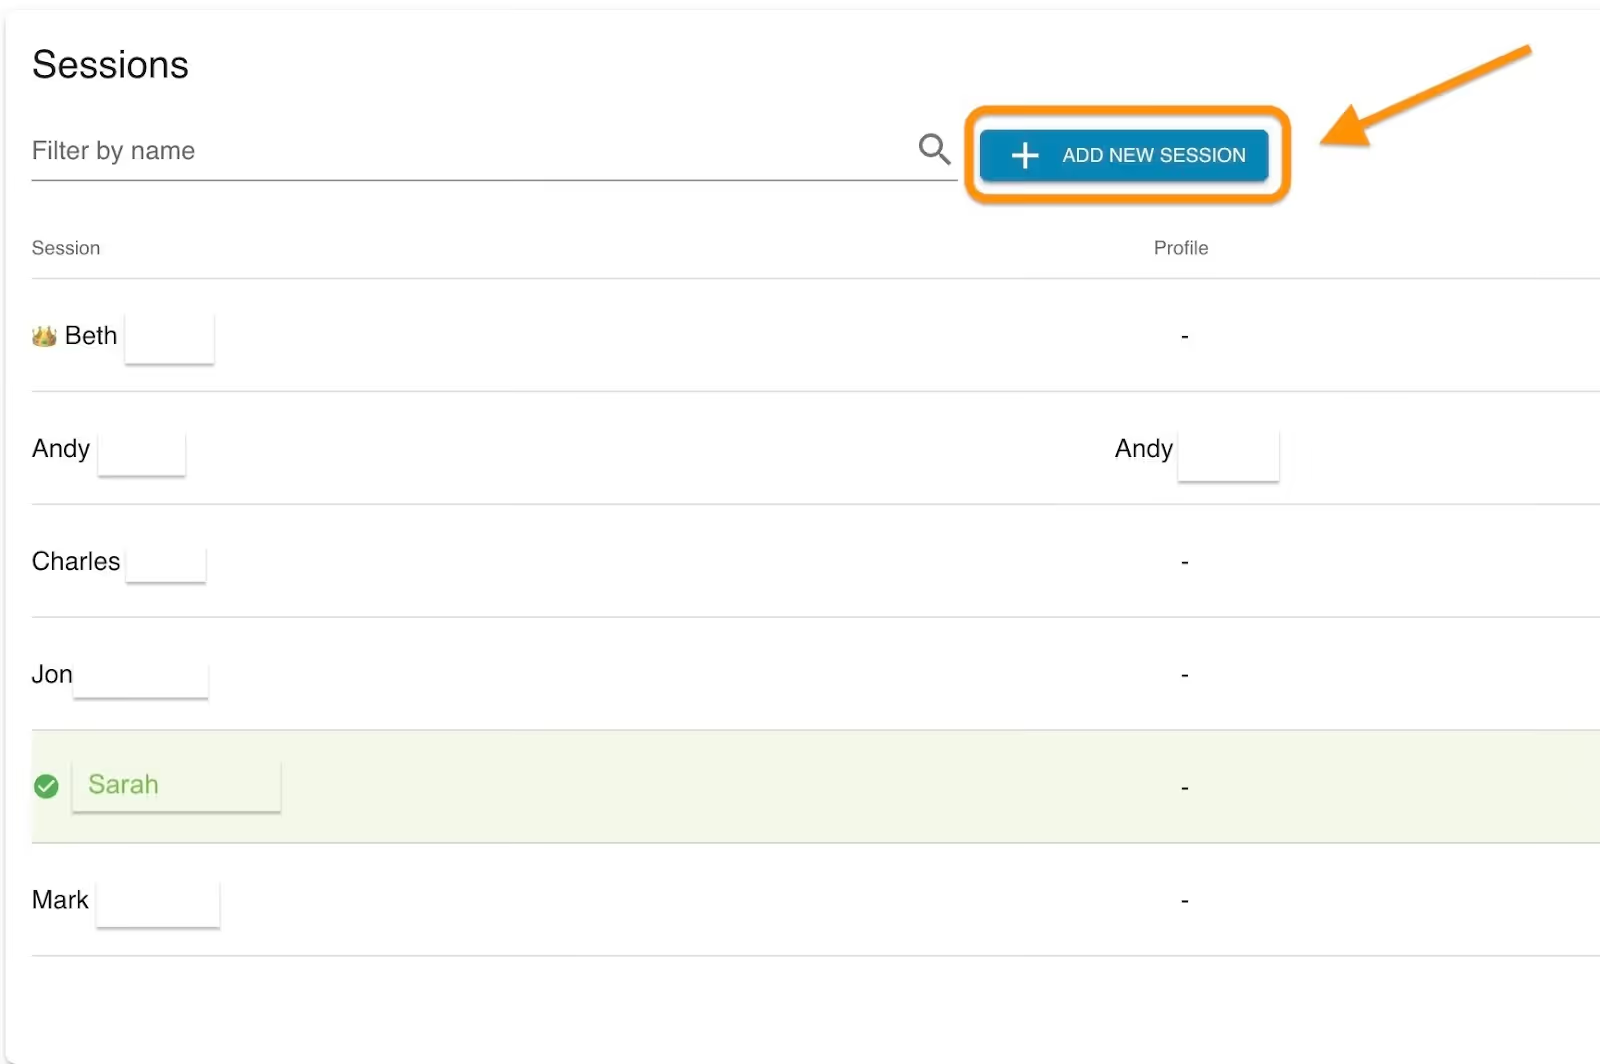
Admins can add new client accounts. Go to the ‘Sessions’ section in your Dux-Dash.
To add clients, click ‘Add new session’ and hit ‘Continue’. The license key is automatically added, so you only need to add your Client information.
If you have multiple clients and Admins, to distinguish easily between them, you can use these fields as identifiers:
- First Name
- Last Name
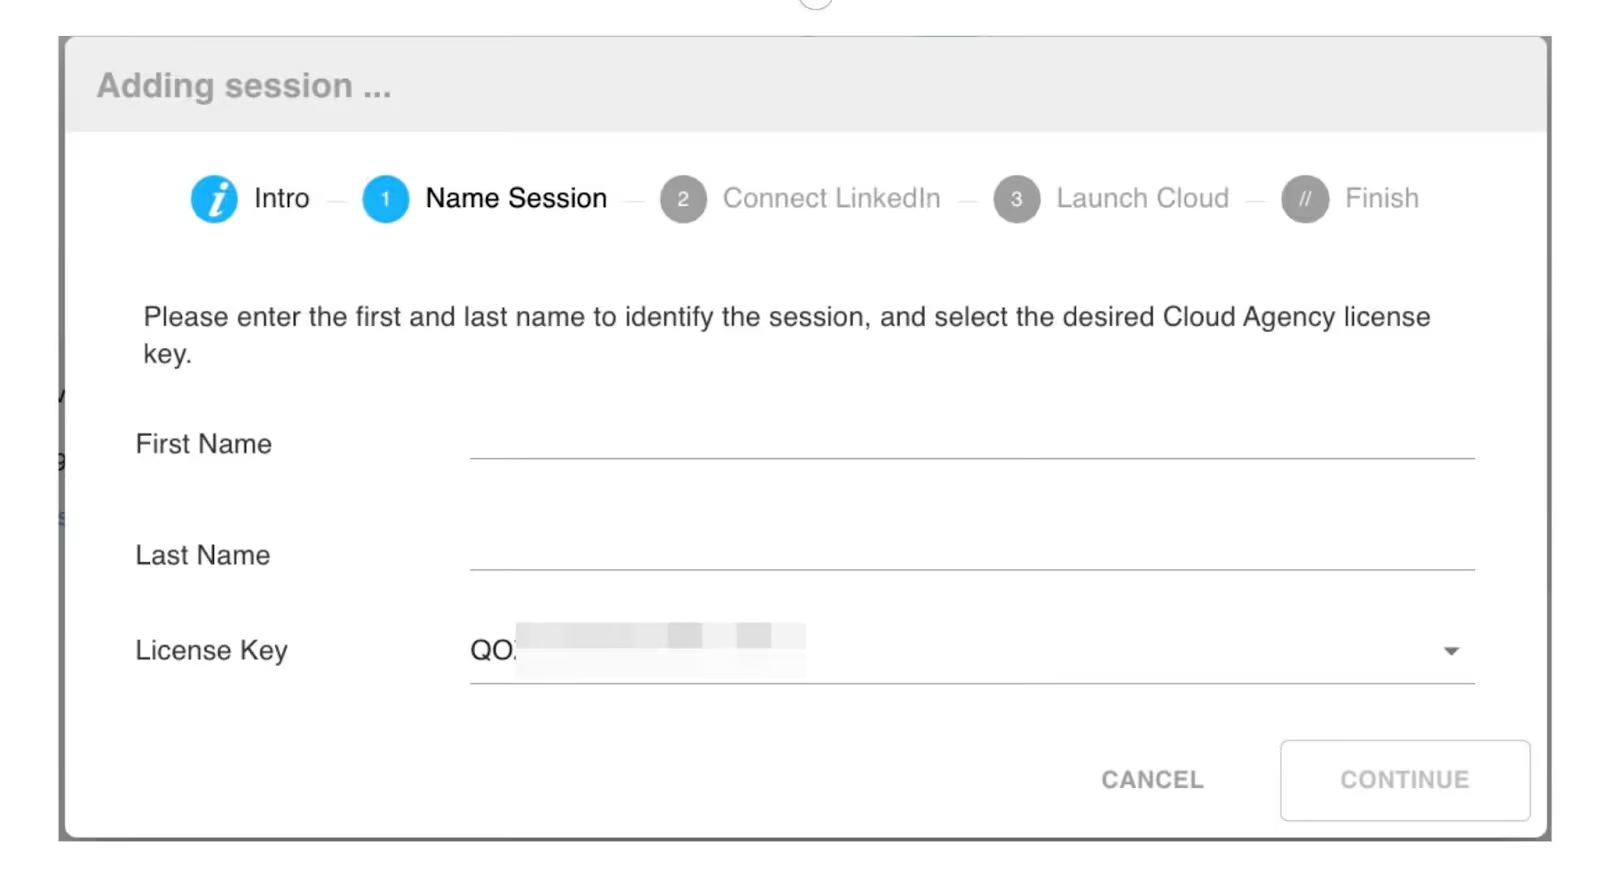
For the third step, you need to have your client’s LinkedIn login details ready, so follow the steps in the pop-up box to connect their LinkedIn account.
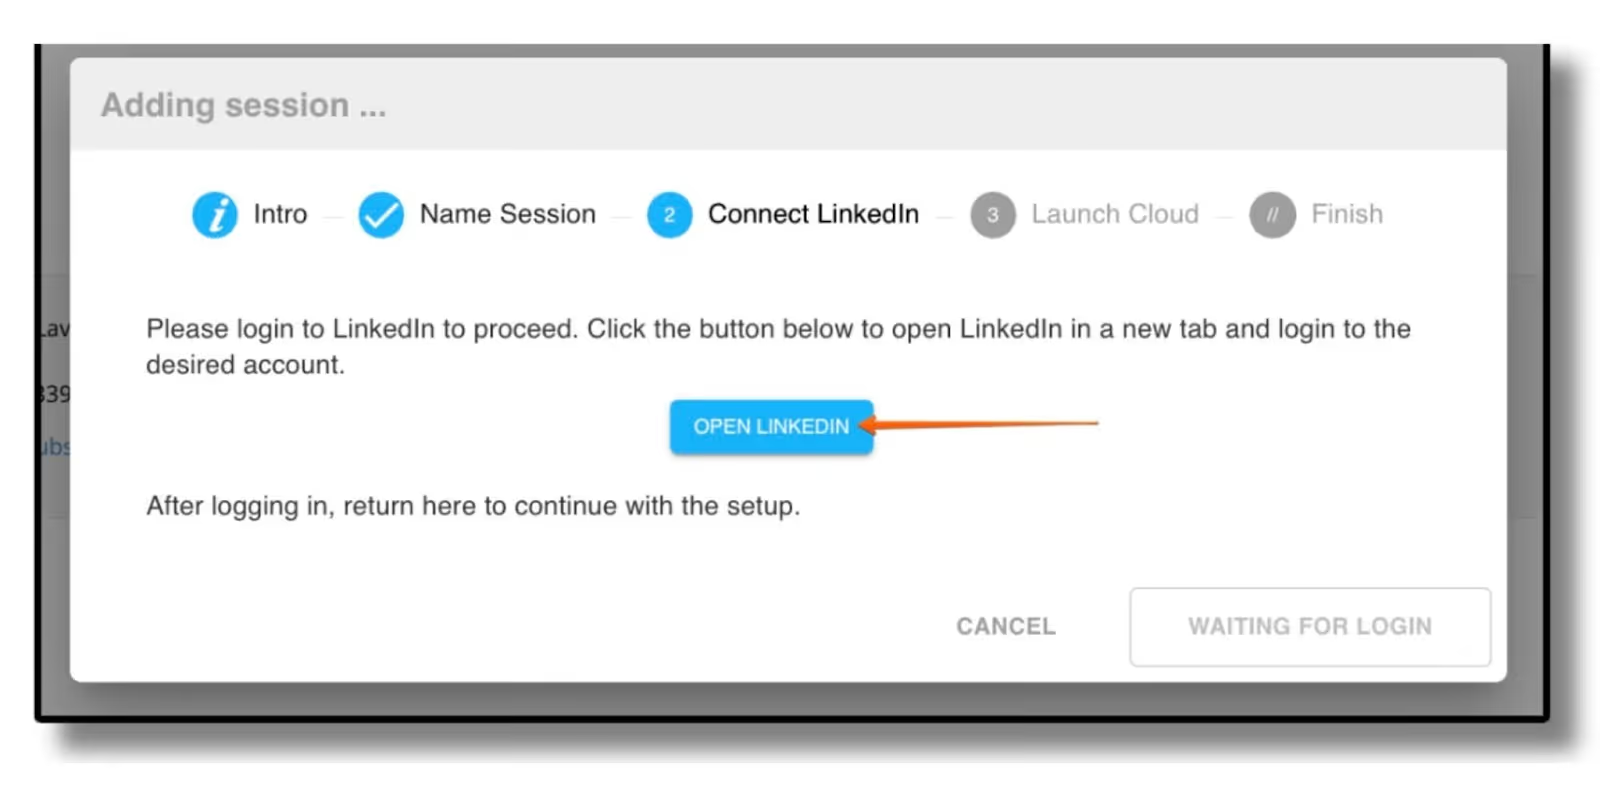
For the initial login on LinkedIn, you should complete Two-Factor authentication before starting the session.
Note: If the Two-Factor authenticator is enabled, this is a one-time process.
You will see the Session appear in the ‘Session’ section of your Dash, meaning that it is ready to run automation.
Afterwards, the session will appear in your Sessions panel.
Your first Cloud session is now ready, congrats!
Session Status
You can monitor the status of each Session in your Agency Dash. This allows you to determine whether Dux-Soup is running or has stopped against each Session.
It’s important to understand the different session statuses you may encounter:
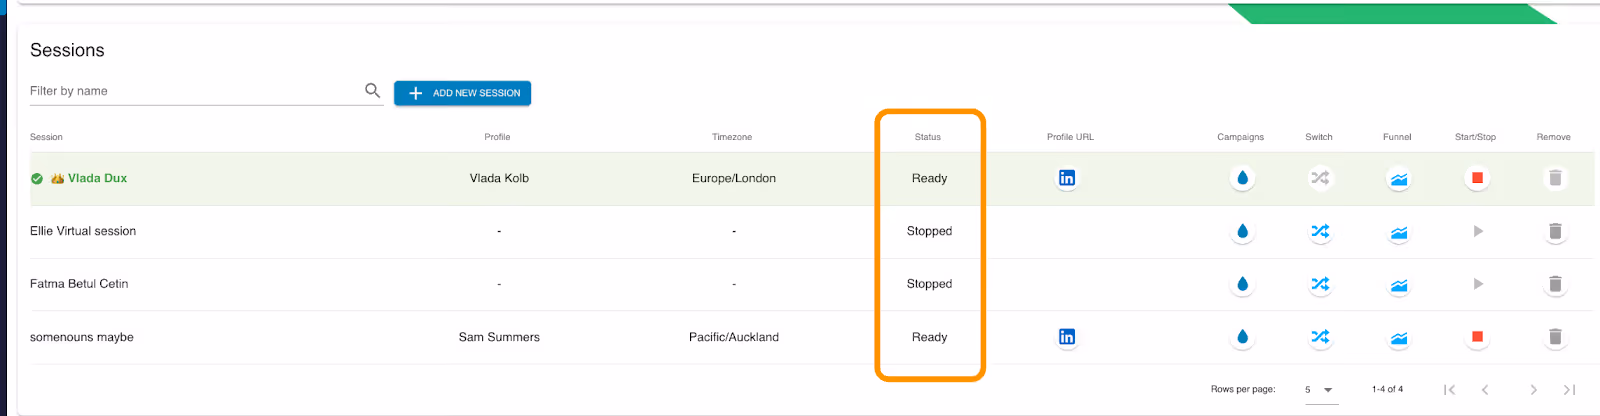
Starting / Started – These statuses indicate that your cloud session is in the process of launching. Typically, they occur within 30–60 seconds of each other. During this time, automation is not yet running, even if activities are queued. This status appears right after you click the button to start the session.
Ready – The session is fully active, and automation is running according to your Planner settings and daily limits. This status appears shortly after the session starts, usually within 1–2 minutes.
Stopped – The session is no longer running. LinkedIn may require you to re-login and generate new credentials. When this happens, you must manually restart the session. In most cases, the system automatically attempts to restart sessions. However, if LinkedIn requires new login credentials, the automation will pause until you manually restart it.
You can stop a Session or start it from here in your Agency Dash, providing instant visibility and control over the status of your Sessions.
Switching seamlessly between clients
Once you have added more Sessions to your dashboard, you can switch between Sessions in the Agency Dash, allowing you to change which account you are managing.
In the ‘Sessions’ section, you’ll see the current account you are managing highlighted in green. Click on the switch icon next to the name of the Session you want to use.
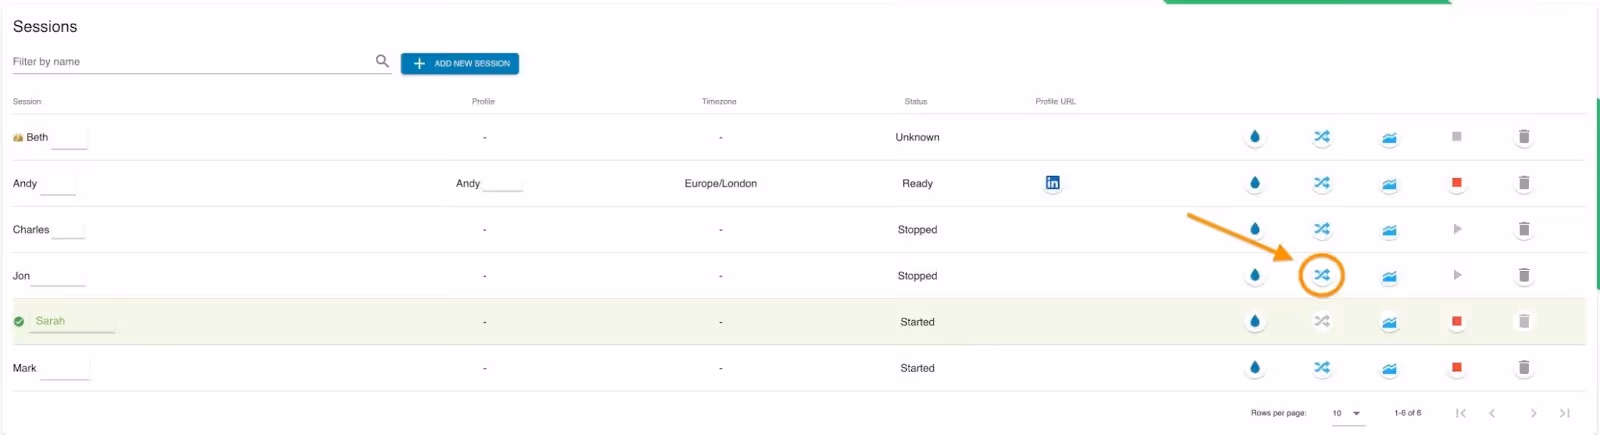
Dux-Soup will automatically open a LinkedIn tab for the Session you wish to switch to and log in. If LinkedIn required you to enter a password, type it in for the Cloud Session to start.
Important: The LinkedIn tabs will be restored to the previous position when the session was last active. This allows you to pick up where you left off without needing to repeat the authentication process.
Removing a client
To remove a client account, go to the trash bin icon next to their name. That account will be removed, and the cloud session shut down.

Managing LinkedIn Sessions from the Agency Dash
All Dux-Soup Agency Admins should switch LinkedIn sessions from the Dash rather than manually logging into different LinkedIn accounts. This approach helps to prevent potential failures in Dux-Soup actions.
For example, if you need to reply to messages on a certain profile, make sure you don’t log out of LinkedIn from the current session you are on to log into the other profile. This stops the current cloud session, and you will need to restart the Cloud session.
Your Admins should always switch Sessions in the Dash to modify drip campaigns, change Throttling settings, or Planner settings.
Custom scenarios
If you have a team of two managing your Agency plan and both of you also want to use Dux-Soup on your own profiles, you’ll each need to activate the license key on your accounts, occupying two seats.
Since you’re both Admins (the second Admin must be added by emailing our support team on info@dux-soup.com), you’ll have access to each other’s sessions. Either of you can add additional sessions, and both will be able to manage them.
Of course, this scenario also applies to multiple Admins who want to be users.
Similarly, if you have a client who also wants access to Dux-Soup and campaigns, they just need to install the extension and activate your cloud license key. They will only have access to their own session as a regular Cloud user.
Mistakes happen - especially when dealing with tech! But don’t worry, almost everything can be fixed or retrieved, whether it’s accidentally deleting an active session, removing a campaign, or activating the key on the wrong account. Just reach out to our support team on info@dux-soup.com, and we’ll be happy to help!
Analyzing and measuring results
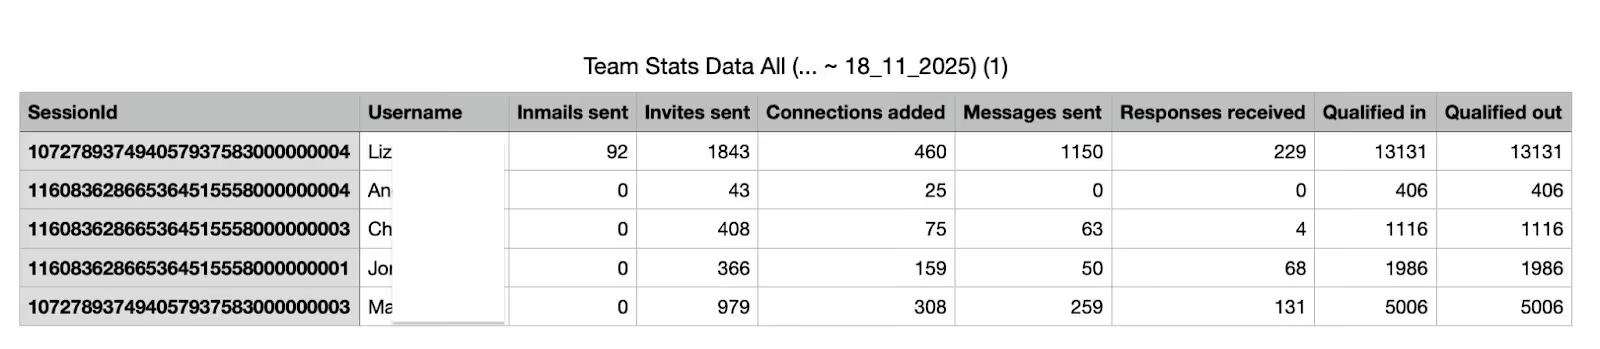
The KPIs section of the Agency Dash
All admins have access to the KPIs view, where you can review detailed campaign statistics and analyze each stage of your pipeline across all Campaigns and Sessions.
It’s everything an Agency needs to identify which campaigns are performing best and delivering the strongest results for clients. It’s the central place to evaluate performance at both the Agency level and by drilling down into specific Sessions, Campaigns, or Date Ranges.

For the management team and client account managers, it’s easy to see what’s working, compare campaign successes, and understand conversion rates at a glance.
Remember: your Session filter at the top determines what data your entire Dashboard displays.
Unified Inbox
Our Agency plan provides a single Unified Inbox, which collates all messages received by all of the LinkedIn Sessions you have added to your Agency Dash. You can filter your inbox using the master filters at the top of your Dashboard - by Session, Campaign, and Date Range.
Click on the down arrow next to a contact to view the message history.
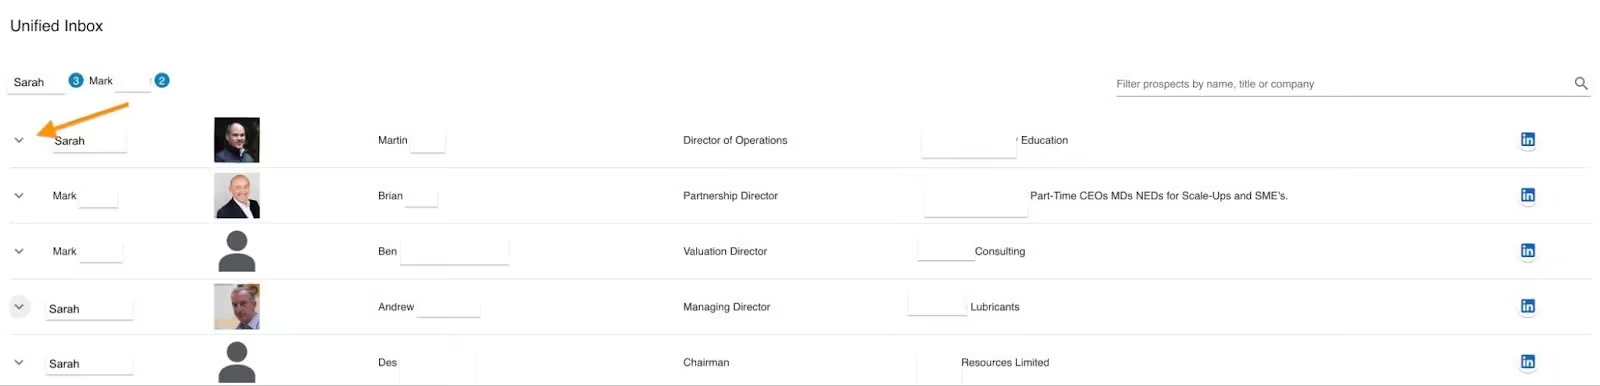
From here, you can take action. Choose to continue them in the campaign (Dux-Soup will automatically pause campaign progress once a prospect responds), message the prospect, qualify them in/out, switch them into a different campaign, or unenroll them.

With our Unified Inbox, you’ll never miss a response again, and save time following up on your leads - allowing you to close more deals, faster.
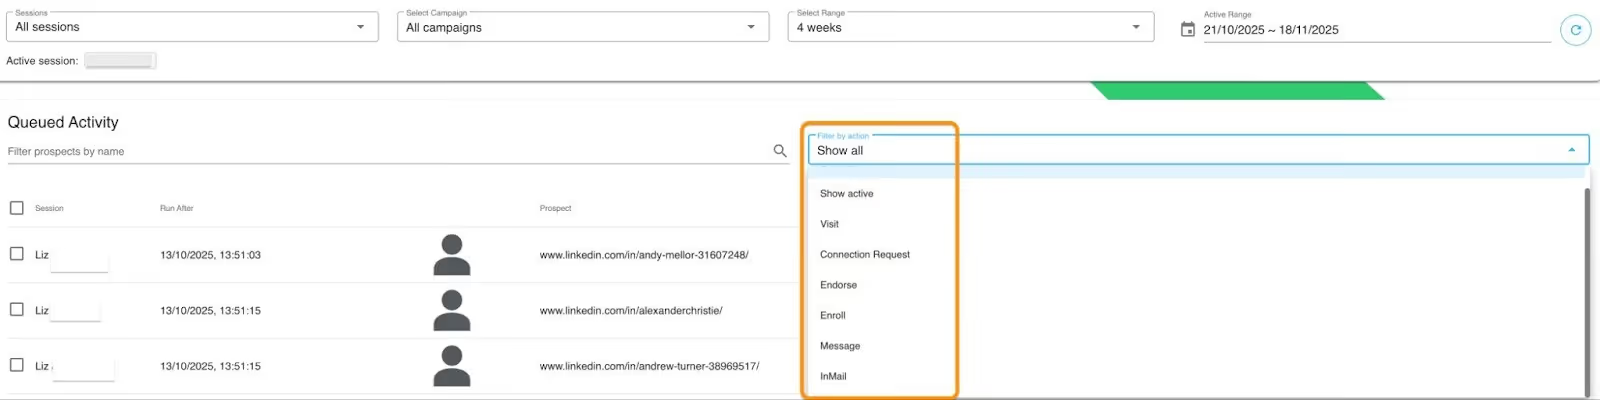
Queued Activity & Activity Log
You may want to see what activities are waiting for Dux-Soup to execute, or check what activity has taken place. You can do this under our Queued Activity and Activity Log sections of the Agency Dash.

Don’t forget you can filter here too - using your master filters at the top, and also using additional filters located just within this section:
- Filter by prospect name, allowing you to take action against specific contacts
- Filter by action - including Visit, Connection request, Endorse, Enroll, Message, and InMail
You can select contacts and remove them from the Activity Queue:

And select contact and re-run activities in your Activity Log:

Contacts database
Your ‘Contacts’ section is a database of all the contacts Dux-Soup has visited or performed an action against.
You can use your master filters here to filter your contacts by Session, Campaign, and Date Range. Plus, you have additional filters:
- Filter by Degree Connection
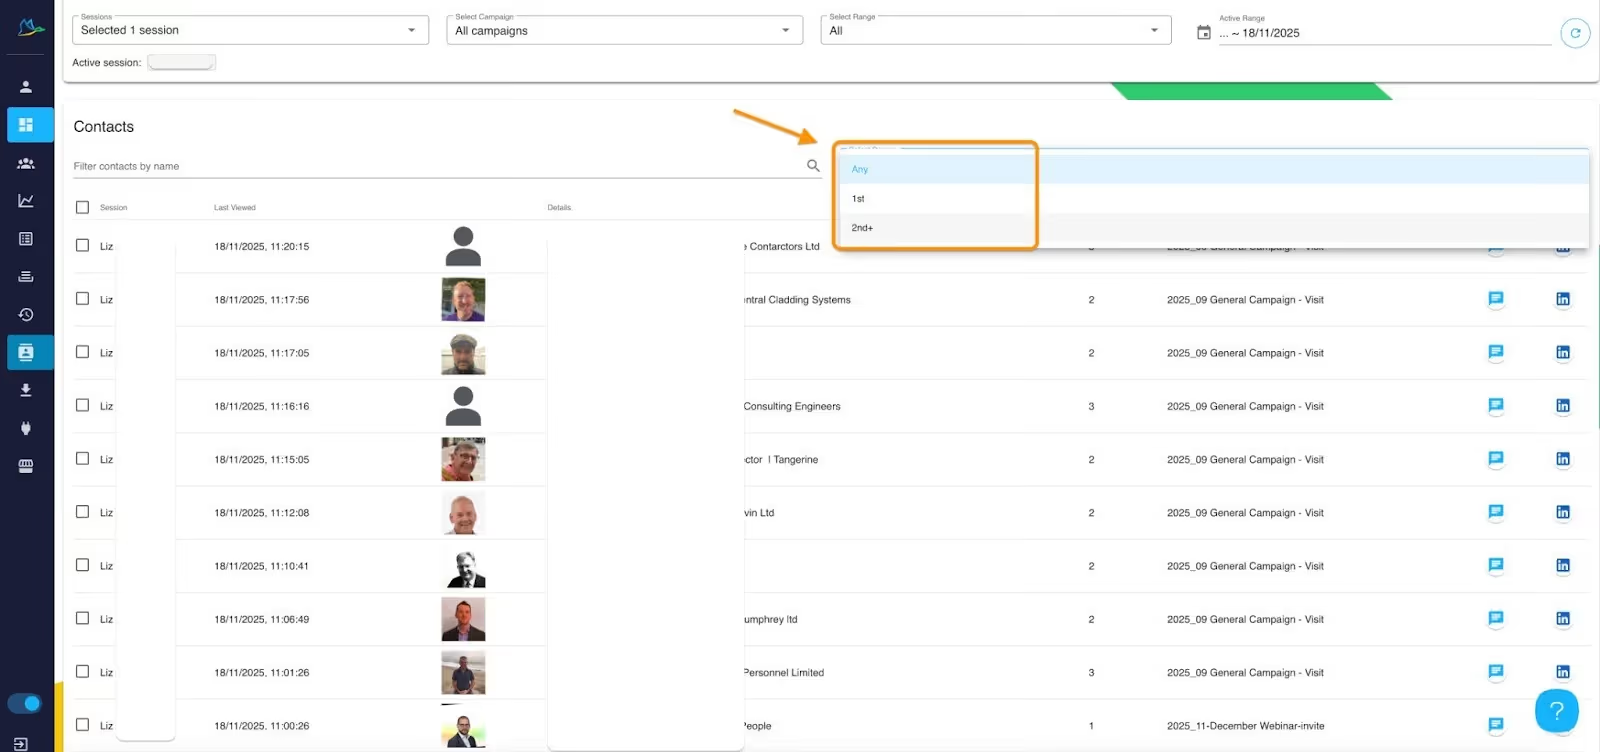
- Filter by individual contact
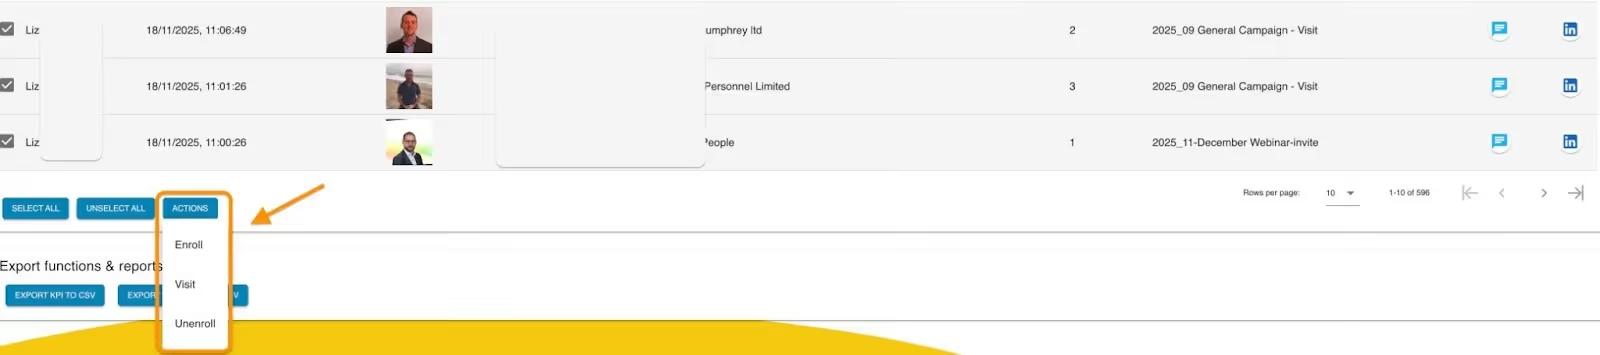
From here, you can select contacts and perform actions on them:
- Enroll in a campaign
- Visit
- Unenroll from a campaign
You can also view the full conversation history with each contact by clicking on the message icon.

And view their LinkedIn profile by clicking on the LinkedIn icon.
Exporting client data
Export your KPIs or your Contacts to CSV with a single click. It’s quick and easy to share results and data with your team.
App Connections
Dux-Soup offers incredibly simple-to-set-up 2-way integrations with leading tools, including Slack, Teams, Salesforce, Hubspot, Pipedrive, and more. You can set these up in the ‘App Connections’ area of the Agency Dash, so you can:
1. Send data straight to a CRM system or third-party app
2. Run Dux-Soup actions directly from your CRM system or third-party app
Explore our integrations.
Support
With a Cloud Agency license, you’ll automatically become a High Flyer, giving you free access to our VIP support and training:
- Free Booster Calls
- Priority Support
- Direct access to our customer success team
We recommend booking your Booster calls in early (you’ll get an email with your links from our High Flyer team) to get your Agency LinkedIn Outreach off to a flying start.
If you have any questions, at any time, regardless of how silly you think they are, we encourage you to contact your High Flyer team on the dedicated High Flyer email address that you’ll receive when you become a High Flyer, or via info@dux-soup.com.
Remember, we’re always here to help, so don’t ever hesitate to contact us.


